1. Introduction
This manual provides detailed instructions for the safe and efficient use of your Link2Home Outdoor Wireless Remote Control Outlet. This device offers convenient remote control for outdoor electrical appliances and lighting systems.
2. Important Safety Information
Please read and understand all safety instructions before installation and use. Failure to follow these instructions may result in electric shock, fire, or property damage.
- Ensure the product is plugged into a Ground Fault Circuit Interrupter (GFCI) protected outdoor-rated electrical outlet.
- Do not immerse the unit in water. It is weatherproof, not submersible.
- Keep the unit and remote control away from children.
- Do not exceed the maximum electrical ratings of 15A/125VAC, 1875W Resistive, 5A/625W Tungsten, 1/2 HP.
- Always unplug the unit from the power source before performing any maintenance or cleaning.
- For outdoor use, ensure the outlet unit is installed at least 2 feet (0.6 meters) above ground level to prevent water ingress.
3. Package Contents
Verify that all items are present upon unpacking:
- 1 x Link2Home Outdoor Wireless Remote Control Outlet Unit
- 1 x Remote Control (with CR2032 battery installed)
- 1 x Instruction Manual
4. Product Overview
The Link2Home Outdoor Wireless Remote Control Outlet consists of a main outlet unit and a handheld remote control. The outlet unit features dual grounded outlets and an indicator light.

Figure 1: Link2Home Outdoor Wireless Remote Control Outlet and Remote Control.
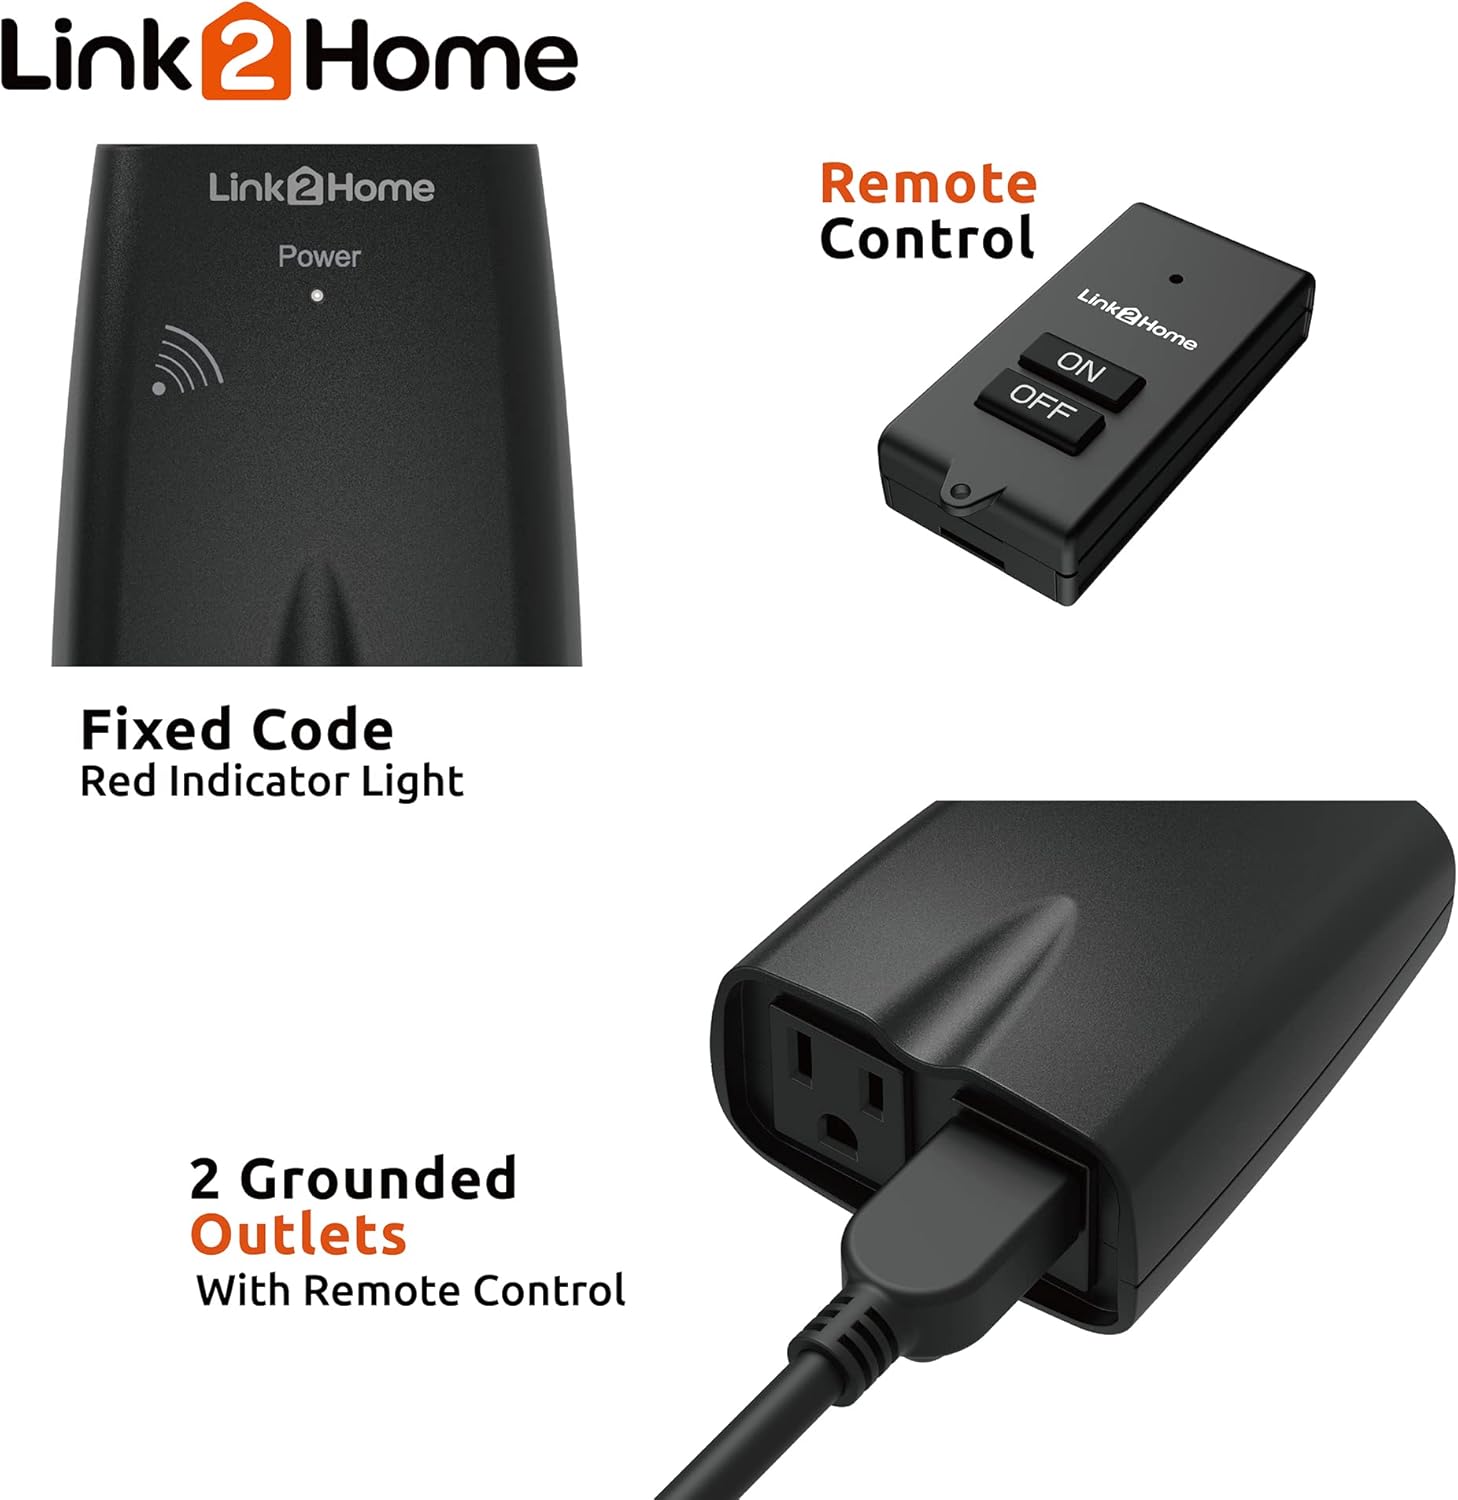
Figure 2: Close-up view of the outlet unit, highlighting the indicator light and two grounded outlets.
5. Setup
- Choose Location: Select an outdoor location with a GFCI-protected outlet. Ensure the chosen location allows the outlet unit to be installed at least 2 feet (0.6 meters) above ground level.
- Plug In: Plug the Link2Home Outdoor Wireless Remote Control Outlet unit into the outdoor-rated electrical outlet.
- Connect Devices: Plug your outdoor lights, security systems, or other appliances into the dual grounded outlets on the Link2Home unit.
Video 1: Demonstrates the initial setup and plugging in of the outdoor remote control outlet.
6. Operating Instructions
The Link2Home Outdoor Wireless Remote Control Outlet is pre-programmed for immediate use. You can control the connected devices using the remote control or the manual button on the outlet unit.
- Remote Control Operation: Press the 'ON' button on the remote control to turn on the connected devices. Press the 'OFF' button to turn them off. The remote has a range of up to 100 feet in line of sight and can work through walls and doors.
- Manual Operation: Press the power button on the outlet unit itself to manually turn the connected devices ON or OFF.

Figure 3: The remote control offers a 100-foot range for convenient operation.
7. Pairing and Unpairing the Remote Control
Your outlet unit and remote control are pre-paired. If re-pairing is needed or you wish to unpair, follow these steps:
7.1. Pairing
- Ensure the outlet unit is plugged into a live power outlet.
- Press and hold the ON/OFF button on the outlet unit for approximately 3 seconds. The indicator light will begin to flash slowly.
- Release the ON/OFF button on the outlet unit.
- Within 5 seconds, press either the 'ON' or 'OFF' button on the remote control. The indicator light on the outlet unit will stop flashing, indicating successful pairing.
7.2. Unpairing / Resetting
- Unplug the outlet unit from the power source.
- While pressing and holding the ON/OFF button on the outlet unit, plug the unit back into the power source.
- Continue holding the ON/OFF button until the indicator light starts flashing rapidly.
- Release the ON/OFF button. The indicator light will stop flashing, confirming the unpairing/reset process is complete.
Video 2: Detailed demonstration of pairing and unpairing the remote control with the outlet unit.
Video 3: Visual guide on how to reset and pair the outdoor remote control outlet.
8. Troubleshooting
| Problem | Possible Cause | Solution |
|---|---|---|
| Device not responding to remote. | Remote battery low or dead. Out of range. Obstructions blocking signal. Unit and remote unpaired. | Replace CR2032 battery in remote. Move closer to the unit. Remove obstructions. Re-pair the unit and remote (see Section 7.1). |
| Outlet unit has no power. | Not plugged in correctly. Power outage. GFCI tripped. | Ensure unit is fully plugged into a working outlet. Check household circuit breaker. Reset GFCI outlet. |
| Connected device not turning on/off. | Device itself is off or faulty. Unit is overloaded. | Check the connected device's power switch. Ensure total wattage does not exceed 1875W. |
Video 4: Troubleshooting guide for common issues with remote control outlets, including resetting.
9. Specifications
| Feature | Detail |
|---|---|
| Model Number | EM-OR650B |
| Input Voltage | 125 Volts AC, 60Hz |
| Max. Current | 15 Amps |
| Max. Resistive Load | 1875 Watts |
| Max. Tungsten Load | 625 Watts |
| Motor Rating | 1/2 HP |
| Remote Range | Up to 100 feet (line of sight) |
| Remote Battery | CR2032 (included) |
| Dimensions (L x W x H) | 5.08 x 7.62 x 12.7 cm |
| Weight | 281 g |
| Material | Plastic, Metal |
| Certifications | FCC, ETL |
10. Maintenance
- Clean the unit with a soft, damp cloth. Do not use harsh chemicals or abrasive cleaners.
- Regularly inspect the power cord and plugs for any signs of damage. Discontinue use if damage is found.
- Replace the remote control battery (CR2032) when the remote's indicator light dims or it stops responding.
11. Warranty and Support
This Link2Home product comes with a 1-year warranty from the date of purchase. For warranty claims or technical support, please refer to the contact information provided with your purchase documentation or visit the official Link2Home website.


