1. Product Overview
The Makita DVC750LZX1 is an 18V cordless wet/dry vacuum cleaner designed for efficient cleaning in various environments. It features a brushless motor for extended durability and efficiency, a HEPA filter for improved air quality, and two suction power settings for versatile use. Its compact design and cordless operation make it suitable for small construction sites, workshops, and general clean-up tasks.

Image 1.1: Makita DVC750LZX1 18V Cordless Wet/Dry Vacuum Cleaner with hose and nozzle.
2. Safety Instructions
Always observe basic safety precautions when using electrical appliances to reduce the risk of fire, electric shock, and personal injury. Read all instructions before operating this vacuum cleaner.
- Battery Safety: Use only Makita 18V batteries and chargers. Do not expose batteries to water, heat, or direct sunlight.
- Proper Use: This vacuum is designed for wet and dry vacuuming. Do not use it to pick up flammable or combustible liquids, hot ashes, or sharp objects.
- Filter Maintenance: Ensure the HEPA filter is correctly installed before use. Clean or replace the filter regularly to maintain optimal performance and prevent motor damage.
- Supervision: Do not leave the vacuum cleaner unattended while it is running. Keep children and unauthorized persons away from the operating area.
- Storage: Store the vacuum cleaner in a dry, secure place out of reach of children when not in use.
- Personal Protective Equipment: Wear appropriate personal protective equipment, such as safety glasses, when operating the vacuum cleaner, especially during dusty tasks.
3. Components Included
The following components are typically included with your Makita DVC750LZX1 vacuum cleaner:
- Makita DVC750LZX1 18V Vacuum Cleaner Unit
- Suction Hose (28mm x 2m)
- HEPA Filter
- Shoulder Strap with Padding
- Wide Nozzle
- Suction Nozzle
- Brush (as per some specifications)
Note: Batteries and charger are not included and must be purchased separately.
4. Setup
4.1 Battery Installation
- Ensure the vacuum cleaner is turned off.
- Open the battery compartment cover, typically located on the top or side of the unit.
- Align the battery with the battery slot and slide it in until it clicks into place.
- Close the battery compartment cover securely.
4.2 Hose and Nozzle Attachment
- Locate the suction inlet on the vacuum cleaner.
- Insert the end of the suction hose into the inlet and twist clockwise until it is firmly secured.
- Attach the desired nozzle (wide nozzle or suction nozzle) to the other end of the hose. Ensure it fits snugly.
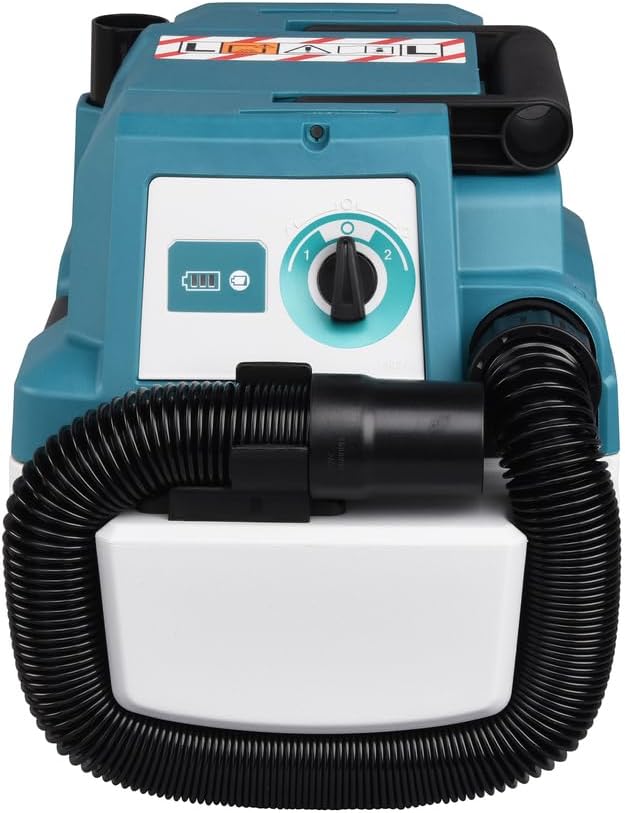
Image 4.1: Front view showing control dial and hose connection point.
5. Operation
5.1 Powering On/Off and Suction Settings
- Ensure a charged battery is installed and the hose/nozzle are attached.
- Locate the power switch/dial on the unit.
- Turn the dial to position '1' for low suction or '2' for high suction.
- To turn off the vacuum, turn the dial to the 'O' (off) position.

Image 5.1: Side view illustrating the control dial for power and suction settings.
5.2 Wet Vacuuming
- Ensure the HEPA filter is removed or replaced with a foam filter (if supplied and recommended for wet use).
- Do not overfill the liquid tank. Monitor the liquid level to prevent overflow.
- After wet vacuuming, empty and clean the tank thoroughly to prevent mold and odors.
5.3 Dry Vacuuming
- Ensure the HEPA filter is clean and properly installed.
- For fine dust, consider using a dust bag (if compatible and available) in conjunction with the HEPA filter for easier disposal and extended filter life.
5.4 Emptying the Canister
- Turn off the vacuum cleaner and remove the battery.
- Unlatch the clips securing the motor head to the canister.
- Carefully lift the motor head off the canister.
- Dispose of collected debris or liquids into an appropriate receptacle.
- Clean the canister as needed before reassembling.
6. Maintenance
Regular maintenance ensures optimal performance and extends the lifespan of your vacuum cleaner.
6.1 HEPA Filter Cleaning
- After each use, especially with fine dust, remove the HEPA filter.
- Tap the filter gently to dislodge accumulated dust.
- For a more thorough cleaning, the filter can be rinsed with water. Ensure it is completely dry before reinstallation to prevent damage and mold growth.
- Replace the HEPA filter if it is damaged or if suction performance significantly decreases after cleaning.
6.2 Canister Cleaning
- Empty the canister after each use.
- Wipe the interior of the canister with a damp cloth to remove any residue.
- For wet vacuuming, rinse the canister with water and allow it to air dry completely before storing.
6.3 Hose and Nozzle Care
- Check the hose and nozzles for blockages regularly.
- Clean any debris from the hose and nozzles to maintain airflow.
- Store the hose without kinks or sharp bends to prevent damage.
7. Troubleshooting
Refer to the table below for common issues and their potential solutions.
| Problem | Possible Cause | Solution |
|---|---|---|
| Vacuum does not turn on | Battery not charged or improperly installed; Power switch off | Charge battery and ensure proper installation; Turn power switch to '1' or '2' |
| Low suction power | Clogged filter; Blocked hose/nozzle; Full canister | Clean or replace filter; Clear blockages; Empty canister |
| Motor stops during operation | Battery depleted; Overheating due to blockage | Recharge battery; Check for and clear any blockages |
| Water leaks during wet vacuuming | Canister overfilled; Seals not properly seated | Do not overfill; Check and reseat seals on motor head and canister |
8. Technical Specifications
| Feature | Specification |
|---|---|
| Model Name | DVC750LZX1 |
| Brand | Makita |
| Voltage | 18V |
| Engine Type | Brushless (BL) |
| Max Suction Depression | 7.0 kPa |
| Dust Tank Capacity | 7.5 Liters |
| Liquid Tank Capacity | 4.5 Liters |
| Max Air Flow | 1.8 m³/min |
| Weight (EPTA) | 4.0 kg (approx. 8.8 lbs) |
| Dimensions (L x W x H) | 418 x 251 x 278 mm (approx. 16.5 x 9.9 x 10.9 inches) |
| Special Features | HEPA Filter, Wet/Dry Functionality |
| Filter Type | Cartridge |
| Cordless | Yes |
| Number of Power Levels | 2 |
| Noise Level | 76 dB |
9. Warranty and Support
This product is identified as a parallel import. While it is a genuine item manufactured by Makita, its warranty coverage and customer support may differ from products officially distributed in your region. It may not be eligible for manufacturer warranty coverage or direct customer support within the United States.
For any issues, technical assistance, or warranty inquiries, please contact the seller or the point of purchase directly. They will be able to provide guidance based on their specific terms of sale for parallel imported goods.
Always retain your proof of purchase for any support claims.