1. Introduction
This manual provides detailed instructions for the installation, operation, and maintenance of your Zmodo 8-Channel 720p sPoE Network Video Recorder (NVR) system. This all-in-one NVR is designed to connect and configure up to eight 720p sPoE cameras, offering a comprehensive surveillance solution with a pre-installed 1TB hard disk drive (HDD) for local storage. The system supports remote viewing via smartphone applications and web clients, ensuring convenient access to your security footage.
2. Package Contents
Please verify that all items listed below are included in your package. If any items are missing or damaged, please contact Zmodo customer support.
- 1 x Zmodo 8-Channel 720p sPoE NVR with 1TB HDD
- 1 x Power Adapter (DC19V)
- 1 x Quick Start Cable (Ethernet cable for initial setup)
- 1 x USB Mouse
3. Product Overview
3.1. NVR Unit
The Zmodo NVR unit is the central component of your surveillance system, managing camera connections, video recording, and data storage.

Figure 3.1: Front view of the Zmodo 8-Channel 720p sPoE NVR. The front panel features LED indicators for HDD activity and Power status, providing quick visual feedback on the system's operational state.
3.2. Rear Panel Connections
The rear panel of the NVR provides all necessary ports for power, camera connections, network access, and display outputs.
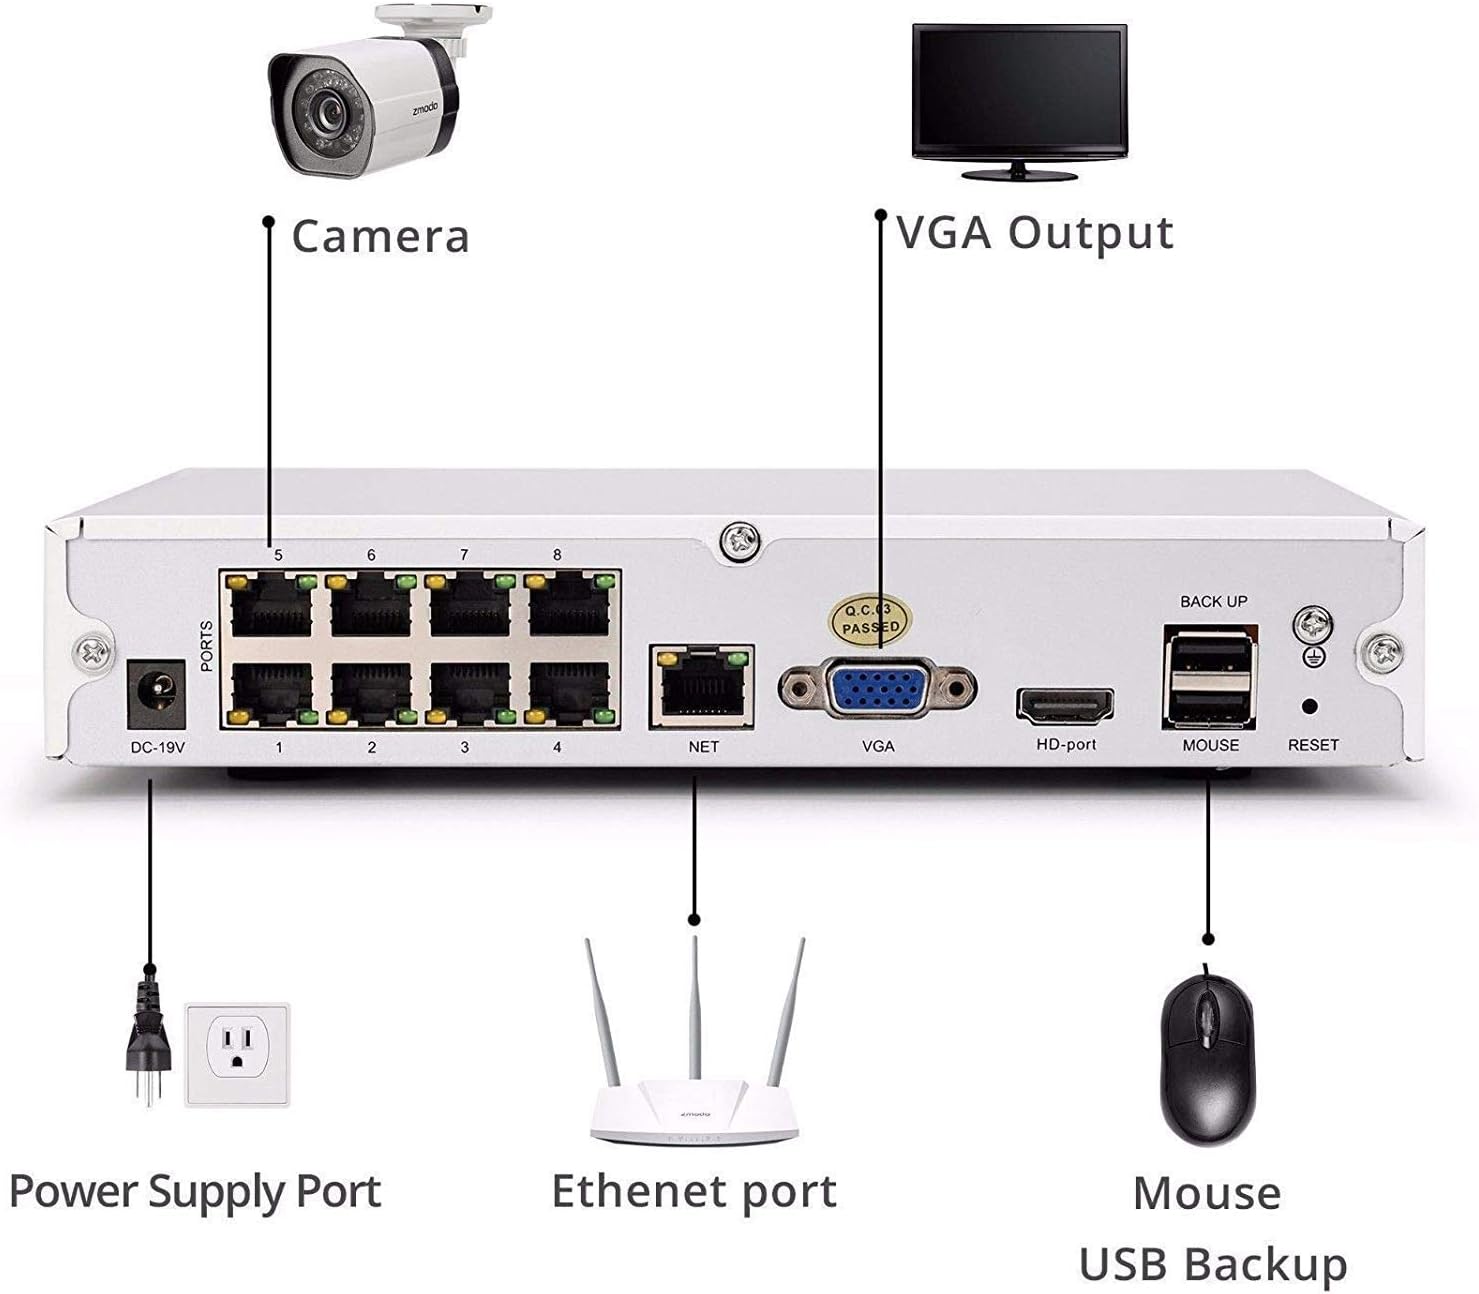
Figure 3.2: Rear panel connections of the Zmodo NVR. From left to right, the ports include: DC-19V power input, 8 sPoE ports for cameras (labeled 1-8), NET (Ethernet) port for network connection, VGA output for monitors, HD-port (HDMI) output for monitors, MOUSE port for USB mouse, RESET button, and BACK UP port for USB backup devices.
- DC-19V: Power input port.
- PORTS 1-8: sPoE (simplified Power over Ethernet) ports for connecting Zmodo 720p cameras. These ports provide both power and video signal.
- NET: Ethernet port for connecting the NVR to your local network or router.
- VGA: Video Graphics Array output for connecting to a monitor.
- HD-port: High-Definition Multimedia Interface (HDMI) output for connecting to a monitor or TV.
- MOUSE: USB port for connecting the included USB mouse for local control.
- RESET: Button to restore factory default settings (use with caution).
- BACK UP: USB port for connecting external storage devices for video backup.
4. Setup Guide
4.1. Hardware Connection
- Connect Cameras: Connect your Zmodo 720p sPoE cameras to the NVR's PORTS 1-8 using Ethernet cables. The sPoE ports will provide power to the cameras.
- Connect Monitor: Connect a monitor or TV to the NVR using either the VGA or HD-port (HDMI) cable.
- Connect Mouse: Plug the USB mouse into the MOUSE port on the NVR's rear panel.
- Connect to Network: Connect an Ethernet cable from the NVR's NET port to your router or network switch. This is essential for remote access and online features.
- Connect Power: Plug the power adapter into the DC-19V port on the NVR, then plug the adapter into a power outlet. The NVR will power on automatically.
4.2. Initial Configuration
Upon first power-up, the NVR will guide you through an initial setup wizard on the connected monitor. Follow the on-screen prompts to set up basic parameters such as language, time zone, and password. For remote access and advanced features, download the Zsight app on your smartphone or tablet, or access the MeShare web client (user.meshare.com) on a computer. The app/web client will guide you through adding your NVR to your account.
5. Operating Instructions
5.1. Live View
You can view live camera feeds through several methods:
- Local Monitor: Use the connected monitor and USB mouse to navigate the NVR's interface and view live feeds from all connected cameras.
- Zsight App: Open the Zsight application on your smartphone or tablet. After logging into your account, select your NVR to view live streams.
- MeShare Web Client: Access user.meshare.com in a web browser (Internet Explorer, Chrome, Firefox) on your computer, log in, and select your NVR for live viewing.
5.2. Recording
The NVR records video footage to its internal 1TB HDD. Recording settings can be configured via the local NVR interface or the Zsight/MeShare platform. The system supports H.264 compression for efficient storage and features motion detection, allowing you to record only when activity is detected, conserving disk space.
5.3. Playback
To review recorded footage:
- Local Playback: On the NVR's local interface, navigate to the playback section. You can search for recordings by date, time, and event type (e.g., motion detection).
- Remote Playback: Use the Zsight app or MeShare web client to access and play back recorded videos remotely.
5.4. Remote Access and Alerts
The Zmodo NVR system allows for convenient remote monitoring and alert reception.

Figure 5.4.1: Example of security alerts and live view on a smartphone. The Zsight app provides real-time notifications for events like motion detection and allows immediate access to live camera feeds.
Receive alerts from your cameras and sensors directly on your smartphone or tablet. The Zsight app provides push notifications for detected events, such as motion, allowing you to quickly check your property. You can view live video streams over 3G/4G networks or Wi-Fi on compatible smartphones (iPhone, iPad, Android devices) and tablets.

Figure 5.4.2: Diagram illustrating cloud connectivity for remote access. The Zmodo system utilizes cloud services to enable seamless remote viewing and management of your NVR and cameras from various devices, including tablets, laptops, smartphones, and desktop computers.
6. Maintenance
- Keep Clean: Regularly clean the NVR unit and cameras with a soft, dry cloth. Avoid using liquid or aerosol cleaners.
- Ventilation: Ensure the NVR is placed in a well-ventilated area to prevent overheating. Do not block ventilation openings.
- Data Backup: Periodically back up important video footage to an external USB storage device connected to the BACK UP port.
- Firmware Updates: Check the Zmodo website or Zsight app for available firmware updates to ensure optimal performance and security.
7. Troubleshooting
- No Power: Ensure the power adapter is securely connected to the NVR and a working power outlet. Check the power LED on the front panel.
- No Video Output: Verify that the monitor cable (VGA or HDMI) is securely connected to both the NVR and the monitor. Ensure the monitor is powered on and set to the correct input source.
- Cameras Not Displaying: Check that cameras are properly connected to the sPoE ports. Ensure the cameras are compatible with the NVR.
- No Remote Access: Confirm the NVR is connected to your router via the Ethernet cable and has an active internet connection. Check your router's internet status. Ensure the NVR is correctly added to your Zsight/MeShare account.
- Forgot Password: Use the password recovery option within the NVR's local interface or contact Zmodo support for assistance.
8. Specifications
| Feature | Specification |
|---|---|
| Model Numbers | ZP-NJ18-S, ZM-SS7009D8-S |
| Video Input | 8 Channels IP Camera |
| HDMI Output | 1 Channel |
| Recording Resolution | 720p |
| Video Compression | H.264 |
| Recording Rate | 200 fps |
| Motion Detection | Yes |
| Storage Capacity | 1TB HDD (Pre-installed) |
| Power Supply | DC19V, 4A |
| Dimensions (L x W x H) | 220 x 205 x 42 mm (8.6 x 8.1 x 1.7 inches) |
| Weight | 1.88 kg (4.14 lbs) |
| Compatible Operating Systems | Windows XP, Windows Vista, 7, 8, 10 |
| Compatible Browsers | Internet Explorer, Chrome, Firefox |
| Compatible Mobile Devices | iPhone, iPad, Android devices |
9. Warranty and Support
For specific warranty information regarding your Zmodo NVR, please refer to the warranty card included with your product or visit the official Zmodo website. If you encounter any issues or require technical assistance, please contact Zmodo customer support through their official channels. Support contact details are typically available on the Zmodo website or within the Zsight application.


