Introduction
This manual provides essential information for the installation, operation, and maintenance of your GROHE Start Flow 23809000 Single-Lever Sink Mixer Tap. Please read these instructions carefully before installation and retain them for future reference. This product features a durable Grohe Longlife ceramic disc cartridge, a chrome finish, and Grohe EcoJoy technology for efficient water usage, with a flow rate limited to 5.7 liters per minute. It also includes a 1 1/4 inch hopper discharge.

Image: The GROHE Start Flow Single-Lever Sink Mixer Tap integrated into a contemporary bathroom environment.
Safety Information
- Ensure all water supply lines are turned off before beginning installation to prevent water damage.
- Wear appropriate personal protective equipment, such as safety glasses and gloves, during installation.
- If you are unsure about any step of the installation process, consult a qualified plumber.
- Do not use abrasive cleaners or harsh chemicals on the chrome finish, as this may cause damage.
Package Contents
Verify that all components are present before starting installation:
- GROHE Start Flow Single-Lever Mixer Tap (Model 23809000)
- Mounting hardware
- Flexible connection hoses
- 1 1/4" Saltarello Exhaust (Pop-up waste set)
- Instruction manual

Image: The GROHE Start Flow Single-Lever Sink Mixer Tap, showcasing its chrome finish and modern design from a direct product view.
Setup and Installation
The GROHE Start Flow 23809000 is designed for single-hole, deck-mount installation. It is recommended to have this product installed by a qualified professional to ensure proper function and to prevent damage.
Installation Steps:
- Prepare the Mounting Surface: Ensure the sink or countertop has a single faucet hole with a diameter suitable for the tap's base (typically around 34-45mm). The maximum deck thickness should be 30mm.
- Install the Faucet: Insert the faucet body into the mounting hole. Secure it from underneath the sink using the provided mounting hardware (washer and nut).
- Connect Water Supply Lines: Attach the flexible connection hoses to the hot and cold water supply valves. Ensure a tight, leak-free connection.
- Install the Pop-up Waste Set: Assemble and install the 1 1/4" Saltarello Exhaust (pop-up waste set) into the sink drain hole according to its specific instructions. Connect the pop-up rod to the faucet lever mechanism.
- Test for Leaks: Slowly turn on the main water supply and check all connections for any signs of leaks. Operate the faucet to ensure proper water flow and temperature control.
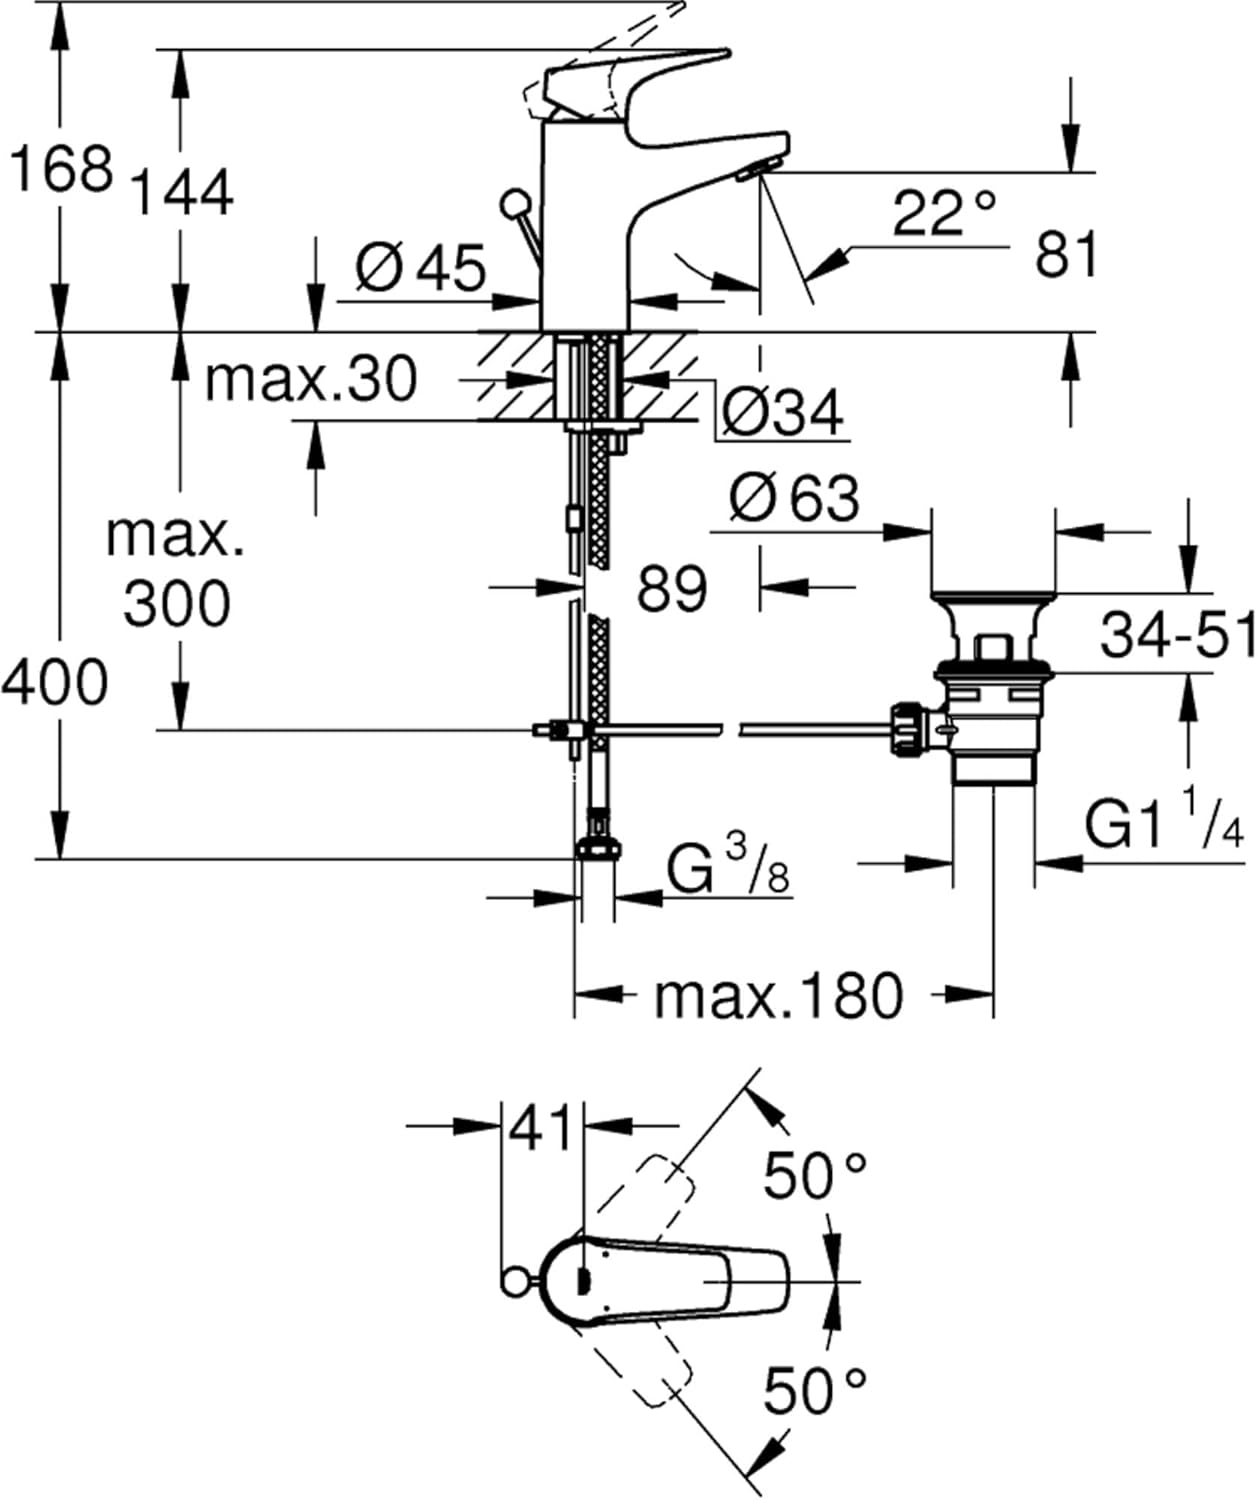
Image: Technical diagram illustrating the dimensions and installation requirements for the GROHE Start Flow faucet, including connections and pop-up waste mechanism.
Operating Instructions
The GROHE Start Flow faucet features a single lever for intuitive control of water flow and temperature.
- Water Flow Control: Lift the lever upwards to increase water flow. Push it downwards to decrease or turn off the water.
- Temperature Control: Move the lever to the left for hot water and to the right for cold water. The ceramic disc cartridge allows for smooth and precise temperature adjustment.
- EcoJoy Technology: This faucet is equipped with GROHE EcoJoy technology, which limits the flow rate to 5.7 liters per minute, helping to conserve water without compromising performance.
- Pop-up Waste Operation: The integrated pop-up rod, typically located at the back of the faucet, controls the sink drain stopper. Pull up the rod to open the drain and push down to close it.
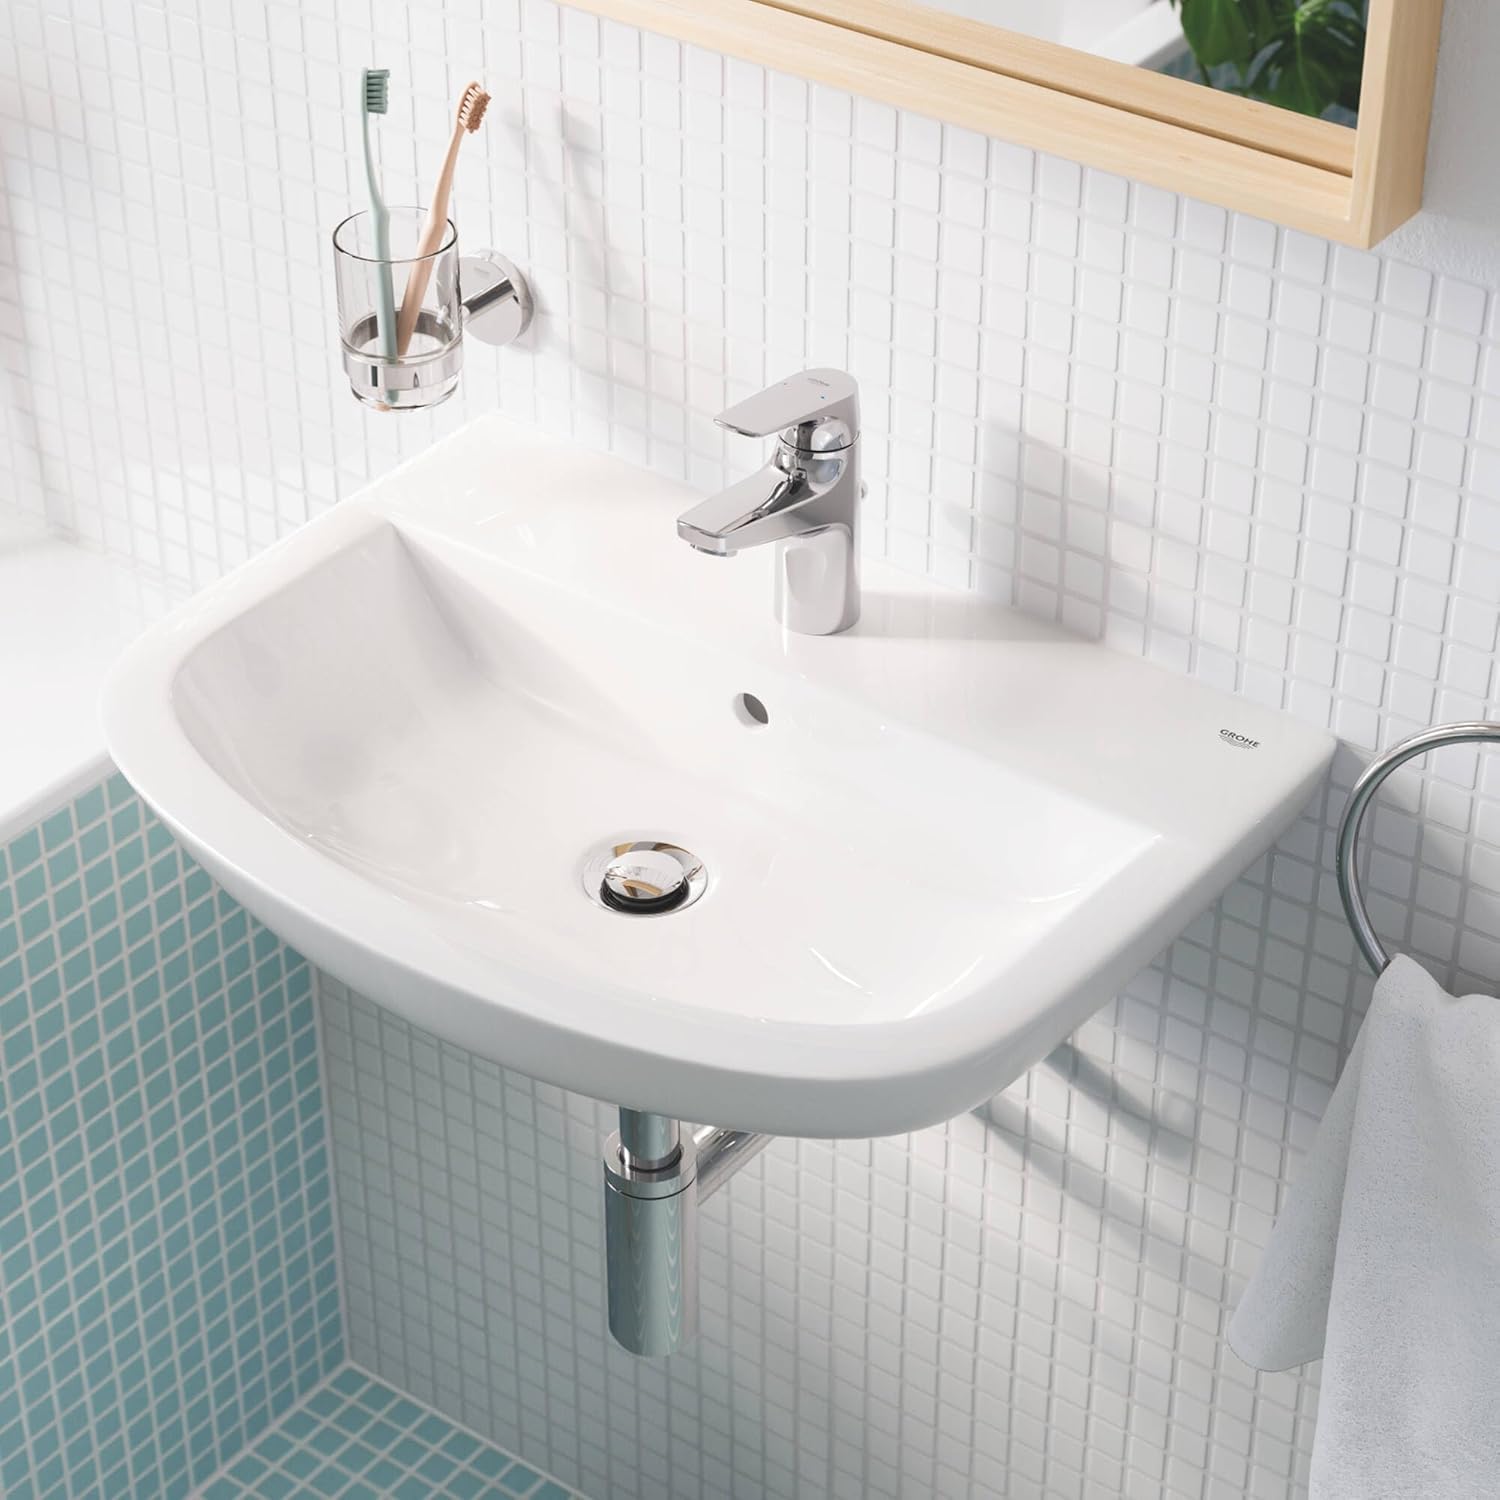
Image: The GROHE Start Flow faucet installed on a sink, demonstrating its functional integration in a bathroom setting, ready for use.
Maintenance
Regular cleaning and maintenance will ensure the longevity and optimal performance of your GROHE faucet.
- Cleaning the Finish: Clean the chrome finish with a soft cloth and mild soap or a non-abrasive cleaner specifically designed for chrome. Rinse thoroughly with clean water and dry with a soft cloth to prevent water spots. Avoid using abrasive sponges, scouring pads, or harsh chemical cleaners, as these can damage the finish.
- Aerator Maintenance: If water flow becomes restricted, the aerator at the end of the spout may be clogged with mineral deposits. Unscrew the aerator, clean it with a soft brush under running water, and reassemble.
- Ceramic Disc Cartridge: The GROHE Longlife ceramic disc cartridge is designed for durability and smooth operation. No regular maintenance is typically required for the cartridge itself. If leaks or stiffness occur, professional service may be needed.
Troubleshooting
| Problem | Possible Cause | Solution |
|---|---|---|
| Low water flow | Clogged aerator; partially closed stopcock; low water pressure. | Clean or replace aerator; fully open stopcock; check household water pressure. |
| Water leaks from spout | Worn ceramic disc cartridge; debris in cartridge. | Contact a qualified plumber for cartridge inspection or replacement. |
| Water leaks from base of faucet | Loose mounting nut; damaged O-rings or seals. | Tighten mounting nut; contact a qualified plumber for seal replacement. |
| Difficulty adjusting temperature | Debris in cartridge; faulty cartridge. | Contact a qualified plumber for cartridge inspection or replacement. |
Specifications
- Brand: GROHE
- Model Name: Start Flow
- Model Number: 23809000
- Material: Ceramic (for cartridge), Metal (faucet body, typically brass)
- Finish Type: Chrome plated
- Color: Grey (Chrome)
- Number of Handles: 1 (Single-Lever)
- Mounting Type: Deck Mount
- Installation Type: Single Hole
- Maximum Flow Rate: 5.7 Liters Per Minute (with GROHE EcoJoy technology)
- Spout Reach: 19.5 Centimeters
- Item Weight: 1 Kilogram (approx. 2.2 pounds)
- Product Dimensions: 9.84 x 9.45 x 2.6 inches (approximate, refers to packaging or overall product size)
- Included Components: 1 Grohe 23809000 Start Flow Single Lever Mixer for Washbasin, Size S, 1 1/4" Saltarello Exhaust
Warranty and Support
For warranty information, technical support, or to purchase replacement parts, please contact GROHE customer service or visit the official GROHE website. Keep your proof of purchase for warranty claims.
Official GROHE Website: Visit the GROHE Store on Amazon


