
FrSky Horus X12s
Contents
FrSky Horus X12S Transmitter User Manual
Comprehensive guide for the FrSky Horus X12S 16 Channels Transmitter, covering setup, operation, maintenance, and specifications.
Introduction to the FrSky Horus X12S
The FrSky Horus X12S is a high-performance 16-channel radio transmitter designed for advanced remote control applications. It features an inbuilt GPS module, a full-color LCD screen, premium gimbals, and extensive customization options. This manual provides detailed instructions to help you set up, operate, and maintain your Horus X12S transmitter.
Key Features
- High resolution display (480 x 272 px): full colour screen for configuration and model monitoring.
- New gimbals: CNC machined, equipped with 6 bearings for smooth operation, hall sensors, and extensible ends.
- Internal GPS module for precise location data.
- Revolutionary wireless training system.
- Integrated 6DOF Sensor: 6-axis sensor with gyroscope and accelerometer.
- Customization options: Choose from matte, textured, or aluminum details on the front panel.
- 16 channels, expandable up to 32, with a dedicated communication channel for real-time telemetry logging.
Setup Guide
Unboxing and Initial Inspection
Upon receiving your FrSky Horus X12S, carefully unbox all components and inspect for any signs of damage.
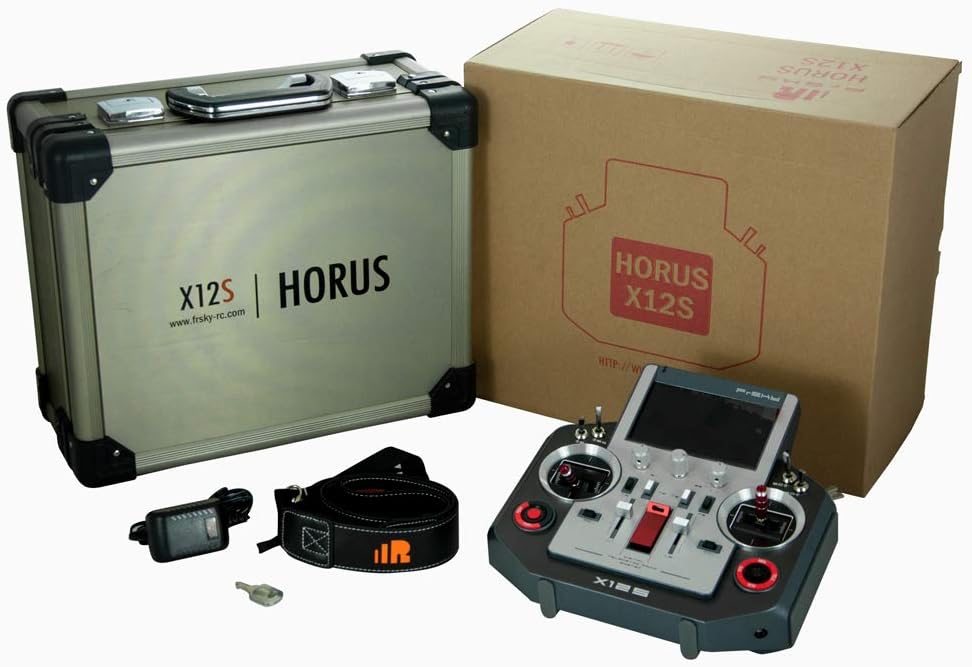
Image: The FrSky Horus X12S transmitter, hard case, charger, and neck strap, as typically found in the product packaging.
The package should include:
- 1 x FrSky Horus X12S Transmitter
- 1 x 2200mAh NiMH Battery (internal)
- 1 x Charger
- 1 x Manual
- 1 x Back strap / Neck Strap
- 2 x Keys (for hard case)
- 1 x Hard Case
Battery Charging
The Horus X12S includes an internal 2200 mAh NiMH battery. To charge:
- Connect the included power transformer to the transmitter's charging port.
- The charging indicator LED will blink green (battery level detection and charge beginning).
- It will then turn solid green (charging).
- The LED will turn off when the battery is fully charged, indicating the charging circuit has automatically shut off.
MicroSD Card and USB Connectivity
The transmitter comes with a pre-installed microSD card containing the operating system/firmware.
A USB port is available for transferring files to the Horus without removing the microSD card. This port can also be used for firmware updates and accessing MP3 files, image files for model customization, and voice warning tracks.
Operating the FrSky Horus X12S
Controls Overview

Image: Front view of the FrSky Horus X12S transmitter, showing the screen, gimbals, switches, and buttons.
The Horus X12S features a comprehensive array of controls for precise operation:
- Gimbals: The primary control sticks are CNC machined with hall sensors and 6 bearings for smooth, precise movement. Stick height is adjustable.
- Switches: Located on both sides and top, including 3-position and 2-position switches. One switch is spring-loaded for momentary action.
- Sliders: Soft and smooth sliders are located at the back of the transmitter.
- Rotating Buttons/Pots: Three rotating buttons are located under the display. The central one is a 6-position encoder for configuring multiple flight modes.
- Trim Buttons: Four buttons for vertical and horizontal trimming, located around the power button.
- Navigation Buttons: Buttons at the lower part of the front plate for navigating configuration menus.

Image: Close-up view of the FrSky Horus X12S controls, highlighting the switches, sliders, and rotary encoders.
Display and User Interface

Image: The FrSky Horus X12S display screen showing flight mode, timer, altitude, speed, and telemetry data.
The full-color LCD screen (480 x 272 px) provides an easy-to-navigate UI system. It displays model configuration, real-time telemetry data, and other essential information.
RF Module Configuration
The transmitter includes an upgraded internal IXJT RF module connected to an internal antenna.
To use an external antenna or module, change the model configuration in the settings to select the desired RF source.
The rear module bay allows connection of compatible external modules for broader craft compatibility.
Trainer Mode
The Horus X12S supports trainer mode via two connectors located under a cover at the back.
Additionally, multiple Horus transmitters can be linked wirelessly for a more comfortable trainer mode experience.

Image: Close-up of the attachment point for the neck strap on the FrSky Horus X12S, which can also be used for trainer port access.
Maintenance
General Care
- Keep the transmitter clean and free from dust and debris. Use a soft, dry cloth for cleaning.
- Avoid exposing the transmitter to extreme temperatures, direct sunlight, or moisture.
- Store the transmitter in its hard case when not in use to protect it from physical damage.

Image: The durable hard case provided with the FrSky Horus X12S, designed for safe storage and transport.
Battery Care
- Fully charge the battery before first use.
- Do not over-discharge the battery. Recharge when the low battery warning is displayed.
- If storing for extended periods, charge the battery to approximately 50% capacity.
Troubleshooting
| Problem | Possible Cause | Solution |
|---|---|---|
| Transmitter does not power on. | Low or depleted battery. | Charge the internal battery using the provided charger. Ensure the charger is properly connected. |
| No signal to receiver. | Receiver not bound, incorrect RF module selected, or antenna issue. | Ensure the receiver is properly bound to the transmitter. Verify the correct internal or external RF module is selected in model settings. Check antenna connection. |
| Display is blank or unresponsive. | Software glitch or hardware issue. | Try restarting the transmitter. If the issue persists, check for firmware updates or contact FrSky support. |
| Gimbals feel stiff or gritty. | Dust or debris accumulation, or lack of lubrication. | Clean around the gimbals. If necessary, consult a qualified technician for lubrication or service. |
Technical Specifications
| Feature | Detail |
|---|---|
| Model Name | Horus X12s |
| Brand | FrSky |
| Channels | 16 (expandable up to 32) |
| Display Resolution | 480 x 272 px (Full Color LCD) |
| Connectivity Technology | USB |
| Internal Module | IXJT RF module |
| GPS | Inbuilt GPS Module |
| Sensor | 6DOF Sensor (Gyroscope & Accelerometer) |
| Battery | 2200 mAh NiMH (internal) |
| Audio Output Mode | Speaker |
| Recommended Age | 14 years and up |
Compatibility
The FrSky Horus X12S transmitter is compatible with:
- FrSky X series receivers
- FrSky D series receivers
- FrSky L series receivers
- FrSky V8-II series receivers
- Other receivers when an external module is used in the module bay.
Warranty and Support
For warranty information, technical support, and service inquiries, please refer to the official FrSky website or contact your authorized FrSky dealer. Keep your purchase receipt as proof of purchase.
Firmware updates and additional resources may be available on the FrSky support page.
Documents and downloads
Ask a question about this manual
Ask about setup, troubleshooting, compatibility, parts, safety, or missing instructions. Manuals+ will review the question and use this page’s manual context to help answer it.