1. Introduction
This manual provides detailed instructions for the setup, operation, and maintenance of your Zerone Digital Alarm Clock, Model Zeronek1gfg26oth-02. Please read this manual thoroughly before using the product to ensure proper function and longevity.
2. Safety Information and Precautions
- Use the clock in a dry environment. Avoid prolonged exposure to wet conditions, high temperatures, or areas with rapid temperature changes.
- Handle the clock with care to prevent damage.
- When using batteries, ensure they are high-quality AAA alkaline batteries. If the display dims or blinks, replace the batteries promptly. Prevent battery leakage by replacing old batteries.
- If the clock is not powered, verify that batteries are correctly inserted or the USB power source is connected.
- When using a USB power adapter, ensure it is a compatible DC 5V/500mA adapter.
3. Package Contents
Upon opening the package, please verify that all accessories are present:
- Digital Wooden Clock (1 pc)
- User's Manual (1 pc)
- USB Charging Cable (1 pc)
4. Product Overview
The Zerone Digital Alarm Clock features a modern cube design with an LED display that shows time and temperature. It includes multiple alarm settings and adjustable brightness.

Figure 4.1: Front view of the Zerone Digital Alarm Clock displaying the time.

Figure 4.2: Key features indicated by icons: Clock, Alarm, Thermometer, and Sound Control.
4.1. Components and Buttons
The clock features a minimalist design with control buttons located on the back panel.
- SET Button: Used to enter and confirm settings.
- UP Button: Used to increase values or navigate settings.
- DOWN Button: Used to decrease values or navigate settings. Also controls sound control mode.
- RESET Button: A small recessed button to reset the clock to factory defaults.
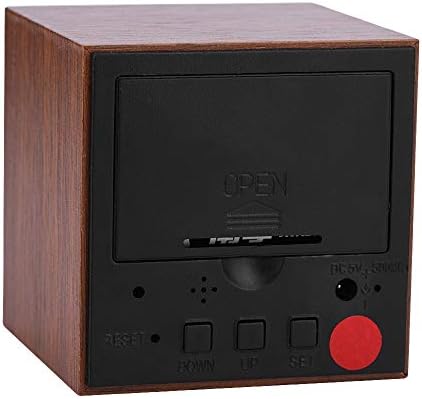
Figure 4.3: Rear view of the clock with the battery cover closed, showing the USB power input and control buttons.
5. Setup
5.1. Powering the Clock
The clock can be powered by either 3 AAA batteries or a DC 5V/500mA USB power supply.
- Battery Power: Open the battery compartment cover on the back of the clock. Insert 3 AAA alkaline batteries, ensuring correct polarity (+/-). Close the cover securely.
- USB Power: Connect the provided USB charging cable to the DC 5V/500mA port on the back of the clock and plug the other end into a compatible USB power adapter (not included) or a USB port.
Note: When powered by batteries, the sound control mode is recommended to conserve power. The display will not show continuously in this mode.
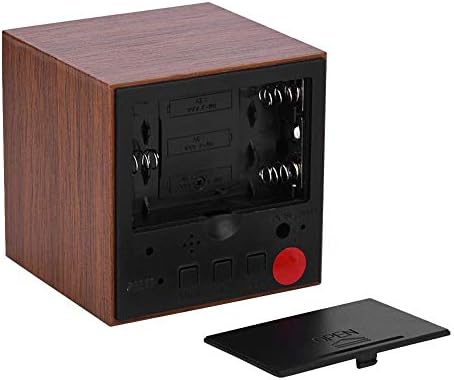
Figure 5.1: Rear view with the battery compartment open, showing slots for 3 AAA batteries.
6. Operating Instructions
6.1. Display Modes
The clock has two main display modes:
- DP-1: Displays Time, Temperature, Year, Month, and Date in a rotating sequence.
- DP-2: Displays Time continuously.
To switch between DP-1 and DP-2, press the SET button briefly.
6.2. Setting Time and Date
To enter the setting mode, press and hold the SET button for 3 seconds. The display will show the first setting item (YEAR) flashing.
- While an item is flashing, use the UP or DOWN buttons to adjust the value.
- Press the SET button briefly to move to the next setting item.
- The setting sequence is: YEAR → MONTH → DATE → 12/24H Format → HOUR → MINUTE → ALARM 1 (AL1) → ALARM 2 (AL2) → ALARM 3 (AL3).
- After setting the last item (AL3), the clock will exit the setting mode automatically.
6.3. Setting Alarms
The clock supports three independent alarms (AL1, AL2, AL3). Each alarm sounds for 1 minute.
- Enter the setting mode by pressing and holding the SET button for 3 seconds.
- Press SET repeatedly until you reach the AL1, AL2, or AL3 setting.
- When the alarm hour or minute is flashing, use the UP or DOWN buttons to set the desired alarm time.
- Press SET to confirm and move to the next alarm setting or exit.
6.4. Adjusting Brightness
The clock offers three levels of brightness (L1, L2, L3), with L3 being the brightest and L1 the dimmest. Additionally, the display automatically reduces brightness by half between 18:00 (6 PM) and 07:00 (7 AM).
- Press and hold the UP button for 3 seconds to enter brightness adjustment mode. The current brightness level (e.g., "L3") will be displayed.
- Use the UP or DOWN buttons to cycle through the brightness levels (L1, L2, L3).
- Once the desired brightness is set, press and hold the UP button for 3 seconds again to exit brightness adjustment mode.
6.5. Activating Sound Control Mode
Sound control mode (power-saving mode) is recommended when the clock is powered by batteries. In this mode, the display turns off and activates when a sound is detected (e.g., a clap or tap).
To toggle sound control mode:
- Press the DOWN button briefly.
- "ON:SD" indicates sound control is active.
- "--:SD" indicates sound control is off, and the display will remain continuously on (if in DP-2 mode).
6.6. Switching Temperature Unit (Celsius/Fahrenheit)
The clock supports both Celsius (C) and Fahrenheit (F) temperature displays.
To switch the temperature unit:
- Press the UP button briefly. The display will toggle between "--:C" (Celsius) and "--:F" (Fahrenheit).
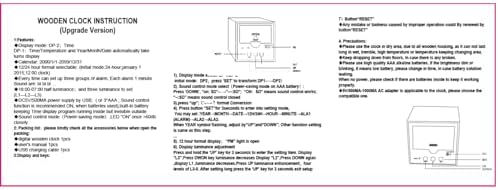
Figure 6.1: Reference image of the original instruction sheet.
7. Maintenance
- Clean the clock with a soft, dry cloth. Do not use abrasive cleaners or solvents.
- Avoid exposing the clock to water or excessive moisture, as this can damage the internal circuitry.
- If the clock will not be used for an extended period, remove the batteries to prevent leakage.
8. Troubleshooting
| Problem | Possible Cause | Solution |
|---|---|---|
| Display is dim or blinking. | Low battery power. | Replace AAA batteries or connect to USB power. |
| Display is off, no time shown. | Sound control mode is active and no sound detected; no power. | Tap the clock or make a sound to activate display. Check battery installation or USB power connection. Disable sound control mode by pressing DOWN button until "--:SD" is shown. |
| Clock not responding to button presses. | Temporary software glitch or improper operation. | Use a thin object (like a paperclip) to press the recessed RESET button on the back of the clock. This will restore default settings. |
| Time or date is incorrect after power loss. | Batteries removed or depleted while USB power was disconnected. | Re-set the time and date following the instructions in Section 6.2. |
9. Specifications
| Feature | Specification |
|---|---|
| Brand | Zerone |
| Model Number | Zeronek1gfg26oth-02 |
| Material | MDF, PVC |
| Color | Brown |
| Display Type | Digital LED |
| Product Dimensions | 6 x 6 x 6 cm (2.36"W x 2.36"H) |
| Item Weight | 3.87 ounces |
| Power Source | 3 x AAA Batteries (not included) OR DC 5V/500mA USB |
| Brightness Levels | 3 (L1, L2, L3) |
| Alarm Function | Yes, 3 groups of alarms |
| Temperature Display | Yes (Celsius/Fahrenheit) |
| Time Format | 12-hour or 24-hour mode |
| Special Features | Voice Control Mode, Automatic Half Luminance (18:00-07:00) |

Figure 9.1: Dimensions of the Zerone Digital Alarm Clock.
10. Warranty and Support
For warranty information or technical support, please refer to the product packaging or contact the retailer where the product was purchased. Keep your purchase receipt as proof of purchase.


