
Introduction
This instruction manual provides detailed guidance for the safe and efficient operation, setup, and maintenance of your Yamata Industrial Electronic Sewing Machine, model FY9300. Please read this manual thoroughly before using the machine to ensure proper function and to prevent damage or injury. Keep this manual accessible for future reference.
Important Safety Instructions
WARNING: To reduce the risk of electric shock, burns, fire, or injury:
- Always unplug the machine from the electrical outlet immediately after using and before cleaning, servicing, or making any adjustments.
- Never leave the machine unattended when plugged in.
- Keep fingers away from all moving parts. Special care is required around the sewing machine needle.
- Use the proper needle plate. The wrong plate can cause the needle to break.
- Do not use bent or dull needles.
- Do not pull or push fabric while stitching. This may deflect the needle, causing it to break.
- Wear safety glasses when operating the machine.
- Ensure the machine is placed on a stable, level surface.
Setup
1. Unpacking and Inspection
Carefully remove all components from the packaging. Verify that all parts listed in the packing list are present and undamaged. Report any missing or damaged parts immediately.
2. Table Assembly
The sewing machine table requires assembly. Follow the instructions provided with the table components. Ensure all bolts are securely tightened for stability.

Figure 1: Disassembled table components. This image shows the various parts of the table, including the metal frame and wooden top, before assembly.
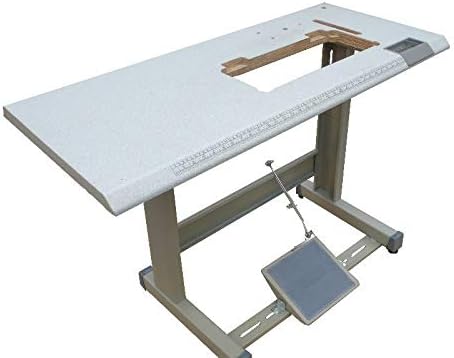
Figure 2: Assembled sewing machine table. The table is shown fully assembled with the foot pedal mechanism in place, ready for the machine head.
3. Machine Head Installation
Carefully place the sewing machine head into the designated opening on the assembled table. Ensure it is seated correctly and secured according to the table's instructions, typically using hinge pins and rubber grommets.
4. Power Connection
Connect the machine's power cord to a suitable electrical outlet. Ensure the voltage matches the machine's requirements. The machine features a direct drive motor, which is integrated into the machine head.
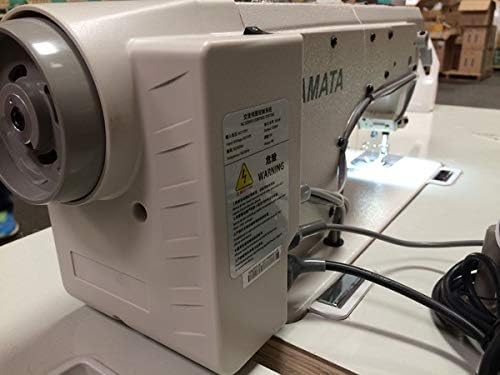
Figure 3: Side view of the machine head. This image highlights the integrated direct drive motor and the power cable connection point.
5. Needle Installation
- Turn the handwheel to raise the needle bar to its highest position.
- Loosen the needle clamp screw.
- Insert a new needle (DBx1 type recommended) with the flat side facing away from you, pushing it up as far as it will go.
- Tighten the needle clamp screw securely.
6. Thread Spool Setup
Place the thread spool on the spool pin located on the machine stand. Ensure the thread unwinds smoothly.
7. Bobbin Winding
Refer to the machine's specific bobbin winding mechanism. Typically, thread is guided from the spool through a tension disc and onto an empty bobbin, which is then placed on the bobbin winder spindle. Engage the winder and allow it to fill the bobbin evenly.
8. Threading the Machine
Follow the numbered threading path indicated on the machine. This usually involves guiding the thread through thread guides, tension discs, the take-up lever, and finally through the needle eye.
Operating Instructions
1. Control Panel Overview
The electronic control panel allows for precise adjustments of various sewing parameters. Familiarize yourself with the buttons and display.

Figure 4: Control Panel. This image shows the detailed layout of the control panel, including the LCD screen, function buttons, and adjustment arrows.

Figure 5: Control Panel with Stitch Setting. The display shows a numerical value, likely indicating stitch length or another programmable setting.

Figure 6: Machine Features Overview. This graphic illustrates key features such as stitch patterns, needle type, thread trimming, and control panel symbols.
2. Basic Stitching
- Turn on the machine using the power switch.
- Place fabric under the presser foot.
- Lower the presser foot using the knee lift or lever.
- Gently press the foot pedal to begin sewing. The machine will start stitching.
- Guide the fabric smoothly through the machine.
3. Adjusting Stitch Length
Use the arrow buttons on the control panel (refer to Figure 4 and 5) to increase or decrease the stitch length. The current setting will be displayed on the LCD screen.
4. Using the Under-Trimmer
This machine is equipped with an automatic under-trimmer. At the end of a seam, press the designated trim button on the control panel or activate it via a programmed foot pedal action (if configured) to automatically cut the threads.
5. Reverse Stitching
To reinforce seams, press and hold the reverse stitch button (often marked with a back arrow or 'R') while sewing. Release the button to resume forward stitching.
6. LED Light Operation
The machine includes an integrated LED light to illuminate the sewing area. This light can typically be turned on or off using a dedicated button on the control panel or machine head.

Figure 7: LED Light. This image shows the LED light illuminating the needle and presser foot area, improving visibility during sewing.
Maintenance
Regular maintenance ensures the longevity and optimal performance of your sewing machine.
1. Cleaning
- Daily: Use a soft brush to remove lint and dust from the bobbin case, feed dogs, and needle plate area.
- Weekly/Monthly: Remove the needle plate and clean thoroughly underneath. Use a vacuum cleaner with a small nozzle attachment if available.
- Wipe the exterior of the machine with a soft, dry cloth. Do not use harsh chemicals.
2. Lubrication
Consult the machine's specific lubrication points and schedule. Industrial machines typically require regular oiling. Use only high-quality sewing machine oil. Over-oiling can cause stains on fabric.
3. Needle Replacement
Replace the needle regularly, especially when sewing different types of fabric or if you notice skipped stitches or fabric damage. A general rule is to replace the needle after every 8 hours of sewing or at the start of a new project.
Troubleshooting
| Problem | Possible Cause | Solution |
|---|---|---|
| Skipped Stitches | Incorrectly installed needle, bent needle, wrong needle type, improper threading, insufficient tension. | Reinstall needle correctly, replace bent needle, use correct needle for fabric, re-thread machine, adjust tension. |
| Thread Breakage | Incorrect threading, too much tension, poor quality thread, bent or dull needle, burrs on thread path. | Re-thread machine, reduce tension, use quality thread, replace needle, check thread path for rough spots. |
| Bobbin Thread Looping | Incorrect upper thread tension, bobbin incorrectly wound or inserted, lint in bobbin case. | Adjust upper tension, re-wind and re-insert bobbin, clean bobbin case. |
| Machine Not Starting | Power cord unplugged, power switch off, safety features engaged. | Check power connection, turn on switch, ensure presser foot is down and other safety interlocks are clear. |
Specifications
- Model: FY9300
- Brand: Yamata
- Power Source: Corded Electric
- Needle Type: DBx1 (recommended)
- Stitch Type: Straight Stitch
- Motor: Direct Drive
- Features: Under-Trimmer, Electronic Control Panel, LED Light
- UPC: 760781219489
Warranty and Support
Warranty information for the Yamata FY9300 Industrial Electronic Sewing Machine is typically provided separately with your purchase. Please refer to the warranty card or documentation included in your product packaging for details regarding coverage and terms.
For technical support, service, or to inquire about replacement parts, please contact your authorized Yamata dealer or the manufacturer's customer service directly. Contact information can usually be found on the manufacturer's website or in your purchase documentation.