1. Introduction
This manual provides comprehensive instructions for the safe and effective use of your Ledlenser MH11 Outdoor LED Connect Bluetooth Headlamp. Please read this manual thoroughly before operating the device and retain it for future reference. The Ledlenser MH11 is a high-performance headlamp designed for outdoor activities, featuring powerful illumination, rechargeable battery, and Bluetooth connectivity for personalized settings via the Ledlenser Connect app.
2. Safety Instructions
- Do not look directly into the light beam.
- Keep the device out of reach of children.
- Do not disassemble or modify the headlamp. This may void the warranty and pose safety risks.
- Use only the original or approved charging accessories.
- Avoid exposing the headlamp to extreme temperatures or direct sunlight for extended periods.
- Ensure the charging port is dry before connecting the magnetic charging cable.
3. Package Contents
Verify that all items are present in your package:
- Ledlenser MH11 Headlamp
- 1 set of rechargeable batteries (Lithium Ion)
- Magnetic Charge System cable
- Pouch
- User Manual (this document)
4. Product Overview
Familiarize yourself with the components of your Ledlenser MH11 headlamp.

Figure 1: Front view of the Ledlenser MH11 Headlamp, showing the main light, auxiliary lights, and adjustable head strap.
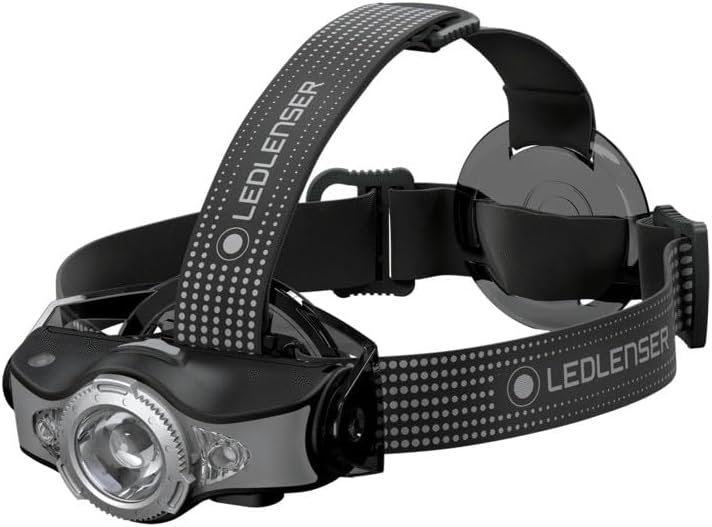
Figure 2: Side view of the Ledlenser MH11 Headlamp, illustrating the adjustable lamp head and strap design.
The headlamp features a main LED light, auxiliary colored lights, a power button, and a magnetic charging port. The adjustable head strap ensures a comfortable and secure fit.
5. Setup
5.1. Charging the Battery
The Ledlenser MH11 comes with a rechargeable Lithium Ion battery. Before first use, fully charge the headlamp.
- Ensure the headlamp is turned off.
- Locate the magnetic charging port on the headlamp.
- Connect the magnetic charging cable to the port. The cable will snap into place.
- Connect the other end of the charging cable to a USB power source (e.g., computer, USB wall adapter).
- The charging indicator will show the charging status. A full charge typically takes several hours.
- Once fully charged, disconnect the cable.
5.2. Adjusting the Head Strap
The head strap is designed for comfort and stability during various activities.
- Place the headlamp on your head.
- Adjust the elastic straps using the buckles to achieve a snug, yet comfortable fit. The top strap provides additional stability.
- Ensure the lamp unit is centered on your forehead.
6. Operating Instructions
6.1. Basic Operation
The main power button controls the headlamp's primary functions.
- Power On/Off: Press and hold the power button for approximately 1 second to turn the headlamp on or off.
- Switching Brightness Modes: With the headlamp on, short press the power button to cycle through different brightness levels (e.g., High, Medium, Low).
- Boost Mode: A quick double-press of the power button may activate a temporary boost mode for maximum brightness. Refer to the Ledlenser Connect app for specific customization.

Figure 3: The Ledlenser MH11 headlamp in use, demonstrating its illumination capabilities.
6.2. Advanced Light Functions
The MH11 offers various light functions, including colored lights (red, green, blue) and specialized modes. These can often be accessed by specific button sequences or, more conveniently, through the Ledlenser Connect app.
6.3. Bluetooth Connectivity and Ledlenser Connect App
The Ledlenser MH11 can be connected to your smartphone via Bluetooth to customize settings and access additional features.
- Download the App: Download the "Ledlenser Connect" app from your smartphone's app store (iOS or Android).
- Enable Bluetooth: Ensure Bluetooth is enabled on your smartphone.
- Pairing: Follow the in-app instructions to pair your MH11 headlamp. This usually involves turning on the headlamp and selecting it within the app's device list.
- Customization: Once connected, you can personalize light settings, adjust brightness levels, configure button functions, and activate special modes directly from your phone.

Figure 4: The Ledlenser Connect app interface, showing options for adjusting power levels, such as 'Low Power'.

Figure 5: The Ledlenser Connect app interface, demonstrating the selection of 'Mid Power' for balanced illumination.

Figure 6: The Ledlenser Connect app interface, displaying options for selecting different multicolor lights (red, green, blue).
7. Maintenance
7.1. Cleaning
- Wipe the headlamp body with a soft, damp cloth.
- Do not use abrasive cleaners or solvents.
- The head strap can be hand-washed with mild soap and water, then air-dried.
7.2. Battery Care and Storage
- For long-term storage, charge the battery to approximately 50-70% and store the headlamp in a cool, dry place.
- Recharge the battery every 3-6 months during storage to maintain battery health.
- Avoid fully discharging the battery frequently, as this can reduce its lifespan.
8. Troubleshooting
| Problem | Possible Cause | Solution |
|---|---|---|
| Headlamp does not turn on. | Battery is depleted. | Charge the battery using the magnetic charging cable. |
| Light output is dim. | Low battery level. Lens is dirty. | Recharge the battery. Clean the lens with a soft cloth. |
| Cannot connect via Bluetooth. | Bluetooth is off on phone. Headlamp is not in pairing mode. App issue. | Ensure phone's Bluetooth is on. Restart headlamp and app. Follow app pairing instructions carefully. |
| Headlamp gets warm during use. | Normal operation for high-power LEDs. | This is normal, especially on higher brightness settings. If it becomes excessively hot, reduce brightness or turn off. |
9. Specifications
- Model: MH11
- Model Number: 500996
- Light Source: LED
- Maximum Brightness: 1000 Lumens
- Maximum Beam Range: Up to 130 meters
- Maximum Light Duration: Up to 100 hours (on lowest setting)
- Battery Type: 1x Lithium Ion (included)
- Voltage: 3.6 Volts
- Item Weight: 179 Grams (6.3 ounces)
- Dimensions: 1.57"D x 1.57"W x 1.57"H (approximate lamp unit)
- Water Resistance: Water Resistant
- Special Features: Rechargeable, Bluetooth Connectivity, Red/Green/Blue Front Light, Magnetic Charge System
10. Warranty and Support
Ledlenser products are manufactured with high-quality materials and undergo strict quality control. For information regarding warranty terms and conditions, please refer to the warranty card included with your product or visit the official Ledlenser website. For technical support, troubleshooting assistance, or spare parts, please contact Ledlenser customer service through their official channels.
Website: www.ledlenser.com


