1. Introduction
This manual provides detailed instructions for the installation, operation, and maintenance of the Walfront TM630A 12V DC Mini LCD Digital Microcomputer Control Power Timer Switch. This device is designed for precise control of various electrical equipment, offering automated on/off scheduling for enhanced efficiency and convenience. Please read this manual thoroughly before use to ensure proper operation and safety.
2. Safety Information
- Ensure the power supply matches the voltage requirements of the device (DC 12V).
- Installation should be performed by qualified personnel to prevent electric shock or damage.
- Do not expose the device to water, excessive humidity, or extreme temperatures.
- Disconnect power before performing any wiring or maintenance.
- Keep out of reach of children.
3. Product Overview
The Walfront TM630A is a high-precision digital timer switch featuring an industrial-grade chip for strong anti-interference. It includes a built-in 1.2V/40mA rechargeable battery to retain programming information during power outages. The device supports up to 17 on/off settings for flexible scheduling.

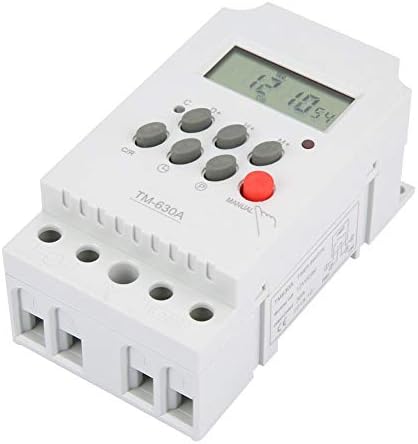
Front view of the TM630A digital timer switch, showing the LCD display and control buttons.
Angled view of the TM630A, highlighting its compact design and terminal blocks.

Rear view of the TM630A, showing the DIN rail mounting clip.

Diagram illustrating the dimensions of the TM630A timer switch: 3.1 inches (depth), 2.2 inches (width), and 1.4 inches (height).
4. Setup and Wiring
The TM630A timer switch is designed for easy installation. It features two input terminals for power supply and two output terminals for the load. The wire slots accept wire sizes from 20AWG to 10AWG.
Wiring Diagram:
Connect the 12V DC power supply to the 'IN' terminals (marked '+' and '-'). Connect the device to be controlled (load) to the 'OUT' terminals (marked '+' and '-'). Ensure correct polarity for DC applications.
Caution: Always ensure power is disconnected before wiring to prevent electric shock.
5. Operating Instructions
Initial Setup:
- Unlock the Device: Press the 'C/R' button four times to unlock the timer. The lock icon on the display will disappear.
- Set Current Time:
- Press the 'D+' button to set the current day of the week.
- Press the 'H+' button to set the current hour.
- Press the 'M+' button to set the current minute.
Programming On/Off Times:
The timer supports up to 17 ON/OFF programs. Follow these steps to set a program:
- Press the 'P' button once. The display will show '1 ON'. This is the first 'ON' setting.
- Use 'D+', 'H+', 'M+' buttons to set the desired day(s), hour, and minute for the first 'ON' event.
- Press the 'P' button again. The display will show '1 OFF'. This is the first 'OFF' setting.
- Use 'D+', 'H+', 'M+' buttons to set the desired day(s), hour, and minute for the first 'OFF' event.
- Repeat steps 1-4 for additional ON/OFF programs (up to 17).
- After setting all desired programs, press the clock icon button (usually labeled with a clock symbol) to return to the current time display.
Manual Control:
Press the 'MANUAL' button to cycle through different modes: ON, AUTO, OFF. In 'AUTO' mode, the timer will follow the programmed schedule. In 'ON' or 'OFF' mode, the output will remain continuously on or off, overriding the schedule.
6. Maintenance
The Walfront TM630A timer switch requires minimal maintenance. Keep the device clean and free from dust. Do not use abrasive cleaners. The internal rechargeable battery is designed to maintain settings during power interruptions; however, if the device is stored for extended periods without power, the battery may discharge. Connect the timer to a power source to recharge the internal battery if it fails to retain settings.
7. Troubleshooting
- Timer not responding or display is blank: Check power connections. Ensure the internal battery has sufficient charge by connecting the timer to power for several hours.
- Timer not executing programs:
- Ensure the device is unlocked (press 'C/R' four times).
- Verify that the timer is in 'AUTO' mode (check the 'MANUAL' button setting).
- Double-check programmed ON/OFF times for accuracy.
- Incorrect time displayed: Reset the current time using the 'D+', 'H+', 'M+' buttons.
- Device turns on/off unexpectedly: Review all programmed ON/OFF settings to identify any conflicts or unintended schedules.
8. Specifications
| Feature | Specification |
|---|---|
| Model Number | Wal front3g6nkvs20r-01 (TM630A) |
| Input Voltage | DC 12V |
| Number of Programs | 17 ON/OFF settings |
| Display | LCD |
| Internal Battery | 1.2V / 40mA rechargeable |
| Dimensions (D x W x H) | 3.1" x 2.2" x 1.4" |
| Item Weight | 5.3 ounces (0.15 Kilograms) |
| Material | Plastic |
| UPC | 783335809516 |
9. Warranty and Support
For warranty information and technical support, please refer to the Walfront official website or contact your retailer. Keep your purchase receipt for warranty claims.

