Important Safety Instructions
Please read this manual carefully before using the appliance and keep it for future reference. Incorrect use may result in electric shock, fire, or serious injury.
- Ensure the power supply voltage matches the rating label on the appliance.
- Do not immerse the appliance, power cord, or plug in water or other liquids.
- Unplug the appliance from the power outlet when not in use, before filling water, or before cleaning.
- Do not operate the appliance with a damaged cord or plug, or after the appliance malfunctions or has been damaged in any manner.
- Keep the appliance out of reach of children.
- Do not block the air inlets or outlets.
- Place the appliance on a stable, flat surface.
- Only use clean water in the water tank.
Product Overview
Key Features
- 3-in-1 Functionality: Air Cooler, Humidifier, and Purifier.
- Water Tank Capacity: 4 Liters.
- Fan Speeds: 3 adjustable speeds.
- Oscillation: Oscillating ventilation grille for wide air distribution.
- Timer: 7-hour programmable timer.
- Control: Operable via control panel and remote control.
- Mobility: Equipped with 4 wheels for easy movement.
Product Components
Familiarize yourself with the main parts of your LIVOO Mobile Air Cooler.

Image: Front view of the LIVOO Mobile Air Cooler, displaying the air outlet grille and the transparent water level indicator at the bottom.

Image: Side view of the LIVOO Mobile Air Cooler, highlighting its compact design and the four castor wheels for portability.
Setup
Unpacking
- Carefully remove the air cooler from its packaging.
- Remove all packaging materials and ensure no parts are missing or damaged.
- Keep packaging materials away from children.
Water Tank Filling
- Ensure the appliance is unplugged from the power outlet.
- Locate the water tank. For this model, the tank is typically accessed from the rear or bottom.
- Fill the tank with clean, cool water. Do not exceed the maximum fill line indicated on the tank. The capacity is 4 liters.
- For enhanced cooling, you may add ice packs (not included) to the water tank if a dedicated compartment is available.
- Securely close the water tank cover.
Positioning the Unit
Place the air cooler on a firm, level surface. Ensure there is adequate space around the unit (at least 20 cm) for proper air circulation. The integrated wheels allow for easy repositioning.
Operation
Once the unit is set up and the water tank is filled, plug the power cord into a suitable electrical outlet.
Control Panel Overview
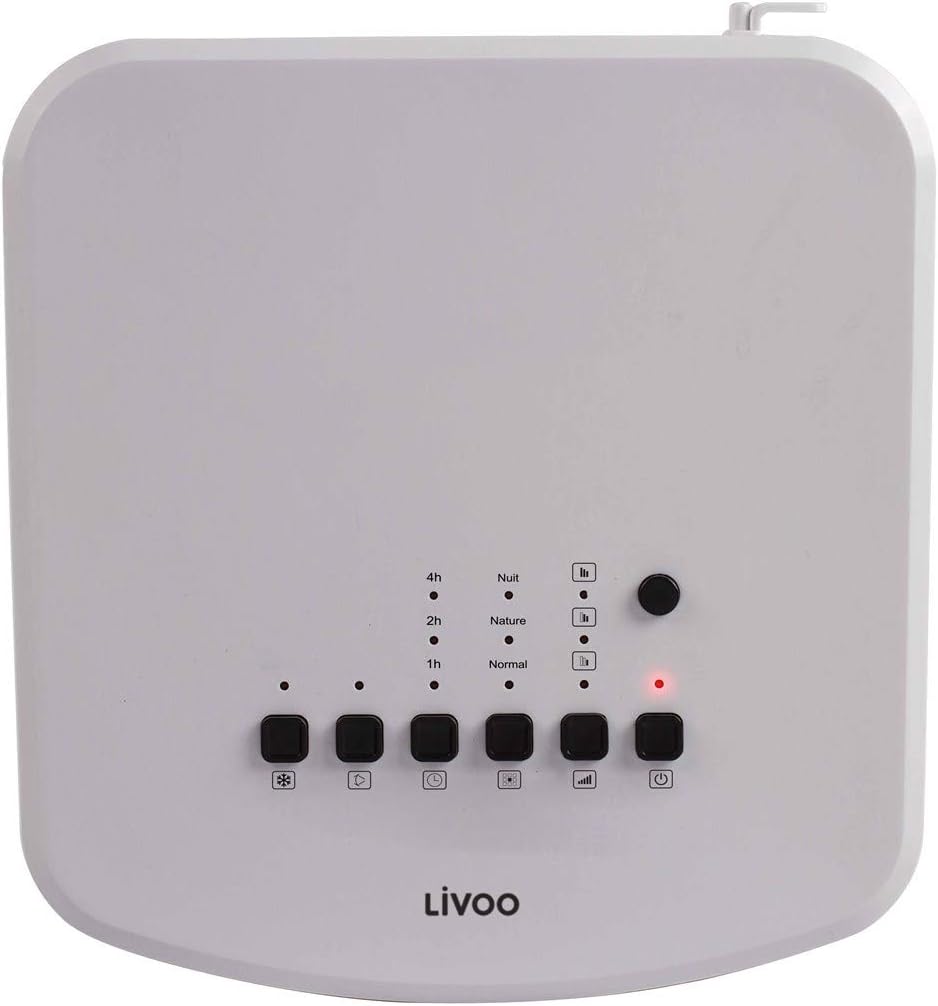
Image: Top-mounted control panel of the air cooler, featuring buttons for power, mode, speed, oscillation, and cooling function, along with indicator lights for timer and mode settings.
- Power Button (⏻): Turns the unit ON or OFF.
- Mode Button (□□□): Cycles through Normal, Nature, and Night modes.
- Speed Button (|||): Adjusts fan speed (Low, Medium, High).
- Oscillation Button (⟳): Activates or deactivates the oscillating grille.
- Cooling/Humidifier Button (❄): Engages the cooling and humidifying function.
- Timer Button (L): Sets the operating timer (1h, 2h, 4h, up to 7 hours).
Remote Control Overview

Image: The remote control for the air cooler, featuring buttons for power, mode, speed, oscillation, cooling, and timer functions, mirroring the main control panel.
The remote control provides the same functionality as the control panel for convenient operation from a distance. Ensure batteries are correctly inserted.
Functions
- Air Cooler: Uses water evaporation to cool the air. Activate by pressing the 'Cooling' button.
- Humidifier: Adds moisture to the air, beneficial in dry environments. This function is integrated with the cooling feature.
- Purifier: Filters dust and other particles from the air as it passes through the unit. This function operates whenever the fan is on.
Speed Settings
Press the 'Speed' button to cycle through Low, Medium, and High fan speeds to adjust airflow intensity.
Oscillation Function
Press the 'Oscillation' button to activate the automatic swing of the vertical louvers, distributing cool air over a wider area. Press again to stop oscillation.
Timer Function
Press the 'Timer' button repeatedly to set the desired operating time (1, 2, 4 hours, or combinations up to 7 hours). The unit will automatically turn off after the set time.
Modes
- Normal Mode: Constant airflow at the selected speed.
- Nature Mode: Simulates natural breeze by varying fan speed.
- Night Mode: Operates at a lower, quieter speed for undisturbed sleep.
Maintenance
Regular maintenance ensures optimal performance and extends the lifespan of your air cooler. Always unplug the unit before cleaning.
Cleaning the Unit
- Wipe the exterior surfaces with a soft, damp cloth. Do not use abrasive cleaners or solvents.
- Clean the air inlet and outlet grilles with a soft brush or vacuum cleaner to remove dust accumulation.
Water Tank Cleaning
To prevent mold and mildew growth, clean the water tank regularly, especially if the unit is used frequently.
- Drain any remaining water from the tank.
- Remove the water tank (if detachable) and wash it with mild soap and water. Rinse thoroughly.
- For stubborn deposits, use a solution of white vinegar and water, let it sit for 30 minutes, then scrub and rinse.
- Allow the tank to air dry completely before reassembling.
Filter Cleaning
The air cooler includes a filter for air purification. This filter should be cleaned periodically.
- Locate the air filter, usually at the back of the unit.
- Carefully remove the filter.
- Rinse the filter under running water to remove dust and debris. For deeper cleaning, use a soft brush.
- Allow the filter to air dry completely before placing it back into the unit. Do not use the unit with a wet filter.
Storage
When storing the unit for an extended period:
- Ensure the water tank is empty and clean.
- Clean the entire unit as described above.
- Store the appliance in a cool, dry place, away from direct sunlight and extreme temperatures.
Troubleshooting
If you encounter issues with your air cooler, refer to the following common problems and solutions:
| Problem | Possible Cause | Solution |
|---|---|---|
| Unit does not turn on | No power supply Power button not pressed | Check if the power cord is securely plugged in. Check the power outlet. Press the Power button (⏻) on the control panel or remote. |
| No cooling effect | Water tank empty Cooling function not activated Room temperature too high | Fill the water tank. Press the Cooling/Humidifier button (❄). Evaporative coolers are most effective in dry climates. For very hot and humid conditions, cooling effect may be limited. |
| Weak airflow | Fan speed too low Air inlets/outlets blocked Filter dirty | Increase fan speed using the Speed button (|||). Ensure nothing is obstructing the grilles. Clean the air filter as per maintenance instructions. |
| Unpleasant odor | Stagnant water in tank Dirty filter | Drain and clean the water tank thoroughly. Use fresh water. Clean the air filter. |
| Remote control not working | Batteries depleted or incorrectly inserted Obstruction between remote and unit | Replace batteries and ensure correct polarity. Remove any objects blocking the signal path. |
Specifications
Technical details for the LIVOO Mobile Air Cooler DOM389.
| Feature | Detail |
|---|---|
| Brand | Livoo |
| Model Number | DOM389 |
| Color | Black and White |
| Product Dimensions (L x W x H) | 26 x 24 x 57 cm |
| Item Weight | 5.3 Kilograms |
| Capacity (Water Tank) | 4 Liters |
| Noise Level | 65 Decibels |
| Control Type | Remote Control, Control Panel |
| Special Feature | Air Cooler, Humidifier, Purifier |
| Mounting Type | Floor Mount |
| Material | Metal (and plastic components) |

Image: Dimensional diagram of the air cooler, indicating a height of 57cm, width of 24cm, and depth of 26cm.
Warranty and Support
This product is covered by a manufacturer's warranty. For specific warranty terms and conditions, please refer to the warranty card included with your purchase or contact your retailer.
For technical support, spare parts, or service inquiries, please contact the Livoo customer service department or your local distributor. Contact information can typically be found on the Livoo official website or your purchase documentation.


