
1. Setup Guide
This section provides instructions for the initial setup of your Xprinter XP-370B Thermal Barcode Sticker Printer.
1.1 Unpacking
Carefully remove all components from the packaging. Ensure the following items are present:
- Xprinter XP-370B Thermal Barcode Sticker Printer
- Power Adapter
- USB Cable
- Quick Start Guide (if included)
- Sample Label Roll (if included)

Figure 1.1: The Xprinter XP-370B Thermal Barcode Sticker Printer. This image displays the overall design of the printer, featuring its black casing and blue accents on the buttons and lid.
1.2 Connecting the Printer
- Power Connection: Connect the power adapter to the printer's power port and then plug it into a suitable electrical outlet.
- USB Connection: Connect one end of the USB cable to the printer's USB port and the other end to your computer.
- Cash Drawer Connection (Optional): If using a cash drawer, connect it to the designated cash drawer port on the printer.

Figure 1.2: Rear view of the Xprinter XP-370B printer, highlighting the power input, cash drawer port, and USB port for connectivity. These ports are essential for connecting the printer to power and a host device.

Figure 1.3: A more detailed rear view of the Xprinter XP-370B, showing various connectivity options including power, Ethernet, serial, and USB ports. This illustrates the printer's versatility in integration.
1.3 Loading Labels
- Open the top cover of the printer by gently lifting the blue lever.
- Place the label roll into the media compartment, ensuring the labels feed from the bottom of the roll and the leading edge is positioned correctly.
- Adjust the movable guides to fit the width of your labels snugly, without pinching them.
- Close the top cover until it clicks securely into place.

Figure 1.4: The Xprinter XP-370B with its top cover open, revealing the internal compartment designed for loading label rolls. This view demonstrates how to access the media path for label installation.
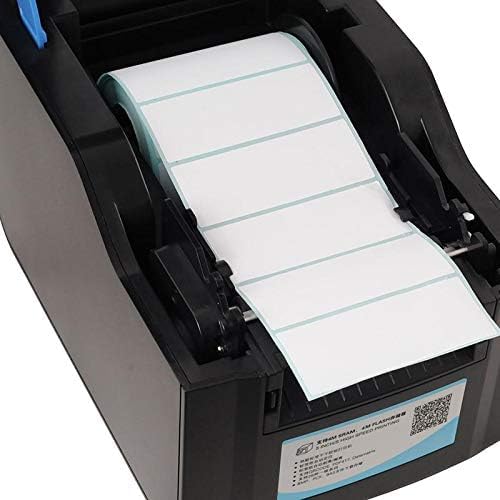
Figure 1.5: A close-up view of labels correctly loaded into the Xprinter XP-370B, showing the label roll positioned within the guides and ready for printing. This illustrates the proper alignment of the label media.
1.4 Driver Installation
Before operating the printer, install the appropriate drivers on your computer. Drivers are typically provided on a CD with the printer or can be downloaded from the official Xprinter website. Follow the on-screen instructions during the installation process.
2. Operating Instructions
This section details the basic steps for operating your Xprinter XP-370B printer.
2.1 Powering On and Off
- Power On: Ensure the power adapter is connected. Press the power button (usually located on the front or side) to turn on the printer. The indicator light will illuminate.
- Power Off: Press and hold the power button until the printer shuts down.
2.2 Printing Labels
- Ensure the printer is powered on and connected to your computer.
- Open the document or software from which you intend to print labels.
- Select the Xprinter XP-370B from your list of available printers.
- Configure print settings such as label size, orientation, and quantity as required by your software.
- Initiate the print command. The printer will feed and print the labels.

Figure 2.1: Top view of the Xprinter XP-370B, displaying the control buttons and status indicators. These elements allow users to manage basic printer functions and monitor its operational status.
2.3 Status Indicators
The printer features indicator lights (typically blue or green) that provide information about its status:
- Solid Light: Printer is ready for operation.
- Flashing Light: Indicates an error, such as out of paper or an open cover. Refer to the troubleshooting section.
3. Maintenance
Regular maintenance ensures optimal performance and extends the lifespan of your Xprinter XP-370B.
3.1 Cleaning the Print Head
The thermal print head should be cleaned periodically to maintain print quality. Use a lint-free cloth dampened with isopropyl alcohol. Gently wipe the print head surface. Ensure the printer is powered off and cooled down before cleaning.
3.2 Cleaning the Platen Roller
The platen roller can accumulate dust or adhesive residue. Clean it with a lint-free cloth dampened with isopropyl alcohol. Rotate the roller manually to clean its entire surface.
3.3 Replacing Label Rolls
When a label roll is depleted, follow the steps in Section 1.3 "Loading Labels" to replace it with a new roll. Always use high-quality thermal labels compatible with your printer model.
4. Troubleshooting
This section addresses common issues you might encounter with your Xprinter XP-370B printer.
| Problem | Possible Cause | Solution |
|---|---|---|
| No Power | Power cable disconnected, power outlet faulty. | Check power cable connections. Try a different power outlet. |
| No Print Output | Printer not connected, incorrect driver, out of labels, print head issue. | Verify USB connection. Reinstall drivers. Load new labels. Clean print head. |
| Poor Print Quality | Dirty print head, low-quality labels, incorrect print settings. | Clean the print head. Use recommended labels. Adjust print density in driver settings. |
| Paper Jam | Labels improperly loaded, foreign object in paper path. | Open cover and carefully remove jammed labels. Re-load labels correctly. |
| Printer Not Recognized by Computer | USB cable issue, driver not installed or corrupted. | Try a different USB port or cable. Reinstall printer drivers. |
5. Technical Specifications
Below are the key technical specifications for the Xprinter XP-370B Thermal Barcode Sticker Printer.
| Feature | Detail |
|---|---|
| Model Number | XP-370B |
| Printer Type | Thermal Barcode Sticker Printer |
| Color | Black |
| Connectivity Technology | USB |
| Printer Technology | Thermal |
| Special Features | Lightweight |
| Printer Output | Monochrome |
| Maximum Print Speed (Black and White) | 30 ppm |
| Product Dimensions | 163 x 231 x 150.7 cm; 2.35 kg |
6. Warranty and Support
For warranty information, technical support, or service inquiries regarding your Xprinter XP-370B, please refer to the documentation provided with your purchase or visit the official Xprinter website. Keep your purchase receipt as proof of purchase for warranty claims.
Extended warranty options may be available from third-party providers. Please check with your retailer for details.