1. Introduction
Thank you for purchasing the Mersoco M49 Belt-Drive Turntable. This record player is designed to provide a high-quality audio experience for your vinyl collection, featuring built-in speakers, Bluetooth connectivity, and multiple output options. Please read this manual thoroughly before use to ensure proper operation and to maximize the lifespan of your device.
2. Safety Instructions
To prevent fire, electric shock, or product damage, please observe the following safety guidelines:
- Do not expose the unit to rain or moisture.
- Do not block any ventilation openings.
- Ensure the power adapter is compatible with your local power supply.
- Protect the power cord from being walked on or pinched.
- Unplug the unit during lightning storms or when unused for long periods.
- Refer all servicing to qualified service personnel.
- Keep the unit away from direct sunlight, heat sources, and strong magnetic fields.
- Avoid placing heavy objects on the unit.
3. Package Contents
Verify that all items listed below are included in your package:
- Mersoco M49 Turntable Unit
- Power Adapter
- 45 RPM Adapter
- Instruction Manual (this document)
- Detachable Dust Cover
- RCA Cable
4. Product Overview
Familiarize yourself with the components of your Mersoco M49 Turntable.

Figure 4.1: Front view of the Mersoco M49 Turntable with the dust cover open, showcasing the record platter, tonearm, and control knob.
4.1 Top Panel Components
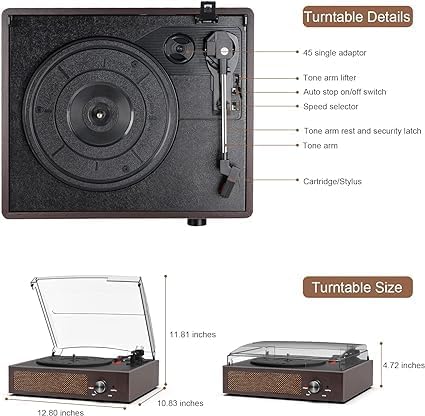
Figure 4.2: Detailed diagram of the turntable's top panel, indicating the 45 RPM adapter, tonearm lifter, auto stop switch, speed selector, tonearm rest, security latch, tonearm, and cartridge/stylus.
- 45 RPM Adapter: Used for playing 7-inch records with a large center hole.
- Tone Arm Lifter: Raises and lowers the tonearm gently.
- Auto Stop On/Off Switch: Engages or disengages the auto-stop function.
- Speed Selector: Allows selection of 33-1/3, 45, or 78 RPM playback speeds.
- Tone Arm Rest and Security Latch: Secures the tonearm when not in use.
- Tone Arm: Holds the cartridge and stylus.
- Cartridge/Stylus: Reads the grooves of the vinyl record.
4.2 Front Panel Controls
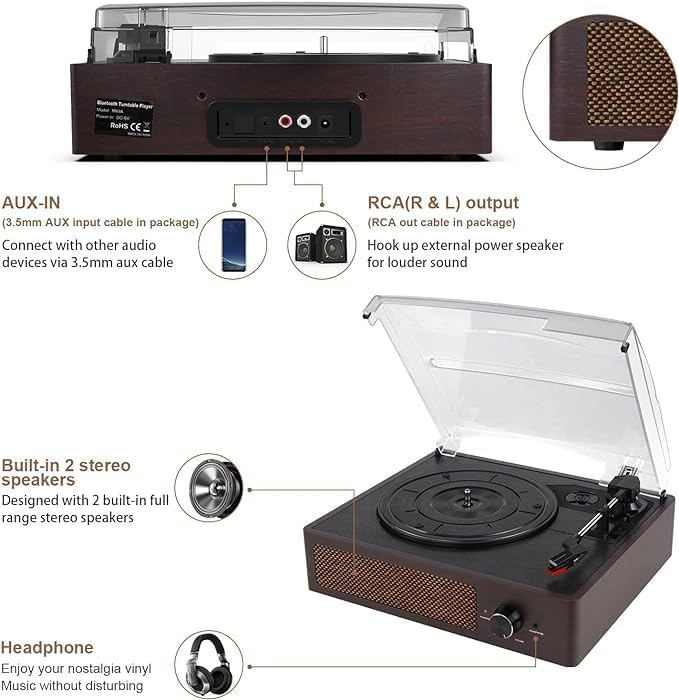
Figure 4.3: Front panel controls, including the Power/Bluetooth indicator light, the On/Off/Volume knob, and the Headphone Jack.
- Power/BT Indicator: Lights up when powered on, flashes during Bluetooth pairing.
- ON/OFF/Volume Knob: Turns the unit on/off and adjusts the volume.
- Headphone Jack: For private listening with headphones.
4.3 Rear Panel Connections

Figure 4.4: Rear panel connections, detailing the USB port (not explicitly mentioned in features, but visible), AUX IN, RCA L/R OUT, and DC IN ports.
- AUX IN: Connect external audio devices via a 3.5mm audio cable.
- RCA (R & L) Output: Connect to external amplifiers or powered speakers using the included RCA cable.
- DC IN: Connect the provided power adapter.
5. Setup
5.1 Placement
Place the turntable on a stable, level surface away from direct sunlight, heat sources, and excessive dust or vibrations.
5.2 Power Connection
- Insert the DC plug of the power adapter into the DC IN port on the rear of the turntable.
- Plug the power adapter into a standard wall outlet.
5.3 Dust Cover Installation
Carefully align the hinges of the detachable dust cover with the slots on the back of the turntable and gently push down until it clicks into place. The dust cover helps protect the platter and tonearm from dust when not in use.

Figure 5.1: The turntable with its detachable dust cover in the open position.
6. Operating Instructions
6.1 Playing a Vinyl Record
- Open the dust cover.
- Place a vinyl record on the turntable platter. If playing a 7-inch record with a large center hole, place the 45 RPM adapter on the center spindle first.
- Select the appropriate speed (33-1/3, 45, or 78 RPM) using the speed selector switch.
- Rotate the ON/OFF/Volume knob clockwise to turn on the unit and adjust to a low volume.
- Release the tonearm from its rest by pushing the security latch.
- Lift the tonearm using the tonearm lifter.
- Carefully position the stylus over the desired starting groove of the record.
- Gently lower the tonearm using the tonearm lifter. The record will begin to play.
- Adjust the volume to your preference.
- When the record finishes playing, the auto-stop function (if enabled) will stop the platter rotation. Lift the tonearm, return it to its rest, and secure it with the latch.
Tip: When placing a 12-inch vinyl record on the turntable, gently tilt it toward the tonearm to ensure proper playback and avoid damage to the stylus.

Figure 6.1: The turntable supports three playback speeds for various record sizes: 33-1/3 RPM for 12-inch LPs, 45 RPM for 7-inch singles, and 78 RPM for older shellac records.

Figure 6.2: The auto stop switch, located near the tonearm, can be toggled to enable or disable the automatic platter stop feature at the end of a record.
6.2 Bluetooth Mode
The turntable can receive audio wirelessly from a Bluetooth-enabled device.
- Rotate the ON/OFF/Volume knob clockwise to turn on the unit. The Power/BT indicator will flash blue, indicating it's in Bluetooth pairing mode.
- Enable Bluetooth on your smartphone, tablet, or other audio device.
- Search for "Mersoco" or "M49" in your device's Bluetooth list and select it to pair.
- Once paired, the Power/BT indicator will glow solid blue. You can now stream music from your device to the turntable's built-in speakers.
- Adjust the volume using the turntable's volume knob or your connected device.

Figure 6.3: Wireless Bluetooth pairing allows you to stream music from your smartphone or other compatible devices to the turntable's speakers.
6.3 AUX Input
Connect external audio sources (e.g., MP3 players, CD players) to the turntable.
- Connect one end of a 3.5mm audio cable (not included, unless specified in package contents) to the AUX IN port on the rear of the turntable.
- Connect the other end of the cable to the headphone jack or line-out port of your external audio device.
- Turn on the turntable and your external audio device.
- Adjust the volume using the turntable's volume knob and/or your external device.

Figure 6.4: The AUX IN port allows connection of external audio devices, while the RCA OUT ports enable connection to external speakers.
6.4 RCA Output
For enhanced sound, connect the turntable to an external amplifier or powered speakers.
- Connect the RCA cable (included) to the RCA (R & L) Output ports on the rear of the turntable.
- Connect the other end of the RCA cable to the corresponding audio input ports on your external amplifier or powered speakers.
- Ensure the turntable and external audio system are powered on.
- Adjust the volume using your external audio system.
6.5 Headphone Jack
For private listening, connect standard headphones to the headphone jack on the front panel.
- Plug your headphones into the HEADPHONE jack.
- The built-in speakers will automatically mute.
- Adjust the volume using the ON/OFF/Volume knob.

Figure 6.5: The headphone jack allows for private listening without disturbing others.
7. Maintenance
7.1 Cleaning the Stylus
- Use a soft brush, specifically designed for stylus cleaning, to gently brush from back to front.
- Do not use excessive force or brush from side to side, as this can damage the stylus.
- A dirty stylus can cause poor sound quality and damage your records.
7.2 Cleaning the Unit
- Wipe the turntable cabinet with a soft, dry cloth.
- For the dust cover, use a soft, slightly damp cloth. Avoid harsh cleaners or abrasive materials.
- Ensure the unit is unplugged before cleaning.
8. Troubleshooting
| Problem | Possible Cause | Solution |
|---|---|---|
| No power | Power adapter not connected or outlet not active. | Ensure the power adapter is securely plugged into the unit and a working wall outlet. |
| No sound from speakers | Volume too low, headphones connected, or external speakers not properly connected. | Increase volume. Disconnect headphones. Check RCA cable connections if using external speakers. |
| Record plays too fast/slow | Incorrect speed selected. | Adjust the speed selector to match the record's RPM (33-1/3, 45, or 78). |
| Skipping or distorted sound | Dirty or worn stylus, dirty record, or unit not on a stable surface. | Clean the stylus and record. Ensure the turntable is on a stable, level surface. Replace stylus if worn. |
| Bluetooth not pairing | Turntable not in pairing mode, or device too far. | Ensure the Power/BT indicator is flashing. Move your Bluetooth device closer to the turntable. Restart both devices. |
9. Specifications
| Feature | Detail |
|---|---|
| Brand | Mersoco |
| Model Number | M49-Brown |
| Product Dimensions | 14.41 x 7.64 x 7.64 inches |
| Item Weight | 4.76 pounds |
| Maximum Rotational Speed | 78 RPM (Supports 33-1/3, 45, 78 RPM) |
| Special Features | AUX Input, Adjustable Speed, Built-In Bluetooth Receiver, Built-in Speakers |
| Material | Plastic (with wood finish) |
| Color | Brown |
| Compatible Devices | Headphone, Smartphone, Speaker, Tablet |
| On-mode Power Consumption | 5 watts |
10. Warranty and Support
Mersoco products are designed and manufactured to the highest quality standards. For warranty information, technical support, or customer service inquiries, please refer to the contact information provided with your purchase or visit the official Mersoco website. Please retain your proof of purchase for warranty claims.


