1. Introduction
This user manual provides comprehensive instructions for the Walfront Inspection Camera Digital Endoscope, Model InsKam113. This device is designed for various inspection tasks, offering clear visual access to hard-to-reach areas. Please read this manual thoroughly before operating the device to ensure proper use and maintenance.
2. Package Contents
Verify that all items listed below are included in your package:
- Digital Endoscope Monitor (4.3-inch LCD Screen)
- Flexible Inspection Camera Cable (8mm diameter, 10M length)
- USB Charging Cable
- User Manual

Image: The complete package includes the main monitor unit, the flexible camera cable, a USB charging cable, and the user manual.
3. Product Features
- High-Resolution Display: Equipped with a 4.3-inch LCD color screen for clear viewing of inspection areas.
- 1080P HD Camera: Provides high-definition video and image capture.
- Flexible and Long Cable: Features a 10-meter flexible cable with an 8mm camera head, allowing access to confined spaces.
- Adjustable LED Illumination: Integrated with 6 super bright LED lights on the camera tip, adjustable for optimal visibility in dark environments.
- Waterproof Camera: The camera probe is IP67 waterproof, suitable for underwater inspections.
- Rechargeable Battery: Built-in 2600mAh lithium battery provides extended operation time and fast charging via USB.
- Versatile Applications: Ideal for automotive inspection, pipeline inspection, air conditioning inspection, object retrieval, and various industrial and home uses.

Image: Detail showing the 6 LED lights on the camera probe and the front auxiliary lamp on the main unit for enhanced illumination.

Image: Illustration of the 2600mAh Li-polymer battery, highlighting fast USB charging (3.5 hours) and long usage time (3.5 hours).

Image: The flexible camera cable demonstrating its ability to bend and rotate 360 degrees for versatile positioning.
4. Setup
4.1 Charging the Device
Before first use, fully charge the endoscope. Connect the supplied USB charging cable to the device's charging port and plug the other end into a standard USB power adapter (not included) or a computer USB port. The charging indicator will show the charging status.
4.2 Connecting the Camera Probe
To connect the flexible camera probe to the main monitor unit:
- Align the connector of the camera probe with the connection port on the side of the monitor unit.
- Gently insert the camera probe connector into the port.
- Tighten the metal ring on the camera probe connector clockwise to secure it firmly in place. Ensure a snug fit to maintain connection and waterproof integrity.
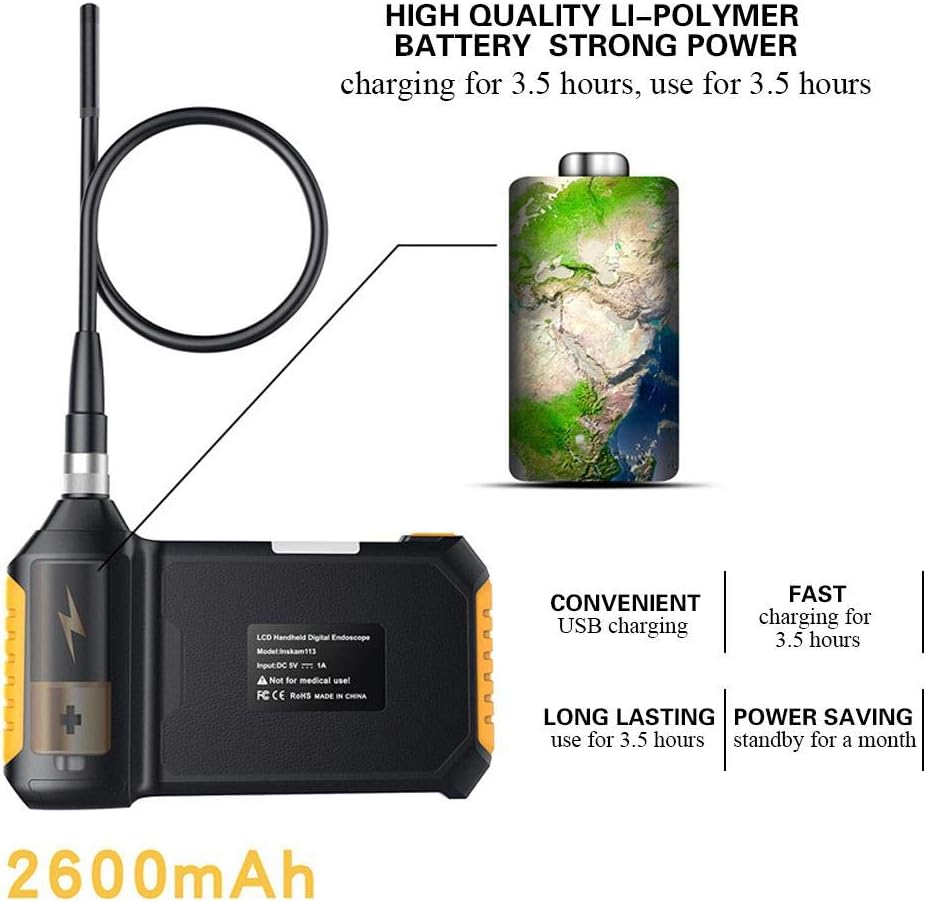
Image: Visual guide demonstrating how to insert the camera tube into the monitor's connection port and secure it with the metal ring.
5. Operating Instructions
5.1 Power On/Off
Press and hold the power button (usually located on the side or front panel) for a few seconds to turn the device on or off. The LCD screen will illuminate upon power-on.
5.2 Adjusting LED Brightness
Once the device is on, use the dedicated LED brightness adjustment button (often marked with a light bulb icon or up/down arrows) to increase or decrease the intensity of the camera's LED lights. This helps in illuminating dark inspection areas effectively.
5.3 Navigating and Capturing
The device typically features navigation buttons (Up, Down, Left, Right, OK) for menu navigation and confirming selections. Refer to the on-screen interface for specific functions like taking photos or recording videos. The "OK" button is often used to capture an image or start/stop video recording.
5.4 Inserting the Camera Probe
Carefully insert the camera probe into the area you wish to inspect. Guide the flexible cable as needed. Avoid forcing the probe into tight spaces to prevent damage.
6. Maintenance
- Cleaning: After each use, especially in dirty or wet environments, gently wipe the camera probe and cable with a soft, damp cloth. For the monitor unit, use a dry, soft cloth. Do not use abrasive cleaners or solvents.
- Storage: Store the endoscope in a cool, dry place, away from direct sunlight and extreme temperatures. Coil the camera cable loosely to prevent kinks or damage.
- Battery Care: To prolong battery life, avoid fully discharging the battery frequently. If storing for a long period, charge the battery to about 50% every few months.
- Lens Care: Ensure the camera lens is clean and free of debris for clear images. Use a lens cleaning cloth if necessary.
7. Troubleshooting
| Problem | Possible Cause | Solution |
|---|---|---|
| Device does not power on. | Low battery. | Charge the device fully. |
| No image on screen. | Camera probe not connected properly. | Ensure the camera probe is securely connected and the metal ring is tightened. |
| Image is blurry or dark. | Insufficient lighting; dirty camera lens. | Adjust LED brightness; clean the camera lens. |
| Device freezes or is unresponsive. | Software glitch. | Press and hold the power button for 10-15 seconds to force a restart. |
8. Specifications
| Property | Value |
|---|---|
| Model | InsKam113 |
| Screen Size | 4.3-inch LCD Color Screen |
| Camera Diameter | 8mm |
| Cable Length | 10 meters |
| Video Capture Resolution | 1080P |
| LED Lights | 6 adjustable LEDs |
| Water Resistance Level | IP67 (camera probe) |
| Battery Capacity | 2600mAh Lithium Battery |
| Charging Time | Approx. 3.5 hours |
| Usage Time | Approx. 3.5 hours |
| Connectivity Technology | USB |
| Product Dimensions | 6.69 x 4.41 x 1.38 inches (monitor unit) |
| Item Weight | 2.24 pounds |
9. Warranty and Support
Walfront products are designed for reliability and performance. For warranty information, technical support, or service inquiries, please refer to the contact details provided on the product packaging or visit the official Walfront website. Please retain your purchase receipt for warranty claims.
