
Introduction
This manual provides essential instructions for the proper installation, operation, and maintenance of your Waterway 550-4260 Clamp with Spring Assembly. This genuine Waterway replacement part is designed for use with Crystal Water DE and cartridge filters, ensuring the efficiency and safety of your pool filtration system. Please read this manual thoroughly before proceeding with installation or use.
Safety Information
- Always disconnect power to the pump and filter system before performing any service or maintenance.
- Relieve all pressure from the filter system before opening the clamp. Failure to do so can result in serious injury or property damage.
- Ensure the clamp is correctly seated and tightened according to instructions to prevent leaks and system failure.
- Use only genuine Waterway replacement parts to maintain product integrity and safety.
- Keep children and pets away from pool equipment during installation and operation.
Product Overview
The Waterway 550-4260 Clamp with Spring Assembly is a critical component for securing the two halves of your pool filter tank. It consists of a durable clamp band and a spring-loaded bolt assembly designed for secure and consistent sealing.
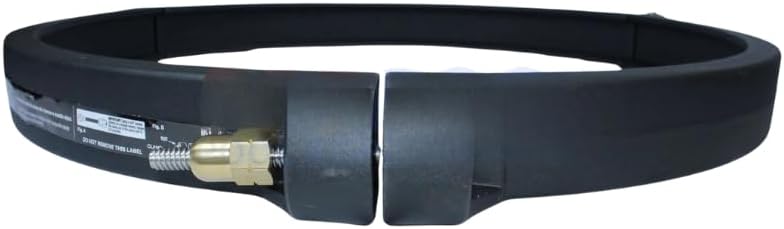
Image 1: Top view of the Waterway 550-4260 Clamp with Spring Assembly. This image shows the full circular clamp band, with the spring-loaded bolt assembly visible at the bottom center, connecting the two ends of the clamp.

Image 2: Angled view of the Waterway 550-4260 Clamp with Spring Assembly. This perspective highlights the robust construction of the clamp and provides a clearer view of the spring mechanism and tightening bolt.
Setup and Installation
- Prepare the Filter Tank: Ensure the filter tank halves are clean and free of debris. Inspect the tank O-ring for any damage or wear. Replace if necessary.
- Position the O-ring: Carefully place the O-ring into the groove on the lower half of the filter tank.
- Assemble Tank Halves: Align the upper half of the filter tank with the lower half, ensuring the O-ring is properly seated between them.
- Position the Clamp: Place the Waterway 550-4260 Clamp around the assembled filter tank halves. Ensure the clamp is centered over the seam where the two tank halves meet.
- Engage the Clamp Ends: Bring the two ends of the clamp together. The spring assembly should align with the bolt and nut.
- Tighten the Clamp: Hand-tighten the nut on the spring assembly until the clamp is snug. Then, using an appropriate wrench, tighten the nut evenly. Do not overtighten. The spring assembly is designed to provide consistent pressure. Tighten until the spring is compressed, but not fully flattened. Refer to your filter's specific manual for exact torque specifications if available.
- Verify Seating: Gently tap around the clamp with a rubber mallet to help it seat properly. Re-tighten the nut slightly if needed after tapping.
- Check for Leaks: After installation, turn on the pump and check for any leaks around the clamp. If leaks occur, relieve pressure, re-adjust the clamp, and re-tighten.
Operating
The Waterway 550-4260 Clamp is designed for secure operation once properly installed. Its primary function is to maintain a watertight seal between the filter tank halves. No specific operational steps are required for the clamp itself beyond ensuring it remains securely fastened.
- Regular Inspection: Periodically inspect the clamp for any signs of corrosion, cracks, or deformation.
- Pressure Monitoring: Always monitor your filter's pressure gauge. If the pressure rises significantly, it may indicate a need for backwashing or cleaning, but also ensure the clamp remains secure.
- Opening the Filter: When opening the filter for maintenance (e.g., backwashing DE filters or cleaning cartridge filters), always follow the safety instructions to relieve pressure before loosening the clamp.
Maintenance
- Visual Inspection: Regularly inspect the clamp for any visible damage, such as cracks, bends, or excessive corrosion. Pay close attention to the bolt and spring assembly.
- Cleanliness: Keep the clamp and the area around the filter tank seam clean from dirt, debris, and chemical residue.
- Lubrication: The bolt and nut assembly may benefit from occasional lubrication with a silicone-based lubricant suitable for pool equipment to ensure smooth operation and prevent seizing.
- Replacement: If the clamp shows signs of significant wear, damage, or if it can no longer maintain a secure seal, it must be replaced immediately with a genuine Waterway 550-4260 Clamp with Spring Assembly. Do not attempt to repair a damaged clamp.
Troubleshooting
| Problem | Possible Cause | Solution |
|---|---|---|
| Water Leak at Clamp Seam |
|
|
| Difficulty Tightening Clamp |
|
|
| Clamp Appears Loose After Operation |
|
|
Specifications
- Model: Waterway 550-4260 Clamp with Spring Assembly
- Compatibility: Designed for Waterway Crystal Water DE and cartridge filters
- Item Weight: 9.63 pounds
- Package Dimensions: 26 x 16.5 x 16.5 inches
- Part Number: 550-4260 (also referred to as 550-4780B in some contexts)
Warranty and Support
For specific warranty information regarding your Waterway 550-4260 Clamp with Spring Assembly, please refer to the documentation provided with your original filter system or contact Waterway Plastics directly. For technical support or further assistance, please visit the official Waterway Plastics website or contact their customer service department.
Waterway Plastics Official Website: www.waterwayplastics.com