
Hikvision DS 7600NI Q2
Contents
Hikvision DS-7600NI-Q2/P Series NVR User Manual
Model: DS 7600NI Q2
1. Introduction
This manual provides comprehensive instructions for the installation, operation, and maintenance of the Hikvision DS-7600NI-Q2/P Series Network Video Recorder (NVR). This NVR is designed for professional surveillance applications, offering advanced video compression, high-definition output, and smart functions for efficient security management.
Please read this manual thoroughly before using the product and retain it for future reference.
2. Safety Information
To ensure proper operation and prevent damage, observe the following safety precautions:
- Power Supply: Use only the power adapter specified for this device. Ensure the power voltage is stable and meets the NVR's requirements.
- Ventilation: Do not block any ventilation openings. Ensure adequate airflow around the NVR to prevent overheating.
- Environment: Avoid exposing the NVR to extreme temperatures, humidity, dust, or corrosive liquids. Do not place heavy objects on top of the NVR.
- Installation: Install the NVR on a stable, level surface. Avoid placing it in direct sunlight or near heat sources.
- Servicing: Do not attempt to disassemble or repair the NVR yourself. Refer all servicing to qualified personnel.
3. Package Contents
Verify that all items are included in your package. If any items are missing or damaged, contact your supplier immediately.
- Hikvision DS-7600NI-Q2/P Series NVR Unit
- Power Adapter
- USB Mouse
- SATA Cables (for HDD connection)
- Screws for HDD Installation
- Quick Start Guide
4. Product Overview
The Hikvision DS-7600NI-Q2/P NVR is a robust network video recorder designed for high-performance surveillance systems. It supports advanced video compression technologies like H.265+ to maximize storage efficiency and offers multiple video output options for versatile display configurations.
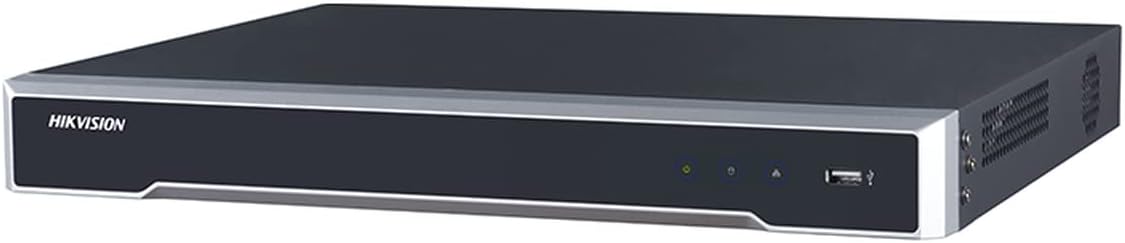
Figure 4.1: Front Panel of the DS-7600NI-Q2/P NVR. This image displays the sleek, dark grey casing of the NVR with a silver trim. The front panel features the 'HIKVISION' logo on the left, followed by three small indicator lights (likely for power, HDD activity, and network status), and a USB port on the right side.
4.1 Front Panel
- Power Indicator: Indicates the power status of the NVR.
- HDD Indicator: Shows hard disk drive activity.
- Network Indicator: Displays network connection status.
- USB Port: For connecting a USB mouse, USB flash drive for backup, or other USB devices.
4.2 Rear Panel
The rear panel typically includes various ports for connectivity:
- Power Input: Connects to the power adapter.
- HDMI Output: For connecting to a monitor or display with up to 4K resolution.
- VGA Output: For connecting to a monitor or display.
- Audio In/Out: For audio input from a microphone and audio output to speakers.
- LAN Port: Gigabit Ethernet port for network connection.
- USB Ports: Additional USB ports for peripherals.
5. Setup
5.1 Hardware Installation
- Install Hard Disk Drive (HDD):
- Unscrew and remove the top cover of the NVR.
- Connect the SATA power and data cables to the HDD.
- Secure the HDD to the NVR chassis using the provided screws.
- Replace the top cover and secure it with screws.
- Connect Peripherals:
- Connect a monitor to the HDMI or VGA output port.
- Connect the included USB mouse to a USB port.
- Connect an Ethernet cable from the NVR's LAN port to your network router/switch.
- Power On: Connect the power adapter to the NVR's power input and then plug it into a power outlet. The NVR will power on automatically.
5.2 Initial Configuration and Network Setup
- First-Time Setup Wizard: Upon first boot, the NVR will guide you through a setup wizard. Follow the on-screen prompts to set up basic parameters such as language, date/time, and administrator password.
- HDD Initialization: The NVR will prompt you to initialize the newly installed HDD. Follow the instructions to format the drive for recording.
- Network Settings:
- Navigate to Configuration > Network > TCP/IP.
- Set the IP address to DHCP (recommended for most home/small business networks) or assign a static IP address.
- Ensure the NVR is connected to the same network as your IP cameras.
- Add IP Cameras:
- Go to Configuration > IP Camera.
- The NVR can automatically discover Hikvision cameras on the local network. Click 'Add' to add discovered cameras.
- For cameras not automatically discovered or from other brands, you may need to manually add them by entering their IP address, protocol, and credentials.
6. Operating Instructions
6.1 Live View
After adding cameras, you can view live feeds. Double-click a camera window to view it in full screen. Use the toolbar at the bottom of the live view screen for functions like instant playback, manual recording, and PTZ control.
6.2 Recording Configuration
Configure recording schedules and modes for each camera:
- Navigate to Configuration > Storage > Schedule Settings.
- Select the camera and set the recording type (continuous, motion detection, alarm, etc.) and schedule.
- Ensure the HDD is initialized and has sufficient space.
6.3 Playback
To review recorded footage:
- Go to Playback from the main menu.
- Select the camera(s) and the date/time range.
- Use the timeline to navigate through recordings. The NVR supports smart search/smart playback to improve efficiency.
6.4 Smart Functions (VCA)
The NVR supports various Video Content Analytics (VCA) events, which can be configured for specific cameras:
- Motion Detection: Triggers recording or alerts when motion is detected in a specified area.
- Line Crossing Detection: Triggers when an object crosses a predefined virtual line.
- Intrusion Detection: Triggers when an object enters or exits a predefined virtual region.
- Heat Map: Visualizes areas of high activity.
- ANPR (Automatic Number Plate Recognition): Identifies vehicle license plates (requires compatible cameras).
- People Counting: Counts people entering or exiting an area (requires compatible cameras).
Configure these functions via Configuration > VCA or Configuration > Event menus, depending on the specific feature.
6.5 Remote Access (Hik-Connect / DDNS)
For remote viewing and management:
- Hik-Connect: Enable Hik-Connect service on the NVR (Configuration > Network > Advanced Settings > Platform Access). Download the Hik-Connect app on your mobile device and add the NVR by scanning its QR code or entering its serial number.
- DDNS (Dynamic Domain Name System): If you prefer not to use Hik-Connect, configure DDNS settings to access your NVR via a domain name, especially if your internet service provider assigns dynamic IP addresses.
7. Maintenance
- Regular Cleaning: Keep the NVR clean and free of dust. Use a soft, dry cloth for cleaning. Do not use liquid cleaners.
- Firmware Updates: Periodically check the Hikvision official website for firmware updates. Updating firmware can improve performance, add new features, and fix bugs. Follow the update instructions carefully to avoid damaging the device.
- HDD Health Check: Regularly check the health status of your hard drives via the NVR's menu (Configuration > Storage > HDD). Replace failing HDDs promptly to prevent data loss.
- Data Backup: Regularly back up important video footage to an external USB drive or network storage.
- Password Management: Change administrator passwords periodically and use strong, unique passwords.
8. Troubleshooting
| Problem | Possible Cause | Solution |
|---|---|---|
| No video output on monitor. | Loose HDMI/VGA cable, incorrect resolution, monitor off. | Check cable connections. Ensure monitor is on and set to correct input. Try a different resolution setting on the NVR if possible. |
| Cannot find IP cameras. | Network issue, camera not powered, incorrect IP address range. | Verify network cable connection. Ensure cameras are powered on. Check if NVR and cameras are on the same subnet. Use SADP tool to find and activate Hikvision cameras. |
| No recording. | HDD not initialized, recording schedule not set, HDD full, camera disconnected. | Initialize HDD. Configure recording schedule. Check HDD status and free space. Ensure cameras are connected and streaming. |
| Remote access not working. | Network configuration error, Hik-Connect/DDNS not enabled, firewall blocking. | Verify NVR network settings. Ensure Hik-Connect/DDNS is enabled and online. Check router firewall settings and port forwarding if applicable. |
For more detailed troubleshooting, refer to the comprehensive user manual available on the Hikvision official website or contact technical support.
9. Specifications
| Feature | Description |
|---|---|
| Model | DS 7600NI Q2 |
| Video Compression | H.265+, H.265, H.264+, H.264, MPEG-4 |
| Video Output | 1 x HDMI (up to 4K), 1 x VGA |
| Audio Input/Output | 1 x Audio In, 1 x Audio Out |
| SATA Interfaces | 2 x SATA (up to 8TB capacity per HDD) |
| Network Interface | 1 x 10/100/1000 Mbps self-adaptive Ethernet |
| USB Interface | Multiple USB ports (front and rear) |
| Dimensions (W x D x H) | 12.4 x 15.2 x 2 inches |
| Weight | 9.35 pounds |
| Channels | 16 Channels |
10. Warranty and Support
Hikvision products typically come with a limited warranty. Please refer to the warranty card included with your product or visit the official Hikvision website for detailed warranty terms and conditions specific to your region.
For technical support, product registration, or further inquiries, please visit the official Hikvision support portal or contact their customer service. Keep your product model number (DS 7600NI Q2) and serial number ready when seeking support.
Official Website: www.hikvision.com
Ask a question about this manual
Ask about setup, troubleshooting, compatibility, parts, safety, or missing instructions. Manuals+ will review the question and use this page’s manual context to help answer it.