1. Introduction
Thank you for choosing the Philips Avent Anti-colic Bottle with AirFree Vent. This bottle is designed to help reduce colic, gas, and reflux by keeping air away from your baby's tummy. Its unique AirFree vent ensures that the nipple stays full of milk, not air, even when held horizontally. This manual provides essential information for the safe and effective use of your new baby bottle.

Figure 1.1: Philips Avent Anti-colic Bottles with AirFree Vent.
2. Safety Information
- Always use this product under adult supervision.
- Never use feeding nipples as a soother.
- Continuous and prolonged sucking of fluids will cause tooth decay.
- Always check food temperature before feeding.
- Keep all components not in use out of the reach of children.
- Before first use, clean the product.
- Inspect before each use and pull the feeding nipple in all directions. Discard at the first signs of damage or weakness.
- Do not store a feeding nipple in direct sunlight or heat, or leave in disinfectant ("sterilizing solution") for longer than recommended, as this may weaken the nipple.
- Do not allow children to play with small parts or walk/run with the bottle.
- This bottle is BPA-free.
3. Components
The Philips Avent Anti-colic Bottle with AirFree Vent consists of the following parts:
- Bottle body (9oz / 260ml capacity)
- Nipple (slow flow, 1m+ recommended for this model)
- Screw ring
- Cap
- AirFree vent
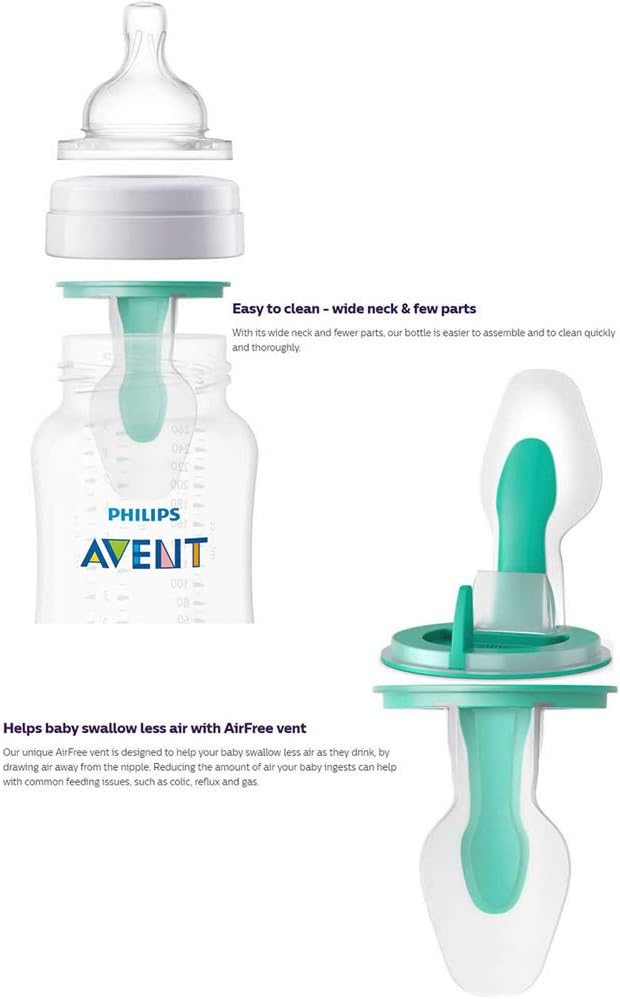
Figure 3.1: Exploded view of the Philips Avent Anti-colic Bottle components.

Figure 3.2: Nipple design for secure latch and appropriate flow.
4. Setup and Assembly
Before first use, disassemble all parts and clean them thoroughly as described in the "Cleaning and Maintenance" section.
4.1 Assembling the Bottle with AirFree Vent
- Insert the AirFree vent into the bottle body. Ensure the vent is securely seated.
- Place the nipple into the screw ring. Pull the nipple through until it is firmly seated.
- Screw the assembled nipple and screw ring onto the bottle body. Ensure it is tightened securely to prevent leaks.
- Place the cap over the nipple for hygiene and travel.
4.2 Assembling the Bottle Without AirFree Vent (Optional)
The Philips Avent Anti-colic bottle can also be used without the AirFree vent. Simply assemble the nipple and screw ring directly onto the bottle body.

Figure 4.1: Bottle assembly options: with or without the AirFree vent.
5. Operating Instructions
5.1 Filling the Bottle
- Prepare formula or breast milk according to instructions.
- Fill the bottle with the desired amount of liquid.
- Ensure the AirFree vent is properly inserted if you intend to use it.
- Securely attach the nipple and screw ring assembly.
5.2 Feeding Your Baby
- When feeding with the AirFree vent, position the bottle so the AirFree vent is pointing upwards. This ensures the nipple stays full of milk and air is drawn away from the baby's tummy.
- The unique valve in the nipple flexes to allow air into the bottle, preventing vacuum build-up, and keeping air away from your baby's tummy.
- The nipple is designed to allow milk to flow only at your baby's natural feeding rhythm, reducing overeating, spit-up, burping, and gas.
- Always check the temperature of the milk before feeding by dropping a few drops on the inside of your wrist.

Figure 5.1: Proper feeding technique with the Philips Avent Anti-colic bottle.
6. Cleaning and Maintenance
Proper cleaning and sterilization are crucial for your baby's health. The Philips Avent Anti-colic bottle is designed with few parts and a wide neck for easy cleaning.
6.1 Cleaning Instructions
- Disassemble all parts of the bottle after each use.
- Wash all components in warm, soapy water. Use a bottle brush to thoroughly clean the inside of the bottle and nipple.
- Rinse all parts thoroughly with clean water.
- The bottle and its components are dishwasher safe (top rack only).
6.2 Sterilization
You can sterilize the bottle components using one of the following methods:
- Boiling: Place all disassembled parts in a pot of boiling water for 5 minutes. Ensure there is enough water to cover all parts and prevent them from touching the bottom of the pot.
- Steam Sterilizer: Use a Philips Avent steam sterilizer or another suitable steam sterilizer, following the manufacturer's instructions.
- Microwave Sterilizer: Use a microwave sterilizer, following the manufacturer's instructions.
- Cold Water Sterilization: Use a cold water sterilization solution, following the manufacturer's instructions.
After sterilization, allow parts to cool and dry. Store assembled or disassembled in a clean, dry container.

Figure 6.1: Easy cleaning and simple assembly for convenience.
7. Troubleshooting
| Problem | Possible Cause | Solution |
|---|---|---|
| Baby experiences colic/fussiness. | Air intake during feeding. | Ensure the AirFree vent is used and positioned upwards during feeding. Check nipple flow rate is appropriate for baby's age. |
| Milk leaks from the bottle. | Nipple or screw ring not properly secured; damaged parts. | Ensure screw ring is tightened securely. Check nipple and screw ring for tears or damage and replace if necessary. |
| Nipple collapses during feeding. | Vacuum build-up; nipple flow rate too slow. | Ensure the AirFree vent is correctly assembled and positioned upwards. Consider using a nipple with a faster flow rate if your baby is struggling to feed. |
8. Specifications
- Model Number: SCF405/34
- Capacity: 9 oz (260 ml)
- Color: Blue
- Material: BPA-Free
- Nipple Type: Vented, Slow Flow (1m+)
- Dishwasher Safe: Yes
- Microwave Safe: Yes (for warming, not for sterilizing unless using a microwave sterilizer)
- Product Dimensions: 7.01 x 20.8 x 16 cm; 281 grams (approx.)
9. Warranty and Support
For warranty information, product registration, or further support, please visit the official Philips Avent website or contact their customer service. Keep your purchase receipt as proof of purchase.
Website: www.philips.com/avent


