
Alinco DM-330FXE
Alinco DM-330 FXE Switching Power Supply
User Manual
1. Product Overview
The Alinco DM-330 FXE is a compact and efficient switching power supply designed to provide stable DC power for various electronic devices. It features an adjustable output voltage, two front-panel USB charging ports, and an analog meter for monitoring voltage or current. This power supply is protected against short circuits, thermal overload, and overcurrent.

Figure 1: Front view of the Alinco DM-330 FXE Switching Power Supply, showing the analog meter, control knobs, USB ports, and output terminals.
2. Safety Instructions
Please read and understand all safety instructions before operating this power supply to prevent injury or damage to the unit and connected equipment.
- Ventilation: Ensure adequate ventilation around the unit. Do not block the ventilation openings or place the unit in an enclosed space.
- Power Source: Connect the power supply only to an AC outlet with the specified voltage (220V AC).
- Moisture: Do not expose the unit to rain, moisture, or excessive humidity. Do not operate with wet hands.
- Overload: Do not exceed the maximum continuous or peak current ratings. Overloading can trigger protection circuits or damage the unit.
- Short Circuits: Avoid short circuits at the output terminals.
- Servicing: Do not attempt to open or service the unit yourself. Refer all servicing to qualified personnel.
- Placement: Place the unit on a stable, level surface away from direct sunlight, heat sources, and strong electromagnetic fields.
3. Product Features, Controls, and Indicators
Familiarize yourself with the various components of your DM-330 FXE power supply.
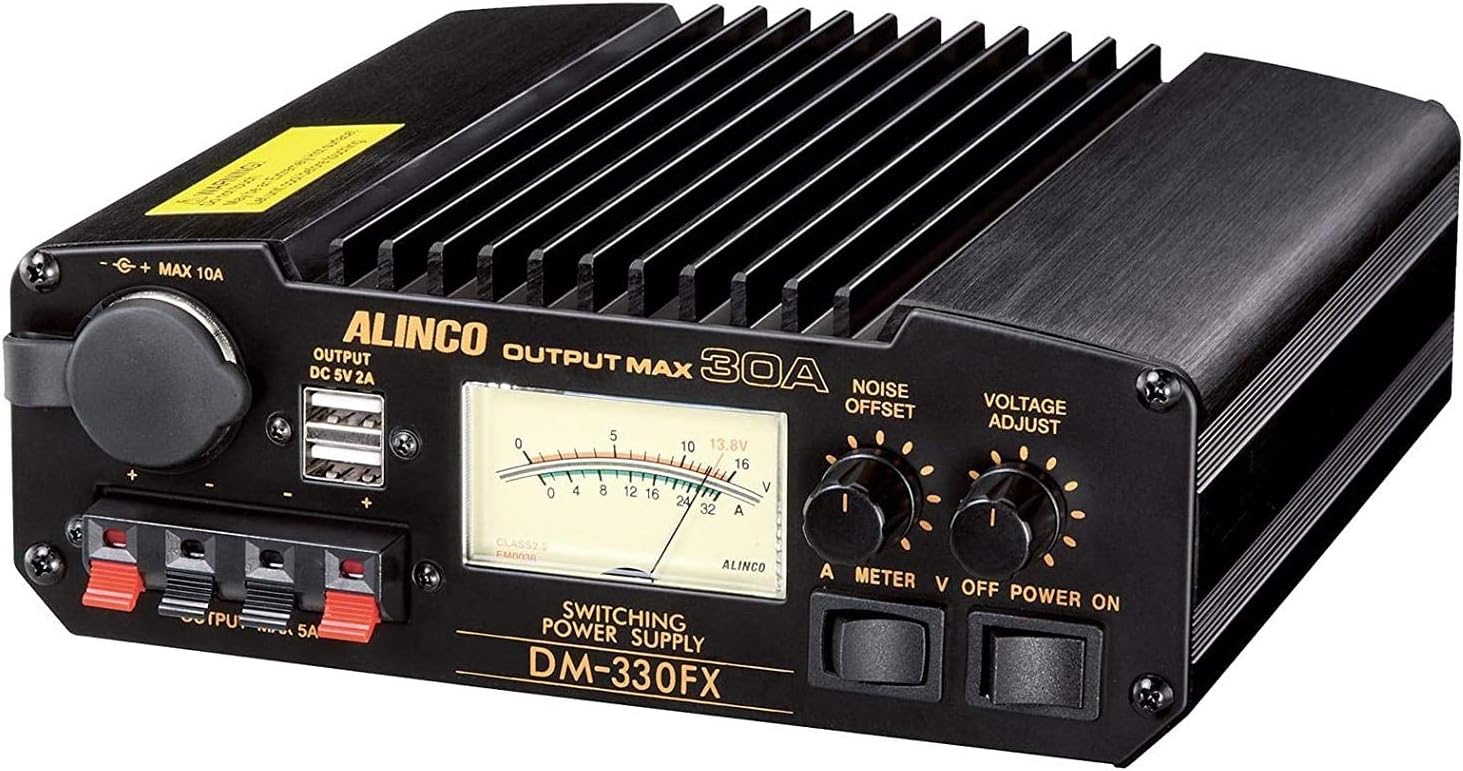
Figure 2: Angled view of the Alinco DM-330 FXE, highlighting its compact design and heat sink fins.
Front Panel:
- Analog Meter: Displays either output voltage (V) or output current (A), selectable via the A METER V switch.
- Voltage Adjust Knob: Used to set the DC output voltage between 9V and 15V.
- Noise Offset Knob: Adjusts the noise reduction circuit to minimize switching noise.
- Power Switch: Turns the unit ON or OFF.
- USB Output Ports (DC 5V 2A): Two USB ports for charging compatible devices.
- Cigarette Lighter Socket (Max 10A): A convenient front-panel socket for devices with a cigarette lighter plug.
- Output Terminals (Output Max 5A): Additional low-current output terminals.

Figure 3: Rear view of the Alinco DM-330 FXE, showing the AC input, cooling fan, and main DC output terminals.
Rear Panel:
- AC Input Socket: For connecting the supplied AC power cord.
- Fuse Holder (F8A 250V): Contains the main AC input fuse.
- GND Terminal: Grounding terminal.
- Cooling Fan: Automatically activates to dissipate heat during operation.
- Main DC Output Terminals (Output DC 9-15V Max 30A): Heavy-duty terminals for connecting high-current devices.
- Voltage Selector Switch (13.8V): Allows selection of a fixed 13.8V output or variable output.
4. Setup
- Unpacking: Carefully remove the power supply from its packaging. Retain the packaging for future transport or storage.
- Placement: Place the unit on a flat, stable surface. Ensure there is at least 10 cm (4 inches) of clear space around all sides, especially the rear fan and top heat sink, for proper ventilation. Do not place it near heat sources or in direct sunlight.
- AC Power Connection: Ensure the power supply's power switch is in the OFF position. Connect the supplied AC power cord to the AC input socket on the rear panel and then plug the other end into a suitable 220V AC wall outlet.
- DC Device Connection:
- For high-current devices, connect them to the main DC Output Terminals on the rear panel. Ensure correct polarity (+ to + and - to -).
- For lower-current devices (up to 5A), use the front Output Terminals.
- For devices with a cigarette lighter plug, use the front Cigarette Lighter Socket.
- For charging USB devices, use the front USB Output Ports.
5. Operating Instructions
- Powering On: After connecting your devices, switch the Power Switch on the front panel to the ON position. The analog meter will illuminate.
- Setting Output Voltage:
- If you require a fixed 13.8V output, ensure the Voltage Selector Switch on the rear panel is set to 13.8V. The Voltage Adjust knob on the front will then have no effect.
- For adjustable voltage, set the Voltage Selector Switch on the rear panel to the variable position. Then, use the Voltage Adjust knob on the front panel to set the desired output voltage between 9V and 15V. Monitor the voltage on the analog meter by setting the A METER V switch to 'V'.
- Monitoring Current: To monitor the current drawn by your connected device, set the A METER V switch to 'A'. The analog meter will then display the output current in Amperes.
- Using USB Ports: Simply plug your USB charging cable into one of the two USB Output Ports (DC 5V 2A) to charge compatible devices. These ports provide a fixed 5V output.
- Using Cigarette Lighter Socket: Insert the cigarette lighter plug of your device into the front socket. This socket supports up to 10A.
- Noise Offset Adjustment: If you experience switching noise, especially with sensitive radio equipment, slowly adjust the Noise Offset knob to minimize or eliminate the noise.
- Powering Off: When finished, switch the Power Switch to the OFF position. Disconnect devices if they are not needed.
6. Maintenance
- Cleaning: Periodically wipe the exterior of the unit with a soft, dry cloth. Do not use abrasive cleaners or solvents.
- Ventilation: Regularly check that the ventilation openings and the cooling fan are free from dust and debris. Use compressed air to clear any blockages if necessary.
- Fuse Replacement: If the unit does not power on, check the fuse located in the fuse holder on the rear panel. Replace it only with a fuse of the same type and rating (F8A 250V). Always disconnect the AC power cord before checking or replacing the fuse.
7. Troubleshooting
- No Power:
- Check if the AC power cord is securely plugged into both the unit and the wall outlet.
- Verify that the wall outlet has power.
- Check and replace the fuse if blown (refer to Maintenance section).
- No Output Voltage/Current:
- Ensure the Power Switch is ON.
- Check if the connected device is drawing excessive current, triggering the overcurrent protection. Disconnect the device and try again.
- Verify that the output terminals are correctly connected and not short-circuited.
- Unit Shuts Down:
- The unit may have overheated. Ensure proper ventilation and allow it to cool down.
- The connected device might be drawing too much current, activating the overcurrent protection. Reduce the load.
- Excessive Noise:
- Adjust the Noise Offset knob on the front panel.
- Ensure proper grounding of the power supply and connected equipment.
8. Specifications
| Input Voltage | 220V AC |
| Output Voltage | 9-15V DC (Adjustable) / 13.8V DC (Fixed) |
| USB Output Voltage | 5V DC |
| Continuous Current | 25A |
| Peak Current | 30A |
| Output Voltage Deviation | Less than 2% |
| Protection | Short circuit, Thermal, Overcurrent (Automatic current limiting above 30A) |
| Cooling Method | Fan |
| Front Cigarette Lighter Socket | Max 10A |
| Dimensions (W x H x D) | 190 x 69 x 181 mm |
| Weight | Approx. 2.5 kg |
9. Warranty and Support
Specific warranty terms and support contact information are not provided in the product data. For warranty claims or technical support, please refer to the documentation included with your purchase or contact Alinco customer service directly through their official website or your point of purchase.
Related documentsDM-330FXE


Ask a question about this manual
Ask about setup, troubleshooting, compatibility, parts, safety, or missing instructions. Manuals+ will review the question and use this page’s manual context to help answer it.