1. Introduction
This manual provides comprehensive instructions for the safe and effective operation of your MIFXIN Digital Mini 7-Egg Incubator. Please read this manual thoroughly before use to ensure proper setup, operation, and maintenance, which are crucial for successful egg hatching.
2. Safety Information
- Ensure the power supply is 110V AC.
- Always disconnect power before opening the incubator lid or performing any maintenance.
- Keep the incubator away from water sources to prevent electrical hazards.
- This appliance is not intended for use by persons with reduced physical, sensory, or mental capabilities unless supervised or instructed.
- Only use fertilized eggs for hatching.
3. Package Contents
Verify that all items are present in the package:
- 1 x MIFXIN Digital Mini 7-Egg Incubator (US Plug)
- 1 x User Manual (this document)
4. Product Overview
The MIFXIN Digital Mini 7-Egg Incubator is designed for hatching various poultry eggs. It features a digital temperature display, adjustable temperature control, and a transparent lid for observation.

Figure 1: MIFXIN Digital Mini 7-Egg Incubator and its retail packaging.

Figure 2: The incubator is suitable for hatching eggs from chickens, ducks, quail, parrots, and pigeons.

Figure 3: Top view of the incubator with the transparent lid, showing the seven egg slots.
5. Setup
- Placement: Place the incubator on a stable, level surface away from direct sunlight, drafts, and extreme temperature fluctuations.
- Power Connection: Plug the power cord into a standard 110V AC outlet. The red LED will illuminate, indicating the incubator is powered on and in working mode.
- Pre-heating: Allow the incubator to run for at least 20-30 minutes to stabilize the internal temperature before placing eggs inside.
- Water Addition: Add a small amount of water to the designated water channel at the bottom of the incubator to establish initial humidity. Refer to the "Maintenance" section for humidity control.
6. Operating Instructions
6.1. Temperature Setting
- With the incubator powered on, press the Set button. The blue light will illuminate, indicating entry into temperature setting mode.
- Use the + and - buttons to adjust the desired temperature. The LED display will flash blue if the temperature is below the set point, and the heating element will automatically activate.
- The incubator has an internal upper and lower limit function for temperature control. The recommended incubation temperature is 38°C ± 1°C.
- Once the desired temperature is set, the incubator will maintain it automatically.
6.2. Egg Placement and Turning
- Carefully place up to 7 fertilized eggs into the designated slots. Ensure the eggs are clean and free from cracks.
- This incubator requires manual egg turning. To ensure proper embryo development, turn the eggs at least 2-3 times per day. Gently rotate each egg approximately 180 degrees.
- The transparent lid allows for observation of the incubation process without interruption.
6.3. Humidity Control
Humidity is crucial for successful hatching. This incubator requires manual humidity control:
- Add water to the water channel at the bottom of the incubator every one to two days. The frequency depends on ambient humidity and the stage of incubation.
- Use a hygrometer (not included) to monitor humidity levels for optimal results, typically 50-60% for most of incubation and 65-75% during the last few days before hatching.
7. Maintenance
- Cleaning: After each hatching cycle, disconnect the power and allow the incubator to cool. Clean all surfaces with a mild disinfectant solution and a soft cloth. Ensure all parts are completely dry before storage or next use.
- Water Tray: Regularly clean the water channel to prevent mold or bacterial growth.
- Storage: Store the incubator in a clean, dry place when not in use.

Figure 4: Underside of the incubator, showing the heating element and water channel for humidity.
8. Troubleshooting
| Problem | Possible Cause | Solution |
|---|---|---|
| Incubator not powering on. | No power supply; loose connection. | Check power outlet and ensure the plug is securely connected. |
| Temperature not stable or incorrect. | Incorrect temperature setting; ambient temperature fluctuations; lid not properly closed. | Verify temperature setting. Ensure incubator is in a stable environment. Check that the lid is securely closed. |
| Low humidity. | Insufficient water in the channel; dry ambient conditions. | Add water to the water channel. Increase frequency of water addition if needed. |
| Poor hatching rate. | Unfertilized eggs; incorrect temperature/humidity; insufficient egg turning; poor egg quality. | Ensure eggs are fertilized. Verify temperature and humidity settings. Turn eggs regularly. Use fresh, high-quality eggs. |
9. Specifications
- Egg Capacity: 7 eggs
- Input Voltage: 110V AC
- Power: 15W
- Adjustable Temperature Range: 20-40°C
- Constant Temperature Precision: ±0.5°C
- Recommended Incubation Temperature: 38°C ± 1°C
- Material: ABS
- Dimensions (L x W x H): 17.5 x 17.5 x 16 cm (6.8 x 6.8 x 6.2 inches)
- Weight: 0.52 kg
- Certifications: CE/FCC/EMC approved
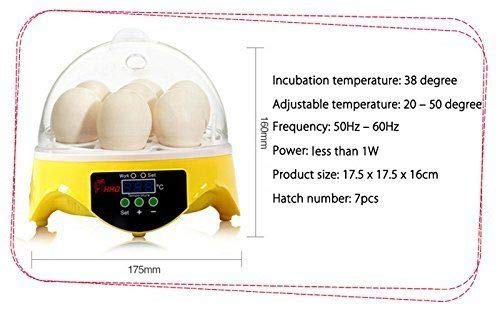
Figure 5: Product dimensions and key technical specifications.


