Introduction
This manual provides detailed instructions for the installation and maintenance of the BTNTVEN W10712395 W10350375 Dishwasher Rack Adjuster Kit. This kit is designed to replace worn or broken upper dishrack adjusters in compatible Kenmore, Whirlpool, and Kitchen Aid dishwashers, restoring proper rack function and stability.
Safety Information
Important Safety Instructions
- Always disconnect power to the dishwasher before beginning any repairs to prevent electrical shock.
- Wear appropriate personal protective equipment, such as gloves, to prevent injury from sharp edges or components.
- Handle tools carefully and ensure they are used correctly for each task.
- If you are unsure about any step or encounter difficulties, consult a qualified appliance technician.
Package Contents
What's Included
The kit includes the following components:
- (2) Adjuster Assemblies (left and right)
- (2) Adjuster Actuators (left and right)
- (2) Adjuster Covers
- (2) Adjuster Housings
- Instruction Sheet (physical copy)

Image: A complete set of dishwasher rack adjuster kit components, including metal adjuster assemblies, plastic actuators, covers, and housings, along with screws.
Compatibility
Compatible Dishwasher Models
This kit is a direct replacement for dishrack adjuster kits in various Kenmore, Whirlpool, and Kitchen Aid dishwashers.
Replaces part numbers: W10712395, W10350375, 3516330, AP5957560, EAP10065979, PS10065979, PD00007293.
Examples of compatible models include:
- Kenmore: 66512762K312, 66512763K312, 66512769K312, 66512772K312, 66512773K312, 66512774K312, 66512776K312, 66512779K312, 66512813K313, 66513202N410, 66513202N411, 66513203N410, 66513203N411, 66513204N410, 66513204N411
- Whirlpool: 7WDT950SAYM0, 7WDT950SAYM1, 7WDT950SAYM2, 7WDT950SAYM3, WDT780SAEM1, WDT780SAEM2, WDT790SLYB0, WDT790SLYM0, WDT790SLYM1, WDT790SLYM2, WDT790SLYM3, WDT790SLYW0, WDT790SLYW2

Image: A silver dishwasher with its door slightly ajar, illustrating common issues that this kit can resolve, such as leaking, door latch failure, or improper dish cleaning.
Installation Instructions
Step-by-Step Guide
This section provides a general guide. Refer to the included instruction sheet (Image PT07) for detailed diagrams and specific steps. A Torx screwdriver may be required for some fasteners.

Image: A scanned instruction sheet with diagrams and text in English and French, detailing the steps for installing the dishwasher rack adjuster kit components.
- Prepare the Dishwasher: Disconnect power to the dishwasher at the circuit breaker. Remove the upper dishrack from the dishwasher by pulling it out completely and lifting it off the rack stops.
- Remove Old Components: Carefully detach the old adjuster assemblies, actuators, covers, and housings from the dishrack. Observe how they are assembled for reference during reassembly. You may need to pry off plastic tabs or unscrew fasteners.
- Install New Adjuster Housings: Attach the new adjuster housings to the sides of the dishrack. Ensure they are securely fastened and aligned with the rack's structure.
- Assemble Adjuster Actuators: Connect the left and right adjuster actuators to their respective housings. These typically snap into place.
- Attach Adjuster Assemblies: Slide the new adjuster assemblies onto the vertical tines of the dishrack, ensuring they align correctly with the adjuster housings.
- Secure Adjuster Covers: Snap the adjuster covers into place over the assemblies and housings. Ensure all tabs are fully engaged for a secure fit.
- Verify Installation: Gently test all newly installed components to ensure they are firmly attached and the rack can move smoothly up and down without binding.
- Reinstall Rack: Place the upper dishrack back into the dishwasher, ensuring it sits correctly on the rack rails.
- Test Functionality: Reconnect power to the dishwasher. Test the rack's adjustment mechanism by raising and lowering it to ensure it locks securely at different heights.

Image: A person kneeling in front of an open dishwasher, installing the rack adjuster kit, with another person observing. Various kit components are visible in a tray nearby.
Operating the Dishwasher Rack
Adjusting the Rack Height
Once the new adjuster kit is installed, you can adjust the height of the upper dishrack. To do this, typically, you will locate the release tabs or levers on the sides of the adjuster assemblies. Press or squeeze these tabs, then gently raise or lower the rack to the desired position. Release the tabs to lock the rack securely in place. Ensure both sides are adjusted to the same height for proper rack function.
Maintenance
Care and Longevity
- Regularly inspect the adjuster components for any signs of wear, cracks, or damage.
- Keep the adjuster mechanism free from food debris, detergent residue, or other obstructions that could hinder its smooth movement.
- Avoid forcing the rack when adjusting its height; always use the designated release tabs or levers.
- Clean the components periodically with a soft cloth and mild detergent if necessary.

Image: Various plastic components of the dishwasher rack adjuster kit, highlighting their high-quality ABS material for long life, water resistance, and high temperature resistance.
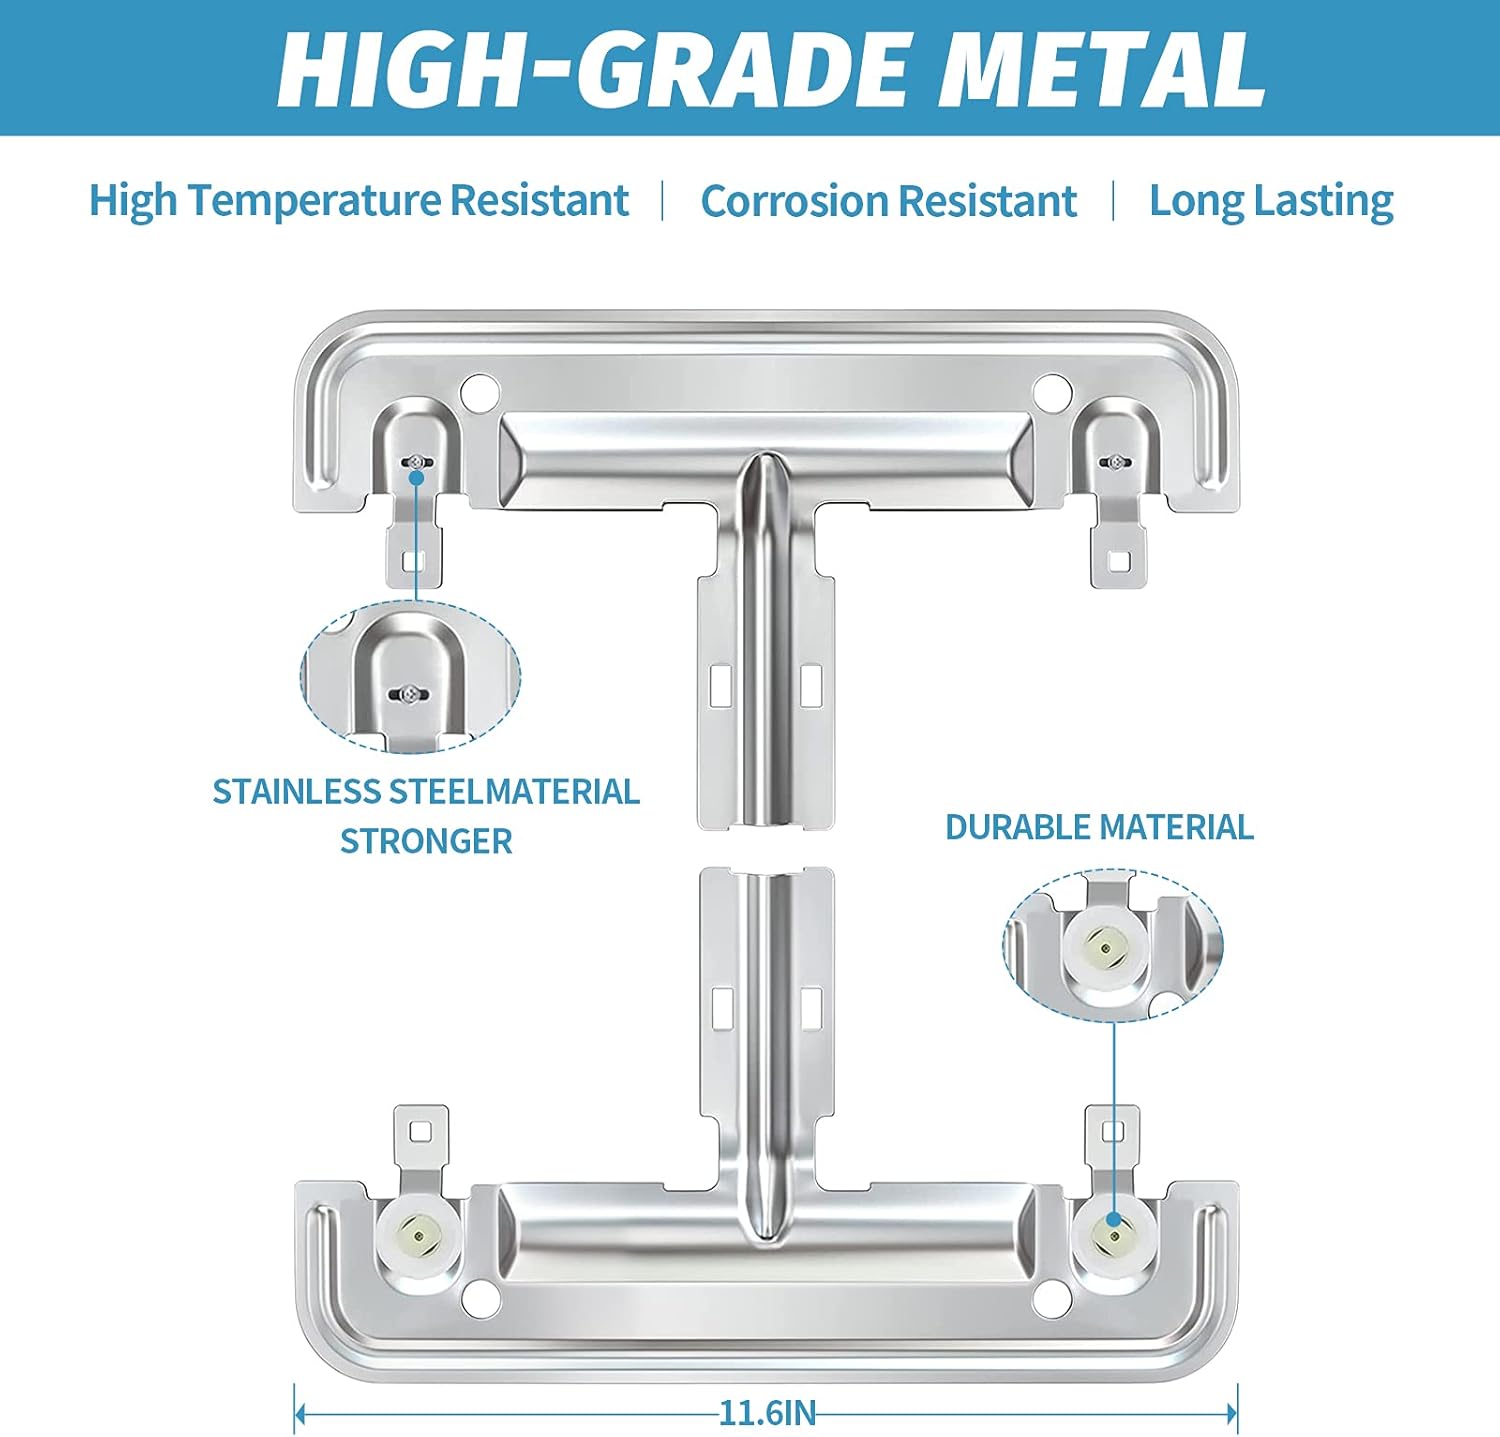
Image: A close-up of the metal adjuster assembly, emphasizing its high-grade metal construction for high temperature resistance, corrosion resistance, and long-lasting durability.
Troubleshooting
Common Issues and Solutions
- Rack not adjusting smoothly: Check for any obstructions or debris in the adjuster mechanism. Ensure all components are correctly aligned and installed according to the instructions. Lubrication is generally not required.
- Rack falling or not holding position: Verify that the adjuster covers are securely snapped into place and the actuators are engaging properly with the rack tines. Re-check the installation steps to ensure all parts are correctly seated.
- Parts feel loose after installation: Ensure all screws are tightened appropriately (if applicable) and all snap-fit components are fully engaged. Loose parts can lead to instability.
If issues persist after following these steps, please refer to the support information below for further assistance.
Specifications
Product Details
- Part Numbers: W10712395, W10350375, 3516330, AP5957560, EAP10065979, PS10065979, PD00007293
- Material: High-quality aluminum alloy (for metal components) and durable ABS plastics (for plastic components)
- Item Weight: Approximately 3.2 ounces (90.7 grams)
- Package Dimensions: Approximately 11.57 x 6.46 x 4.5 inches (29.4 x 16.4 x 11.4 cm)
- Included Components: (2) adjuster assemblies, left and right adjuster actuators, (2) adjuster covers, (2) adjuster housings, and instruction sheet.
Warranty and Support
Customer Assistance
The product is backed by a return or exchange policy within 3 months of purchase. Please retain your proof of purchase for warranty claims.
For troubleshooting assistance, questions regarding installation, or any other inquiries concerning your BTNTVEN Dishwasher Rack Adjuster Kit, please contact BTNTVEN customer support. Refer to the contact information provided with your purchase or visit the official BTNTVEN store on Amazon for more details.
