1. Introduction
This manual provides detailed instructions for the installation and maintenance of the ClimaTek 383EEL9001B Dryer Venting Kit Assembly. This kit is designed as a replacement part for LG dryers, enabling side venting configurations. Please read these instructions thoroughly before beginning installation to ensure proper and safe operation.
2. Safety Information
Always prioritize safety during installation and maintenance. Failure to follow these safety guidelines may result in property damage, personal injury, or death.
- Disconnect Power: Always disconnect the dryer from its power source before performing any installation or maintenance.
- Wear Protective Gear: Use gloves to protect hands from sharp edges of metal components. Safety glasses are recommended.
- Proper Ventilation: Ensure the work area is well-ventilated.
- Professional Assistance: If you are unsure about any step, consult a qualified technician.
- Fire Hazard: Ensure all vent connections are sealed properly to prevent lint accumulation and potential fire hazards.
3. Package Contents
Verify that all components listed below are present and undamaged before beginning installation.
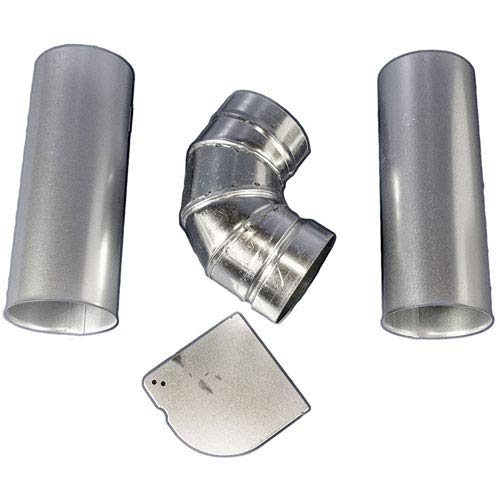
Image 1: Components of the ClimaTek 383EEL9001B Dryer Venting Kit. The kit includes two straight metal duct sections, one 90-degree metal elbow duct, and a flat metal cover plate designed to seal the original rear vent opening.
- Two (2) Straight Metal Duct Sections
- One (1) 90-Degree Metal Elbow Duct
- One (1) Metal Cover Plate
Note: Additional tools and materials such as foil tape, tin snips, and a screwdriver are typically required for installation and are not included in this kit.
4. Setup and Installation
This kit is designed to convert your LG dryer from rear venting to side venting. Ensure your dryer model is compatible with this kit (e.g., LG dryers that support side venting options).
Required Tools (Not Included):
- Screwdriver (Phillips and/or Flathead)
- Tin Snips or Metal Shears (for knockout removal)
- Foil Tape (HVAC approved)
- Gloves and Safety Glasses
- Optional: Rivet gun and rivets for added security
Installation Steps:
- Prepare the Dryer:
- Disconnect the dryer from its electrical power supply.
- If it's a gas dryer, turn off the gas supply and disconnect the gas line.
- Carefully pull the dryer away from the wall to access the rear and sides.
- Remove Rear Vent (if applicable):
- If your dryer is currently rear-vented, disconnect the existing flexible duct from the dryer's exhaust port.
- Punch Out Side Vent Knockout:
- Identify the desired side venting location on your dryer (left or right). Most dryers have a pre-scored knockout panel.
- Using tin snips or a screwdriver and hammer, carefully remove the metal knockout panel for the side vent opening. Be cautious of sharp edges.
- Assemble Venting Kit Components:
- Connect one straight metal duct section to the 90-degree elbow duct. Ensure a snug fit.
- Secure the connection using foil tape, wrapping it tightly around the joint to create an airtight seal. For added security, you may use small rivets.
- Attach the second straight metal duct section to the other end of the elbow, if needed, depending on your dryer's internal configuration and the desired vent length. Secure with foil tape.
- Install Assembly into Dryer:
- Insert the assembled ductwork through the newly created side vent opening from the inside of the dryer.
- Maneuver the elbow and straight duct until the elbow connects securely to the dryer's internal exhaust port.
- Ensure the external end of the straight duct protrudes sufficiently from the dryer's side panel to allow for connection to the external flexible vent hose. Some users report the provided duct may be slightly short, requiring careful positioning or an extension.
- Secure the internal connections with foil tape, ensuring all joints are airtight. This step can be challenging due to limited space; patience is required.
- Cover Unused Rear Vent Opening:
- Use the provided metal cover plate to seal the original rear vent opening.
- Secure the cover plate with screws or rivets, ensuring a tight seal to prevent lint leakage and maintain dryer efficiency.
- Connect to Wall Vent:
- Attach a flexible dryer vent hose (not included) to the protruding side vent duct.
- Connect the other end of the flexible hose to your home's wall vent.
- Secure both connections with clamps or foil tape to ensure an airtight and lint-free pathway.
- Final Checks:
- Ensure all connections are secure and airtight.
- Check for any kinks or obstructions in the flexible vent hose.
- Carefully push the dryer back into its position, ensuring the vent hose is not crushed or disconnected.
- Reconnect the power supply and gas line (if applicable).
5. Operation
The ClimaTek 383EEL9001B Dryer Venting Kit Assembly is a passive component designed to redirect the dryer's exhaust. Once properly installed, it operates automatically with your dryer. Ensure the external vent path remains clear and unobstructed for optimal dryer performance and safety.
6. Maintenance
Regular maintenance of your dryer's venting system is crucial for efficiency and fire safety.
- Clean Lint Filter: Always clean the dryer's lint filter before or after every load.
- Inspect Venting System: Periodically inspect the entire venting system (internal kit, flexible hose, and external wall vent) for lint buildup, kinks, or damage.
- Clean Vent Duct: At least once a year, or more frequently with heavy use, thoroughly clean the entire dryer vent ductwork to remove accumulated lint. This may require disconnecting the flexible hose and using a specialized vent cleaning brush.
- Check Seals: Ensure all taped or riveted connections remain secure and airtight. Reapply foil tape if necessary.
7. Troubleshooting
If you encounter issues after installing the venting kit, consider the following common problems and solutions:
| Problem | Possible Cause | Solution |
|---|---|---|
| Kit components do not fit or align properly. | Incorrect model compatibility or improper orientation during assembly. | Double-check your dryer's model number against the kit's compatibility. Ensure components are oriented correctly before securing. |
| Duct does not extend far enough out of the dryer. | The provided straight duct may be slightly short for some dryer models or configurations. | Carefully adjust the internal position. If still too short, an additional short extension piece may be required (not included). |
| Difficulty sealing internal connections. | Limited access inside the dryer. | Use long-handled tools or consider temporarily disassembling parts of the dryer for better access, if comfortable and knowledgeable. Ensure foil tape is applied smoothly and tightly. |
| Dryer not drying effectively after installation. | Obstructed or kinked vent path, or lint buildup. | Inspect the entire vent system for blockages, kinks in the flexible hose, or loose connections. Clean the vent duct thoroughly. |
8. Specifications
- Model: 383EEL9001B
- Replaces Part Numbers: 3911EZ9131X, 1266802, 383EEL9001L
- Product Dimensions: Approximately 12 x 5 x 14 inches (assembled kit components)
- Weight: Approximately 3.05 Pounds
- Material: Galvanized Steel
- Compatibility: Designed for various LG dryer models supporting side venting.
9. Warranty and Support
For information regarding warranty coverage or technical support, please refer to the documentation provided with your original purchase or contact ClimaTek customer service directly. Keep your purchase receipt as proof of purchase.


