1. Introduction
This manual provides essential instructions for the safe and effective installation, operation, and maintenance of your TOP VACUUM PARTS replacement motor for the Proteam Super Coach Pro 10 Back Pack Vacuum Cleaner. Please read this manual thoroughly before attempting any installation or operation to ensure proper function and longevity of the motor.
2. Safety Information
- Disconnect Power: Always unplug the vacuum cleaner from the power source before attempting any installation, maintenance, or repair. Failure to do so can result in electric shock or serious injury.
- Qualified Personnel: Installation and replacement of the motor should only be performed by qualified technicians or individuals with experience in electrical and vacuum cleaner repair.
- Proper Tools: Use appropriate tools for disassembly and reassembly to prevent damage to the motor or vacuum cleaner components.
- Inspect Components: Before installation, inspect the new motor for any visible damage. Do not install a damaged motor.
- Electrical Connections: Ensure all electrical connections are secure and correctly matched according to the original wiring configuration.
- Ventilation: Ensure the vacuum cleaner's ventilation system is clear and unobstructed after motor installation to prevent overheating.
3. Package Contents
Your package should contain the following item:
- 1 x TOP VACUUM PARTS Replacement Motor (Part # 836099)
If any components are missing or damaged, please contact your supplier immediately.
4. Setup and Installation
This section outlines the general steps for replacing the motor in a Proteam Super Coach Pro 10 Back Pack Vacuum Cleaner. Specific disassembly and reassembly procedures may vary slightly depending on the exact model and year of your vacuum. Refer to your vacuum cleaner's original service manual for detailed instructions if available.
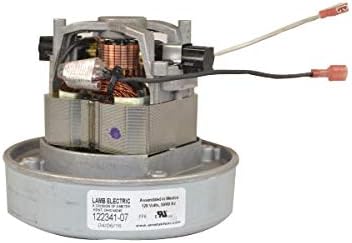
Image 1: The TOP VACUUM PARTS replacement motor (Part # 836099) for the Proteam Super Coach Pro 10 Back Pack Vacuum Cleaner. This image displays the motor unit with its electrical connections, ready for installation.
- Prepare the Vacuum:
- Ensure the vacuum cleaner is unplugged from the power outlet.
- Remove any dust bags, filters, and external attachments.
- Place the vacuum on a clean, stable work surface.
- Access the Motor Compartment:
- Carefully disassemble the vacuum cleaner casing to gain access to the existing motor. This typically involves removing screws and clips. Note the position of all components and fasteners for reassembly.
- Disconnect the Old Motor:
- Disconnect the electrical wires from the old motor. Pay close attention to the wiring configuration (e.g., color coding, terminal types) to ensure correct re-connection.
- Remove any mounting hardware (screws, brackets) securing the old motor in place.
- Carefully lift out the old motor.
- Install the New Motor:
- Place the new TOP VACUUM PARTS motor (Part # 836099) into the motor compartment, ensuring it sits correctly in its housing.
- Secure the new motor using the original mounting hardware. Do not overtighten.
- Connect the electrical wires to the new motor, matching the configuration noted during disconnection. Ensure all connections are firm and insulated.
- Reassemble the Vacuum:
- Carefully reassemble the vacuum cleaner casing, ensuring all components are correctly seated and all screws and clips are replaced.
- Replace dust bags, filters, and any other internal components.
- Initial Test:
- Before full operation, plug the vacuum cleaner into a power outlet and perform a brief test to ensure the motor starts and runs smoothly. Listen for unusual noises.
- If any issues arise, immediately unplug the vacuum and re-check all connections and installation steps.
5. Operating Instructions
Once the replacement motor is correctly installed, the Proteam Super Coach Pro 10 Back Pack Vacuum Cleaner will operate as designed. Refer to your vacuum cleaner's original user manual for specific operating instructions, including power settings, attachment usage, and general cleaning procedures.
The motor is designed for continuous duty within the vacuum cleaner's specified operating parameters. Avoid operating the vacuum with clogged filters or full dust bags, as this can strain the motor and reduce its lifespan.
6. Maintenance
Proper maintenance of your vacuum cleaner will ensure the longevity of the replacement motor.
- Filter Replacement: Regularly check and replace or clean the vacuum's filters (e.g., foam filter, HEPA filter if applicable) as recommended by the vacuum cleaner manufacturer. Clogged filters restrict airflow and can cause the motor to overheat.
- Dust Bag/Canister Emptying: Empty the dust bag or canister before it becomes completely full to maintain optimal airflow and prevent motor strain.
- External Cleaning: Keep the exterior of the vacuum cleaner, especially the motor ventilation areas, free from dust and debris to ensure proper cooling.
- Professional Inspection: If you notice any unusual noises, smells, or a decrease in performance, have the vacuum cleaner inspected by a qualified technician.
7. Troubleshooting
If you encounter issues after installing the new motor, consider the following common troubleshooting steps:
- Motor Does Not Start:
- Check if the vacuum cleaner is properly plugged into a working power outlet.
- Verify that the power switch is in the "ON" position.
- Inspect all electrical connections to the motor for looseness or incorrect wiring.
- Check the vacuum cleaner's circuit breaker or fuse.
- Motor Runs Weakly or Overheats:
- Check if the dust bag is full or the canister needs emptying.
- Inspect all filters (foam, HEPA) for clogging and clean or replace them.
- Ensure there are no obstructions in the vacuum hose, attachments, or air intake vents.
- Verify that the motor compartment has adequate ventilation and is not blocked by debris.
- Unusual Noises from Motor:
- Immediately turn off and unplug the vacuum.
- Re-check the motor's mounting to ensure it is securely fastened and not vibrating against the casing.
- Ensure no foreign objects have entered the motor housing during reassembly.
- If the noise persists, professional inspection may be required.
If troubleshooting steps do not resolve the issue, contact customer support or a qualified service technician.
8. Specifications
| Brand | TOP VACUUM PARTS |
| Model Number | Pro 10 (Part # 836099) |
| Compatible With | Proteam Super Coach Pro 10 Back Pack Vacuum Cleaner |
| Special Feature | High Power |
| Filter Type (Vacuum) | Foam (refer to vacuum's original specifications) |
| UPC | 352360254211 |
| ASIN | B07MLX4JHT |
9. Warranty and Support
For specific warranty information regarding this TOP VACUUM PARTS replacement motor, please refer to the documentation provided at the time of purchase or contact your retailer. Keep your proof of purchase for warranty claims.
For technical support or further assistance, please contact TOP VACUUM PARTS customer service through your retailer or their official website.


