
Rybozen K201
Rybozen Wireless Microphone Karaoke Mixer System User Manual
Model: K201
Brand: Rybozen
1. Introduction
This user manual provides detailed instructions for the Rybozen Wireless Microphone Karaoke Mixer System (Model K201). Please read this manual thoroughly before using the product to ensure proper operation and to maximize your enjoyment of the system. This system is designed for home karaoke, DJ music, house parties, school events, and church gatherings, offering a versatile audio solution with wireless microphone capabilities.
2. What's in the Box

Image showing all components included in the package: two UHF handheld microphones, one UHF wireless receiver (mixer), a power cord, four AA batteries, a user manual, two foam covers, a 3.5mm to 3.5mm audio cable, and an RCA to 3.5mm audio cable.
Upon opening the package, verify that all components listed below are present and in good condition:
- 1 x Rybozen Wireless Karaoke Mixer
- 2 x UHF Wireless Handheld Microphones
- 1 x Power Adapter
- 4 x AA Batteries (for microphones)
- 1 x 3.5mm to 3.5mm Audio Cable
- 1 x RCA to 3.5mm Audio Cable
- 2 x Microphone Foam Covers
- 1 x User Manual
3. Product Overview
The Rybozen Wireless Microphone Karaoke Mixer System is designed for ease of use and high-quality audio output. It features a compact mixer unit and two wireless handheld microphones, providing flexibility for various audio setups.
3.1. Mixer Unit

Front view of the Rybozen mixer unit with its control knobs and input jacks, alongside two wireless microphones.

Close-up of the mixer's front panel, highlighting the two wired microphone input jacks and a smartphone screen indicating Bluetooth connection.
The mixer unit serves as the central hub for audio input and output. It features:
- Control Dials: Dedicated knobs for adjusting Music Volume, Wireless Microphone 1 Volume (W/MIC 1), Wireless Microphone 2 Volume (W/MIC 2), Echo effect, and Tone.
- Wired Microphone Inputs: Two 3.5mm jacks (MIC 1, MIC 2) for connecting additional wired microphones.
- Power Button: To turn the unit on/off.
- HDMI In/Out: For digital audio and video passthrough.
- AUX In/Out: 3.5mm audio jacks for analog audio connections.
- Bluetooth Connectivity: Allows wireless connection to smartphones, tablets, and other Bluetooth-enabled devices for music playback.
3.2. Wireless Microphones
The system includes two UHF wireless handheld microphones, providing freedom of movement up to 100 feet. Each microphone operates on a separate adjustable frequency to minimize interference. They are powered by AA batteries (included).
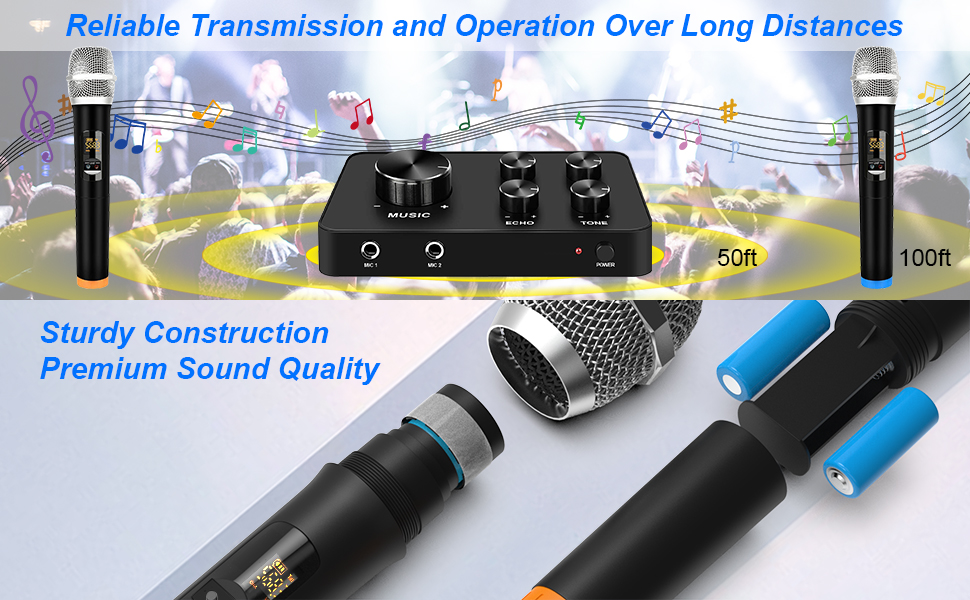
Illustration demonstrating the 100ft wireless operating range of the microphones with the mixer unit.
4. Setup Guide
Follow these steps to set up your Rybozen Wireless Microphone Karaoke Mixer System:
4.1. Initial Power Up
- Step 1: Power the Mixer. Connect the provided power adapter to the DC 5V input on the mixer unit and plug it into a power outlet. Press the Power button on the mixer to turn it on. The power indicator light will illuminate.

Image illustrating Step 1: Connecting the power cable to the mixer and pressing the power button.
- Step 2: Insert Batteries into Microphones. Open the battery compartment of each wireless microphone and insert two AA batteries, ensuring correct polarity.
4.2. Connecting to Multimedia Devices (Input)
The mixer supports various input sources. Choose the connection method that suits your device:
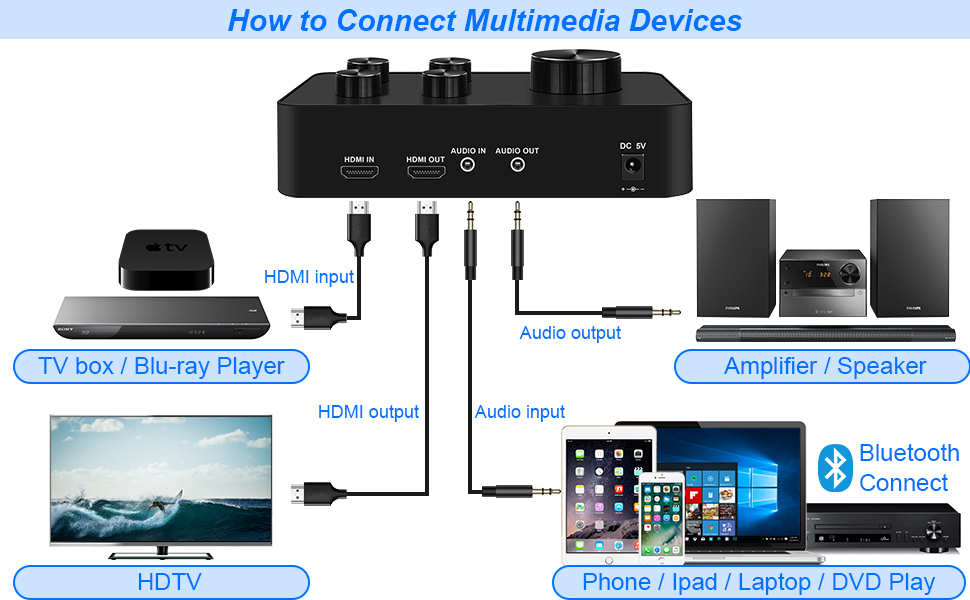
Comprehensive diagram illustrating how to connect various multimedia devices (computers, smartphones, laptops, DVD players) to the mixer's input ports (HDMI IN, AUDIO IN, Bluetooth).
- HDMI Input: For devices like Smart TVs, Blu-ray players, desktop computers, or laptops with HDMI output.
- Connect an HDMI cable from your source device's HDMI OUT to the mixer's HDMI IN port.
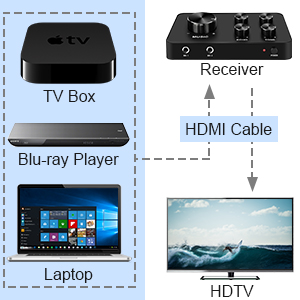
Diagram showing HDMI connection from source devices (TV Box, Blu-ray Player, Laptop) to the mixer, then to an HDTV.
- AUX Input (3.5mm): For devices with a 3.5mm audio output, such as smartphones, tablets, or PCs.
- Connect a 3.5mm to 3.5mm audio cable from your device's headphone jack or audio out to the mixer's AUDIO IN port.
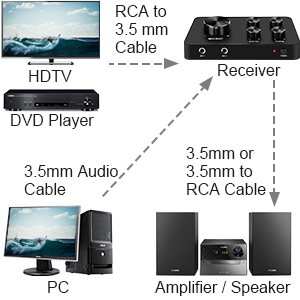
Diagram illustrating RCA to 3.5mm and 3.5mm audio cable connections from various devices to the mixer.
- Bluetooth Input: For wireless audio streaming from smartphones, tablets, or laptops.
- Ensure the mixer is powered on.
- On your device, enable Bluetooth and search for "K201" (or similar device name).
- Select "K201" to pair. Once connected, audio from your device will play through the mixer.
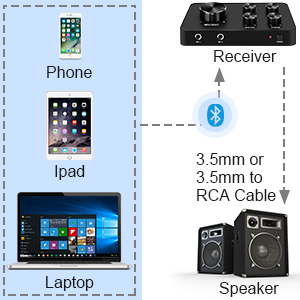
Diagram showing Bluetooth connection from mobile devices to the mixer, then to speakers.
4.3. Connecting to Output Devices (Speakers/Display)
Connect the mixer to your sound system or display for audio and video output:
- HDMI Output: For connecting to an HDTV or projector.
- Connect an HDMI cable from the mixer's HDMI OUT port to your HDTV or projector's HDMI IN port. This will pass through the video signal from your input device and send the mixed audio.
- AUX Output (3.5mm): For connecting to speakers, amplifiers, or home theater systems.
- Connect a 3.5mm to 3.5mm audio cable or a 3.5mm to RCA cable (depending on your speaker/amplifier input) from the mixer's AUDIO OUT port to your sound system's audio input.
Image illustrating Step 2: Connecting input devices via Bluetooth or cables, and Step 3: Connecting output devices like speakers or a TV.
5. Operating Instructions
Once all connections are made, you can begin using your Rybozen Karaoke Mixer System.
5.1. Adjusting Audio Levels
Use the control dials on the mixer unit to fine-tune your audio experience:
- MUSIC: Controls the volume of the background music from your input source. Turn clockwise to increase, counter-clockwise to decrease.
- W/MIC 1 & W/MIC 2: Control the individual volumes of the two wireless microphones. Adjust as needed for balanced vocals.
- ECHO: Adjusts the echo effect applied to the microphone vocals. Turn clockwise for more echo, counter-clockwise for less.
- TONE: Modifies the tonal quality of the microphone vocals (e.g., bass/treble). Experiment to find your preferred sound.
Image illustrating Step 4: Adjusting the various control knobs on the mixer for optimal sound.
5.2. Using Wired Microphones
If you wish to use additional wired microphones, plug them into the MIC 1 or MIC 2 3.5mm input jacks on the front of the mixer. The volume for these microphones will be controlled by the main microphone volume settings or the individual microphone volume settings if available on the mixer (note: the K201 mixer has separate controls for W/MIC 1 and W/MIC 2, but not for the wired inputs, implying they share a general mic volume or are mixed in).
5.3. Usage Scenarios

Collage showing diverse applications of the system, including party gatherings, karaoke sessions, singing practice, and general music listening.

The system can be used for public speaking or presentations.

Ideal for group karaoke sessions with friends and family.

Suitable for events such as weddings for announcements or speeches.
6. Maintenance
Proper maintenance ensures the longevity and optimal performance of your karaoke system.
- Cleaning: Use a soft, dry cloth to wipe down the mixer unit and microphones. Do not use liquid cleaners or abrasive materials, as they may damage the finish or internal components.
- Storage: When not in use for extended periods, store the system in a cool, dry place away from direct sunlight and extreme temperatures.
- Battery Care: Remove batteries from the microphones if they will not be used for a long time to prevent leakage and damage.
- Cable Management: Avoid sharp bends or kinks in cables to prevent internal wire damage.
7. Troubleshooting
If you encounter issues with your Rybozen Karaoke Mixer System, refer to the following common problems and solutions:
| Problem | Possible Cause | Solution |
|---|---|---|
| No sound from microphones. |
|
|
| No music sound. |
|
|
| Echo effect is too strong/weak. | Echo dial setting. | Adjust the ECHO dial on the mixer to your desired level. |
| Sound distortion or static. |
|
|
| Bluetooth connection issues. |
|
|
8. Specifications
| Feature | Detail |
|---|---|
| Model Number | K201 |
| Brand | Rybozen |
| Item Weight | 1.23 pounds |
| Product Dimensions | 6.65 x 4.76 x 2.2 inches |
| Wireless Type | UHF |
| Wireless Operating Range | Up to 100 feet (30 meters) |
| Microphone Power Source | 4 AA batteries required (2 per microphone) |
| Mixer Power Source | Corded Electric (5V DC) |
| Connectivity | HDMI In/Out, 3.5mm AUX In/Out, Bluetooth |
| Compatible Devices | TV, Blu-ray player, Desktop computer, Laptop, iPad, Tablets, Smartphone, PA system, DVD player, Home theater system, Receiver, Speaker |
| Recommended Uses | Karaoke, Speech |
9. Customer Support and Warranty
For any questions, technical assistance, or warranty inquiries regarding your Rybozen Wireless Microphone Karaoke Mixer System, please contact Rybozen customer support through the retailer's platform or the official Rybozen website. Please retain your proof of purchase for warranty claims.
While specific warranty details are not provided in this manual, standard consumer electronics warranties typically cover manufacturing defects for a limited period from the date of purchase. Protection plans may also be available for extended coverage.
Ask a question about this manual
Ask about setup, troubleshooting, compatibility, parts, safety, or missing instructions. Manuals+ will review the question and use this page’s manual context to help answer it.