
1. Important Safety Information
Read and understand all instructions before assembling and using this product. Failure to follow these instructions may result in serious injury or property damage.
- Adult Supervision Required: Children playing alone are dangerous. Always ensure children use the kayak under direct adult supervision and in water shallow enough for an adult to stand.
- Water Safety: Always wear a U.S. Coast Guard-approved personal flotation device (PFD). Do not use this product in rough waters, strong currents, or during storms.
- Capacity Limits: Do not exceed the maximum weight capacity of the kayak. Refer to the specifications section for details.
- Inspection: Before each use, inspect the kayak for any signs of damage, leaks, or wear. Ensure all valves are properly closed and sealed.
- Environmental Awareness: Be aware of your surroundings, including weather conditions, water depth, and potential hazards.
- Disclaimer: The manufacturer is not responsible for any malfunctions, damage, injuries, or accidents resulting from lending, selling, or transferring the product through rentals, auctions, or second-hand sales.
2. Product Overview and Components
The INTEX Excursion Pro Kayak 68309 is designed for durability and versatility, featuring a robust construction and adjustable components for an enhanced kayaking experience.
2.1 Key Features
- Super Tough Material: Constructed with PVC and polyester for strength, durability, lightness, and compactness. This material resists impact, friction, gasoline, oil, and seawater, and is UV-resistant.
- Adjustable Seating: Two movable and adjustable inflatable seats for comfort.
- Integrated Storage: Front storage area with an included dry bag.
- Fishing Rod Holders: Two integrated fishing rod holders.
- Accessory Mounts: Four vertical holders on the main body for mounting GPS, fish finders, or additional rod holders.
- Footrests: Integrated footrests for user comfort.
- Skegs: Movable skegs for navigating various water depths.
- Certified: Certified by the German Technical Inspection Association.
2.2 Included Components
- INTEX Excursion Pro Kayak (Main Body)
- Inflatable Seats (2)
- Footrests (Integrated)
- Skegs (2)
- Repair Patch Kit
- Dry Bag
- Carry Bag
- Double-action Hand Pump (Typically included, though not explicitly listed in feature bullets, it's mentioned in reviews for inflation)
- Paddles (Typically included, though not explicitly listed in feature bullets)
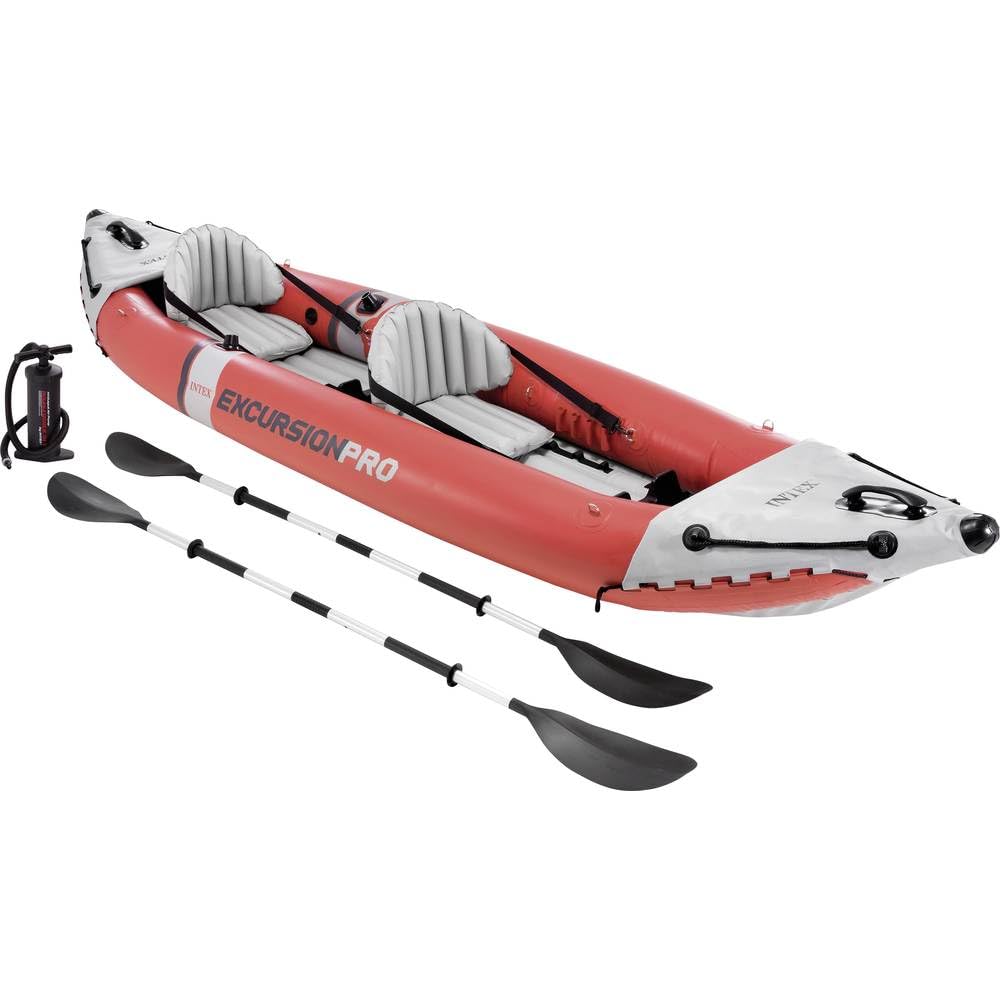
Image 1: The INTEX Excursion Pro Kayak 68309, showcasing its robust design and included accessories like paddles and seats.
3. Setup Instructions
Follow these steps to properly set up your INTEX Excursion Pro Kayak.
3.1 Unpacking and Preparation
- Unpack all components from the carry bag.
- Lay the kayak hull flat on a clean, smooth surface, free from sharp objects.
- Familiarize yourself with the inflation valves and chambers. The kayak typically has multiple air chambers for safety.
3.2 Inflation
- Locate the main inflation valves on the kayak.
- Using the included double-action hand pump, inflate each air chamber until it is firm to the touch but not over-inflated. Refer to the pressure indicators (if present) or the manual's specifications for recommended PSI.
- Ensure all valves are securely closed after inflation to prevent air leakage.
- Inflate the two inflatable seats and place them into the kayak. Adjust their position for comfort using the integrated attachment points.
3.3 Accessory Installation
- Skegs: Attach the skegs to the bottom of the kayak. These are designed to improve tracking in the water. One skeg is for deep water, and a shorter one for shallow water. Choose the appropriate skeg for your environment.
- Footrests: Position the integrated footrests to your preferred comfort level.
- Fishing Rod Holders: Insert fishing rods into the two designated holders.
- Accessory Mounts: Utilize the four vertical holders on the inside of the kayak to attach compatible accessories such as GPS devices, fish finders, or additional rod holders. These mounts are movable and adjustable.
- Dry Bag: Place your dry bag in the front storage area to secure personal items.
Note: If an official setup video were available from the seller, it would be embedded here with a maximum width of 420px and a detailed text description.
4. Operating Instructions
Once your kayak is set up, follow these guidelines for safe and effective operation.
4.1 Launching the Kayak
- Carry the inflated kayak to the water's edge.
- Carefully enter the kayak, ensuring even weight distribution.
- Push off from the shore using your paddle.
4.2 Paddling and Steering
- Use the provided paddles to propel the kayak through the water.
- The skegs assist in straight-line tracking. For tighter turns, you may temporarily lift a skeg or use more powerful strokes on one side.
- Adjust your seating and footrest positions as needed for optimal comfort and control.
4.3 Using Accessories
- Fishing Rod Holders: Secure your fishing rods in the holders when not actively fishing.
- Accessory Mounts: Ensure any electronic devices mounted on the vertical holders are waterproof or protected from water spray.
- Dry Bag: Keep valuables and electronics in the dry bag within the storage compartment to protect them from water.
Note: If an official operating video were available from the seller, it would be embedded here with a maximum width of 420px and a detailed text description.
5. Maintenance
Proper maintenance ensures the longevity and performance of your kayak.
5.1 Cleaning
- After each use, rinse the kayak thoroughly with fresh water to remove salt, sand, and dirt.
- Use mild soap and water for stubborn stains. Avoid harsh chemicals or abrasive cleaners.
- Ensure the kayak is completely dry before deflating and storing to prevent mold and mildew.
5.2 Storage
- Deflate the kayak by opening all valves.
- Fold the kayak neatly and place it back into the carry bag.
- Store the kayak in a cool, dry place, away from direct sunlight and extreme temperatures.
- Keep it away from rodents and sharp objects.
5.3 Repairs
- The kayak comes with a repair patch kit for minor punctures.
- To repair a puncture, clean and dry the affected area. Apply the patch according to the instructions provided with the kit.
- For larger damage or persistent leaks, contact INTEX customer support or a professional repair service.
6. Troubleshooting
This section addresses common issues you might encounter with your kayak.
6.1 Kayak Losing Air
- Check Valves: Ensure all inflation valves are securely closed and properly seated. A loose valve cap can cause slow air loss.
- Inspect for Punctures: Inflate the kayak and listen for hissing sounds. You can also apply soapy water to the surface; bubbles will indicate a leak. Use the included repair patch kit for small punctures.
- Temperature Changes: Air pressure can decrease in cooler temperatures. If the kayak was inflated in warm conditions and then moved to cooler water, it might appear to lose air. Re-inflate slightly if necessary.
6.2 Difficulty Tracking Straight
- Check Skegs: Ensure the skegs are properly installed and not damaged. The skegs are crucial for straight-line tracking.
- Even Inflation: Make sure all air chambers are evenly and adequately inflated. Uneven inflation can affect the kayak's balance and tracking.
- Weight Distribution: Distribute weight evenly within the kayak.
6.3 Seats Not Staying in Place
- Proper Inflation: Ensure the inflatable seats are fully inflated.
- Secure Attachment: Verify that the seats are correctly attached to the kayak's designated attachment points.
7. Specifications
Detailed specifications for the INTEX Excursion Pro Kayak 68309.
| Feature | Detail |
|---|---|
| Product Dimensions (L x W x H) | 384 cm x 94 cm x 46 cm (151.2 in x 37 in x 18.1 in) |
| Product Weight | Approximately 17.73 kg (39.09 lbs) |
| Material Composition | PVC (Polyvinyl Chloride Resin, non-phthalate plasticizer) - 88%, PP - 8%, ALUMINUM - 2%, POM - 1%, ABS - 1% |
| Color | Red |
| Model Number | 68309NP |
| GTIN (Global Trade Identification Number) | 06941057413242 |
| Country of Origin | China |
| Included Accessories | Repair Patch Kit, Dry Bag, Carry Bag, Inflatable Seats, Skegs |
8. Warranty and Support
For warranty information and customer support, please refer to the documentation included with your purchase or contact INTEX directly.
Important Note: The manufacturer's warranty may not cover issues arising from the product being rented, sold through auctions, or transferred to another party. Always retain your proof of purchase for warranty claims.
For further assistance, visit the official INTEX website or contact your retailer.


