1. Introduction
This manual provides detailed instructions for the safe and efficient operation of your auna RQ-132USB Portable Cassette Recorder. Please read this manual thoroughly before using the device and retain it for future reference. The auna RQ-132USB is a versatile device designed for playing and recording audio cassettes, featuring an integrated speaker, microphone input, headphone output, and a USB port for digital audio archiving and playback.
2. Safety Instructions
- Power Source: Use only the specified power adapter (DC 6V, 600mA) or 4 x 1.5V C batteries. Ensure the voltage matches the device requirements.
- Water and Moisture: Do not expose the device to rain, moisture, or immerse it in water. Avoid placing objects filled with liquids, such as vases, on or near the device.
- Heat Sources: Keep the device away from heat sources such as radiators, heat registers, stoves, or other apparatus (including amplifiers) that produce heat.
- Ventilation: Ensure proper ventilation. Do not block any ventilation openings.
- Cleaning: Unplug the device from the power outlet before cleaning. Use a dry, soft cloth for cleaning. Do not use liquid cleaners or aerosol cleaners.
- Servicing: Do not attempt to service this product yourself. Refer all servicing to qualified service personnel.
- Batteries: When using batteries, ensure correct polarity. Do not mix old and new batteries, or different types of batteries. Remove batteries if the device is not used for extended periods.
3. Product Overview
Familiarize yourself with the components and controls of your auna RQ-132USB cassette recorder.

Figure 3.1: Angled view of the auna RQ-132USB Portable Cassette Recorder, showcasing its compact design and main controls.

Figure 3.2: Top view of the device, highlighting the integrated speaker, cassette compartment, and control buttons.
3.1 Front and Top Panel Controls
- PLAY/REC Button: Initiates playback or recording.
- USB/REC Button: Activates USB recording or playback mode.
- Rewind Button: Rewinds the cassette tape.
- Fast Forward Button: Fast forwards the cassette tape.
- Stop/Eject Button: Stops playback/recording and ejects the cassette.
- Pause Button: Temporarily pauses playback or recording.
- Cassette Compartment: Area for inserting audio cassettes.
- Integrated Speaker: For audio output.
- Built-in Microphone: For voice recording.

Figure 3.3: The cassette compartment shown open, ready for tape insertion.
3.2 Rear Panel Connections

Figure 3.4: Rear view of the device, displaying the power input, headphone jack, microphone input, and volume control.
- DC 6V Input: For connecting the included power adapter.
- Headphone Output (3.5mm Jack): For connecting headphones.
- Microphone Input (3.5mm Jack): For connecting an external microphone.
- Volume Control: Rotary knob to adjust the audio output level.
- USB Port: For connecting a USB flash drive for recording or playback.

Figure 3.5: Close-up of the USB port with a USB flash drive connected.
4. Setup
4.1 Powering the Device
The auna RQ-132USB can be powered by either the included AC adapter or batteries.
4.1.1 AC Power
- Connect the small end of the AC adapter to the DC 6V input jack on the rear of the unit.
- Plug the other end of the AC adapter into a standard wall outlet.
4.1.2 Battery Power
- Open the battery compartment cover on the bottom of the unit.
- Insert 4 x 1.5V C-type batteries, ensuring correct polarity (+/-).
- Close the battery compartment cover securely.
4.2 Inserting a Cassette
- Press the Stop/Eject button to open the cassette compartment.
- Insert an audio cassette with the open tape edge facing upwards and the full reel on the left.
- Gently close the cassette compartment until it clicks into place.
5. Operating Instructions
5.1 Cassette Playback
- Insert a cassette as described in Section 4.2.
- Press the PLAY/REC button to begin playback.
- Adjust the volume using the Volume Control knob on the rear panel.
- To fast forward, press the Fast Forward button. To rewind, press the Rewind button.
- To pause playback, press the Pause button. Press it again to resume.
- To stop playback, press the Stop/Eject button.
5.2 Cassette Recording
The device allows recording from the built-in microphone or an external microphone.
5.2.1 Recording with Built-in Microphone
- Insert a blank or recordable cassette.
- Press the PLAY/REC button. The device will automatically enter recording mode.
- Speak clearly towards the built-in microphone.
- To pause recording, press the Pause button. Press it again to resume.
- To stop recording, press the Stop/Eject button.
5.2.2 Recording with External Microphone
- Connect an external microphone (3.5mm jack) to the Microphone Input on the rear panel.
- Insert a blank or recordable cassette.
- Press the PLAY/REC button. The device will automatically enter recording mode, using the external microphone.
- To pause recording, press the Pause button. Press it again to resume.
- To stop recording, press the Stop/Eject button.
5.3 USB Functions (Playback and Recording)
The USB port allows for playback of MP3 files from a USB flash drive and direct recording of cassette audio to a USB flash drive.
5.3.1 USB Playback
- Insert a USB flash drive containing MP3 audio files into the USB Port.
- Press the USB/REC button to switch to USB mode.
- Use the Fast Forward and Rewind buttons to navigate between tracks.
- Press the PLAY/REC button to start or pause playback.
- Adjust the volume using the Volume Control knob.
- To stop playback, press the Stop/Eject button.
5.3.2 USB Recording (Cassette to USB)
- Insert a USB flash drive into the USB Port. Ensure the USB drive has sufficient free space and is formatted correctly (FAT32 recommended).
- Insert the audio cassette you wish to record.
- Press the USB/REC button.
- Press the PLAY/REC button to start cassette playback and simultaneously begin recording to the USB drive.
- To pause recording, press the Pause button. Press it again to resume.
- To stop recording, press the Stop/Eject button. The recorded audio will be saved as an MP3 file on the USB drive.
6. Maintenance
- Cleaning the Casing: Use a soft, dry cloth to wipe the exterior of the device. Do not use abrasive cleaners or solvents.
- Cleaning the Tape Head: Periodically clean the tape head, pinch roller, and capstan with a cotton swab lightly dampened with isopropyl alcohol. This helps maintain sound quality and prevents tape damage.
- Demagnetizing: If sound quality degrades (e.g., muffled sound), consider using a tape head demagnetizer.
- Storage: When not in use, store the device in a cool, dry place away from direct sunlight and extreme temperatures.
- Battery Removal: If the device will not be used for an extended period, remove the batteries to prevent leakage.
7. Troubleshooting
| Problem | Possible Cause | Solution |
|---|---|---|
| No power | AC adapter not connected or faulty; batteries depleted or incorrectly inserted. | Check AC adapter connection and power outlet. Replace batteries or ensure correct polarity. |
| No sound during playback | Volume too low; headphones connected; tape head dirty. | Increase volume. Disconnect headphones. Clean tape head (see Maintenance). |
| Poor sound quality (cassette) | Dirty tape head; worn-out cassette tape. | Clean tape head. Try a different cassette. |
| Recording issues (muffled, low volume) | Microphone too far; dirty tape head; poor quality cassette. | Speak closer to the microphone. Clean tape head. Use a new, good quality cassette. |
| USB recording/playback issues | USB drive not recognized; incompatible file format; insufficient space; slow USB drive. | Ensure USB drive is FAT32 formatted. Use MP3 files for playback. Try a different USB drive, preferably a faster one for recording. |
| Cassette tape jams | Worn-out cassette; dirty pinch roller/capstan. | Try a different cassette. Clean pinch roller and capstan. |
8. Specifications
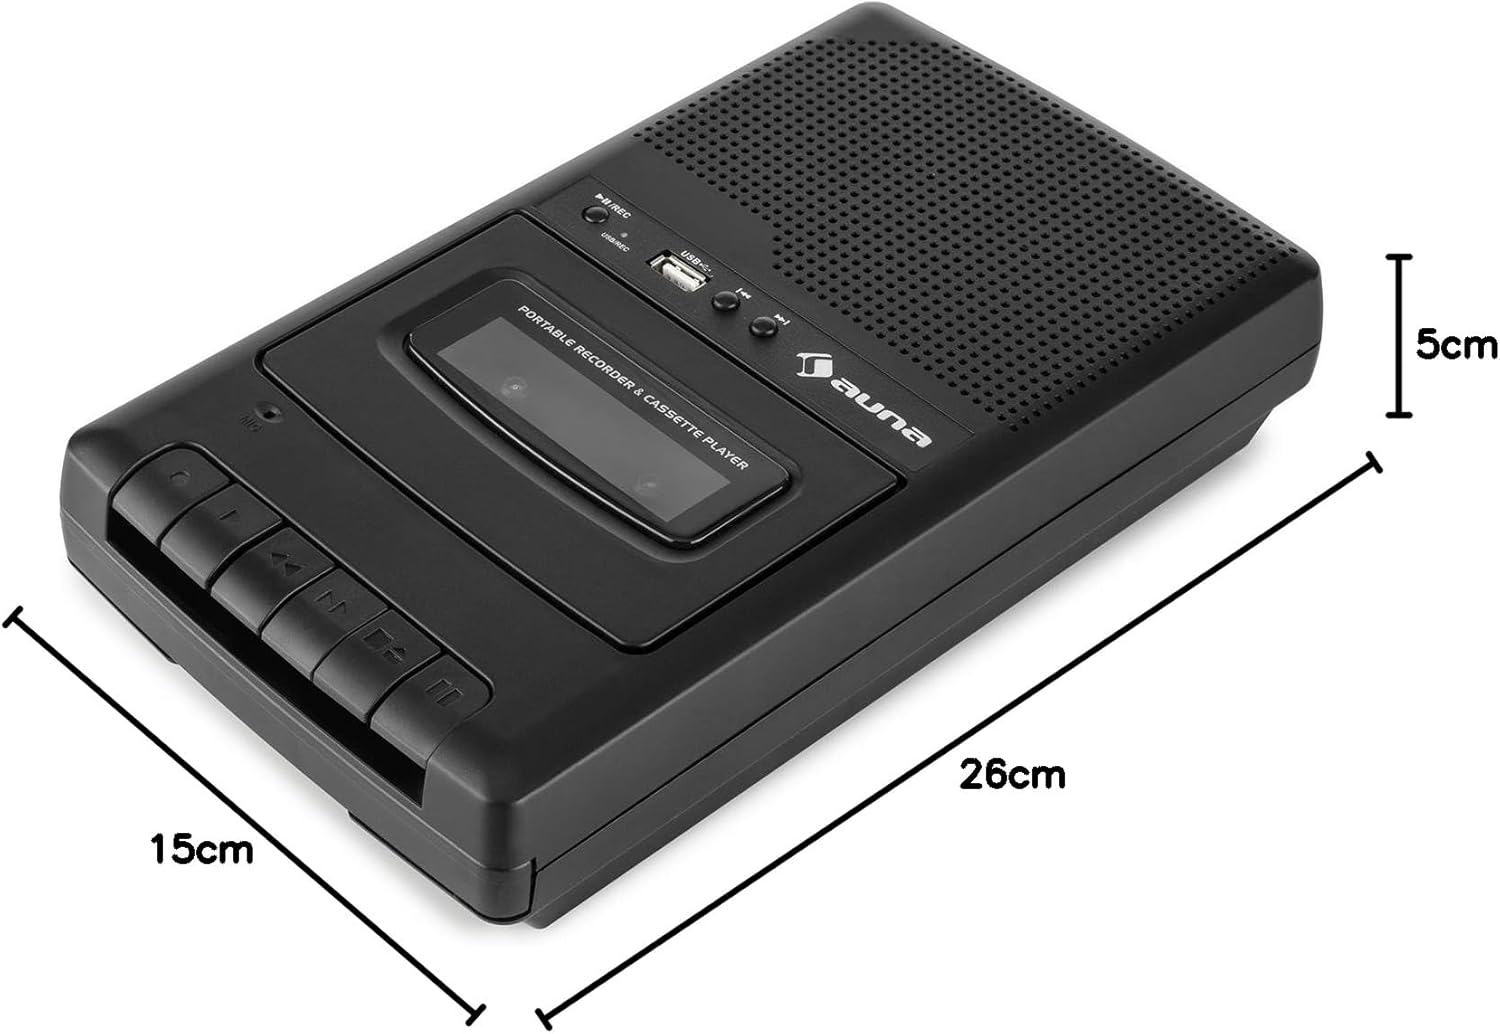
Figure 8.1: Dimensions of the auna RQ-132USB Portable Cassette Recorder.
- Model: RQ-132USB
- Brand: auna multimedia
- Power Supply: DC 6V, 600mA (AC adapter) or 4 x 1.5V C batteries
- Connections: 1 x USB port, 1 x 3.5mm Microphone Input, 1 x 3.5mm Headphone Output
- Microphone: Integrated, Mono
- Audio Format (USB): MP3
- Functions: Play, Record, Fast Forward, Rewind, Stop, Pause, Eject, USB Playback, USB Recording
- Special Features: Integrated speaker, automatic stop, extendable carry handle
- Dimensions (W x H x D): 15 x 5 x 26 cm
- Weight: 635 g
9. Warranty and Support
For warranty information or technical support, please refer to the documentation provided at the time of purchase or contact auna multimedia customer service directly. Keep your proof of purchase for any warranty claims.