Introduction
This manual provides essential instructions for the safe and efficient operation, maintenance, and care of your Maxima 20L Single Basket Deep Fryer with Drain Tap. Please read this manual thoroughly before initial use and keep it for future reference. This appliance is designed for professional use in commercial kitchens and catering environments.
Important Safety Instructions
Always follow basic safety precautions when using electrical appliances to reduce the risk of fire, electric shock, and injury.
- Read all instructions before use.
- Do not touch hot surfaces. Use handles or knobs.
- To protect against electrical shock, do not immerse cord, plugs, or the appliance in water or other liquid.
- Close supervision is necessary when any appliance is used by or near children.
- Unplug from outlet when not in use and before cleaning. Allow to cool before putting on or taking off parts, and before cleaning the appliance.
- Do not operate any appliance with a damaged cord or plug, or after the appliance malfunctions or has been damaged in any manner. Contact qualified service personnel for examination, repair, or adjustment.
- The use of accessory attachments not recommended by the appliance manufacturer may cause injuries.
- Do not use outdoors.
- Do not let cord hang over edge of table or counter, or touch hot surfaces.
- Do not place on or near a hot gas or electric burner, or in a heated oven.
- Extreme caution must be used when moving an appliance containing hot oil or other hot liquids.
- Always attach plug to appliance first, then plug cord into the wall outlet. To disconnect, turn any control to "off", then remove plug from wall outlet.
- Do not use appliance for other than intended use.
- Ensure the appliance is placed on a stable, heat-resistant surface.
- Never fill the oil above the MAX fill line or below the MIN fill line.
- Always ensure the drain tap is securely closed before filling with oil and during operation.
Package Contents
Upon unpacking, verify that all components are present and undamaged. The package should contain:
- Maxima 20L Deep Fryer Unit
- Frying Basket with handle
- Lid
- Heating Element with control panel
- Oil Draining Tap (pre-installed)
- Instruction Manual (this document)

Figure 1: Exploded view showing the main components of the Maxima 20L Deep Fryer, including the main unit, heating element, frying basket, lid, and cold zone plate.
Product Overview
Familiarize yourself with the various parts of your deep fryer before operation.
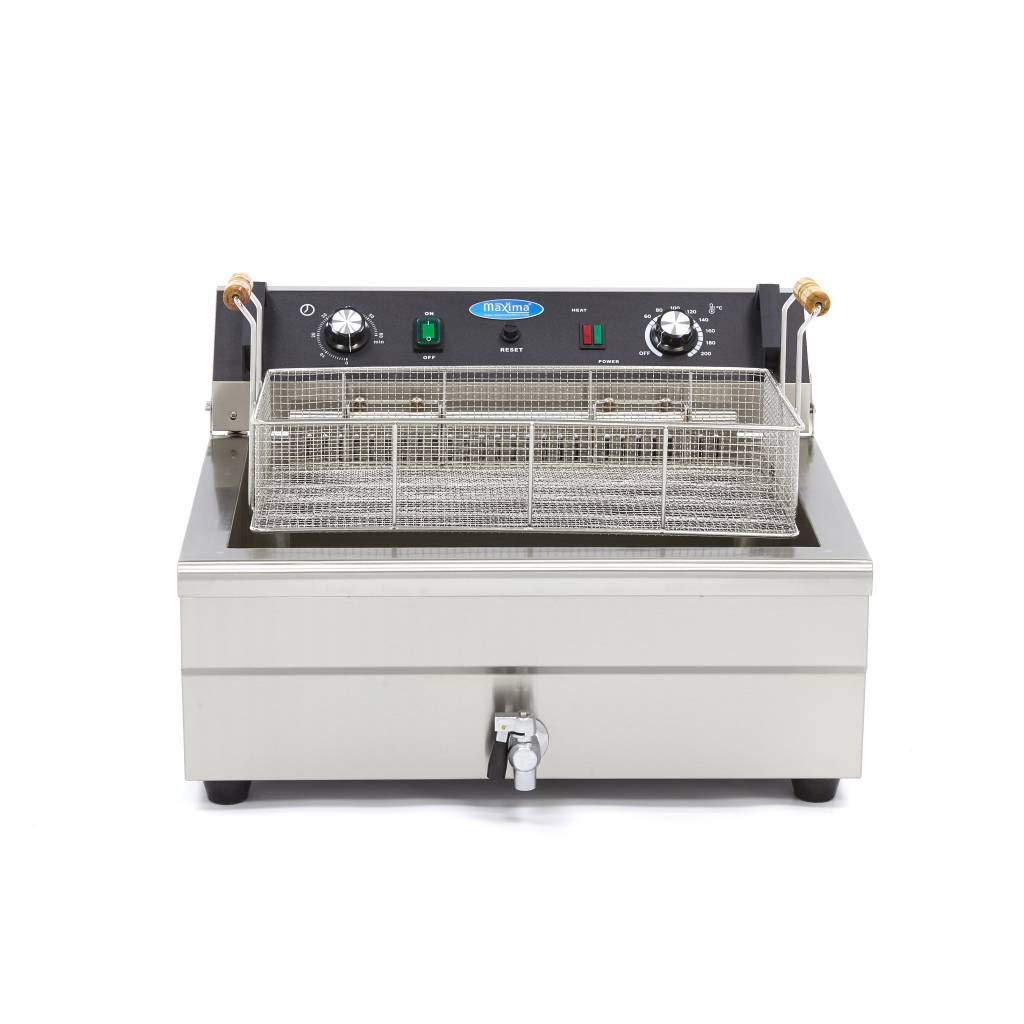
Figure 2: Front view of the Maxima 20L Deep Fryer, showing the control panel, frying basket, and drain tap.

Figure 3: Top-down view of the deep fryer with the frying basket in place and the lid open, revealing the oil pan.
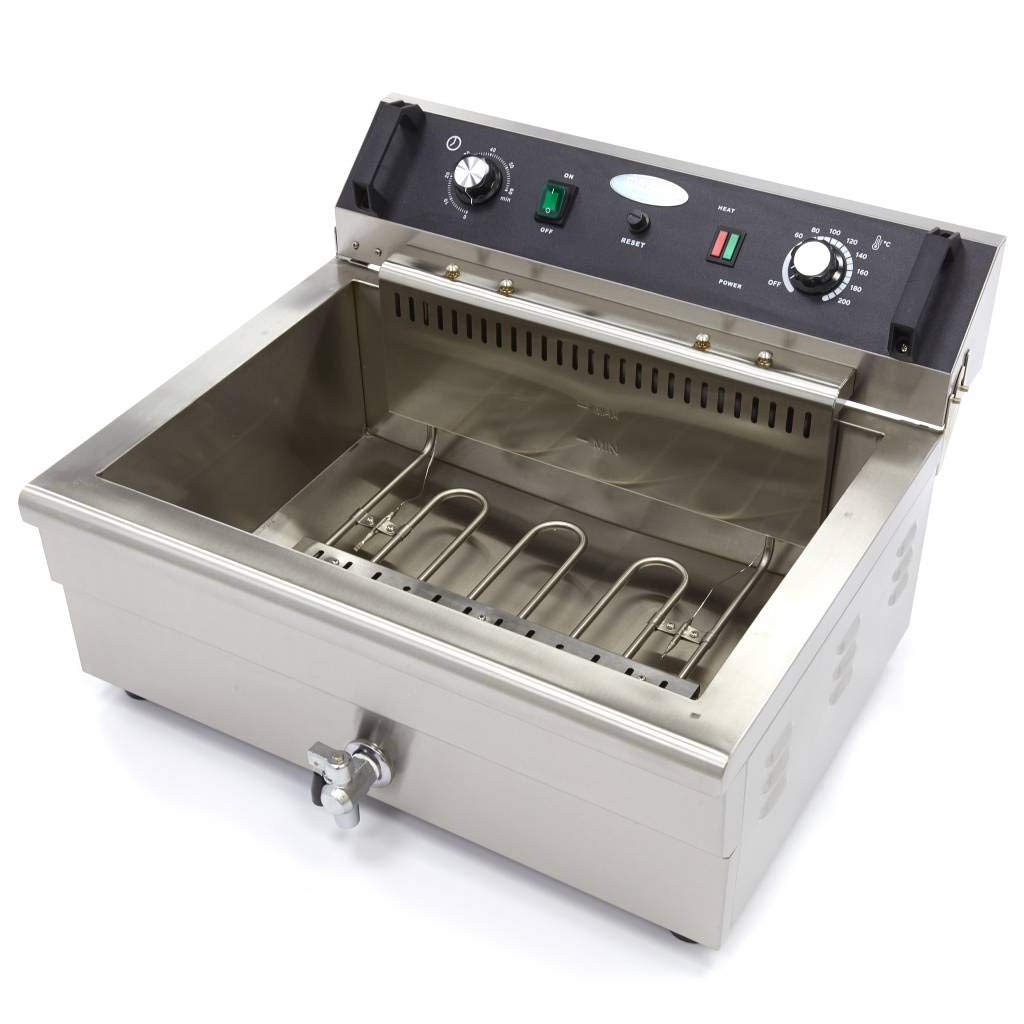
Figure 4: Interior view of the deep fryer, highlighting the heating element and the cold zone area beneath it.
Setup Instructions
- Unpacking: Carefully remove all packaging materials. Inspect the fryer for any damage incurred during shipping.
- Placement: Place the deep fryer on a stable, level, and heat-resistant surface. Ensure there is adequate ventilation around the unit. Do not place it near flammable materials.
- Initial Cleaning: Before first use, clean the oil pan, frying basket, and lid with warm soapy water. Rinse thoroughly and dry completely. Ensure the heating element and electrical components do not come into contact with water.
- Power Connection: Connect the power plug to a suitable electrical outlet. This appliance requires a 400 Volt connection with 4500 KW power. Ensure your electrical supply matches these requirements.
- Oil Filling: Ensure the drain tap is securely closed. Fill the oil pan with frying oil. The oil level must be between the MIN and MAX markings indicated on the inside of the pan. Do not overfill or underfill.

Figure 5: Side view illustrating the robust power connection required for the deep fryer.
Operating Instructions
- Power On: Ensure the fryer is properly filled with oil and connected to power. Turn the main power switch to the "ON" position.
- Set Temperature: Use the temperature control knob to select the desired frying temperature. The indicator light will illuminate, showing that the heating element is active.
- Preheating: Allow the oil to preheat to the set temperature. The indicator light will turn off once the desired temperature is reached. It will cycle on and off during operation to maintain the temperature.
- Frying Food: Carefully place food into the frying basket. Do not overload the basket, as this can lower the oil temperature significantly and result in soggy food. Slowly lower the basket into the hot oil.
- Cooking Time: Fry food for the recommended time or until golden brown and cooked through.
- Removing Food: Carefully lift the frying basket out of the oil. Allow excess oil to drain back into the pan. Place fried food on a wire rack or paper towels to further drain.
- Power Off: After use, turn the temperature control knob to the lowest setting and switch the main power to "OFF". Unplug the appliance from the power outlet.
Note on Cold Zone: This fryer features an integrated cold zone. This area below the heating element collects food debris, preventing it from burning and extending the life of your frying oil.
Maintenance and Cleaning
Regular cleaning and maintenance are crucial for the longevity and hygiene of your deep fryer.
- Cool Down: Always allow the oil and the fryer to cool completely before cleaning. This can take several hours.
- Drain Oil: Place a suitable container under the drain tap. Open the drain tap to empty the oil from the pan. Filter the oil if it is still suitable for reuse, or dispose of it responsibly.
- Remove Components: Carefully remove the frying basket, lid, and heating element assembly. The heating element can be lifted out for easier cleaning of the pan.
- Clean Pan and Components: Wash the oil pan, basket, and lid with warm soapy water and a non-abrasive sponge. For stubborn residue, a specialized fryer cleaner may be used. Rinse thoroughly and dry completely.
- Clean Heating Element: Wipe the heating element with a damp cloth. Do not immerse the heating element or control panel in water.
- Reassembly: Once all parts are clean and dry, reassemble the fryer. Ensure the heating element is correctly seated before refilling with oil.

Figure 6: The interior of the fryer, showing the removable cold zone plate for thorough cleaning.
Troubleshooting
| Problem | Possible Cause | Solution |
|---|---|---|
| Fryer does not heat up. | No power supply; thermostat set too low; safety cut-out activated. | Check power connection and outlet; increase temperature setting; press the reset button on the control panel. If the issue persists, contact service. |
| Oil not reaching desired temperature. | Overloaded basket; insufficient preheating time; faulty thermostat. | Reduce food quantity; allow more time for preheating; contact service if thermostat is suspected. |
| Food is soggy or not crispy. | Oil temperature too low; too much food in basket; food contains too much moisture. | Ensure oil is at correct temperature; fry in smaller batches; pat food dry before frying. |
| Excessive smoking from oil. | Oil is old or contaminated; oil temperature too high. | Replace oil; check temperature setting. |
Technical Specifications
| Model Name | Maxima 20L Single Basket Deep Fryer with Drain Tap |
| Model Number | 8719632124221 |
| Brand | Maxima |
| Material | Stainless Steel |
| Dimensions (L x W x H) | 64 cm x 42 cm x 55 cm |
| Weight | 15 Kilograms |
| Power Source | Mains Powered |
| Voltage | 400 Volts |
| Wattage | 4500 KW |
| Oil Capacity | 20 Litres |
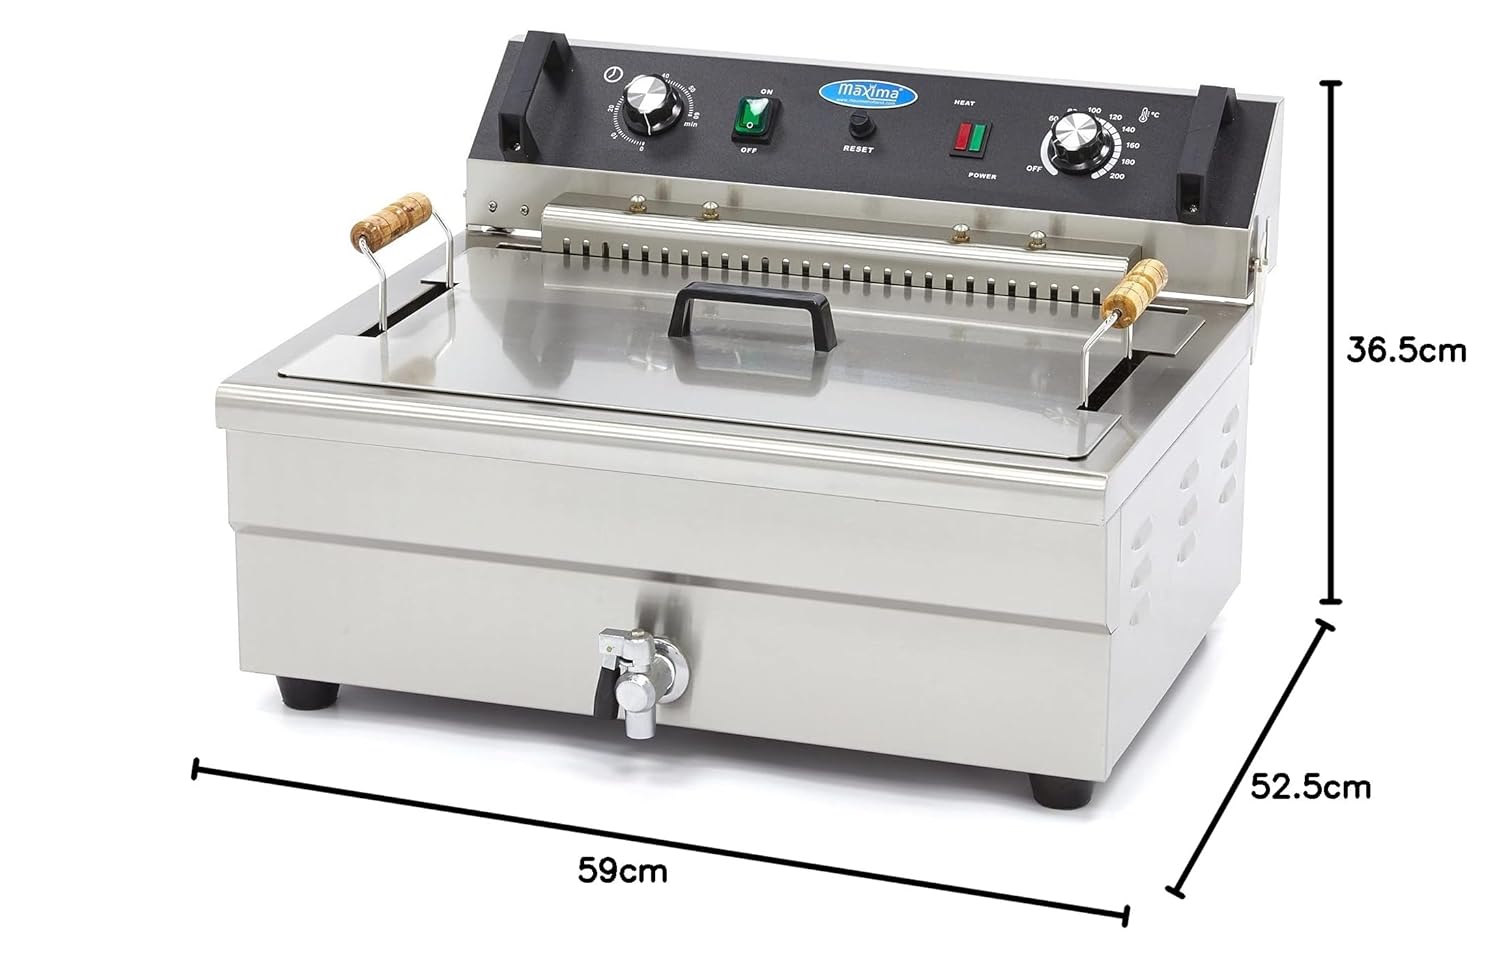
Figure 7: Dimensional drawing of the Maxima 20L Deep Fryer, showing length, width, and height measurements.
Warranty and Support
This Maxima deep fryer comes with a 1-year warranty against manufacturer defects from the date of purchase. Please retain your proof of purchase for warranty claims.
For technical support, spare parts, or warranty inquiries, please contact your retailer or visit the official Maxima Kitchen Equipment website. Refer to the contact information provided with your purchase documentation.
Online Resources: For additional information and product updates, you may visit the Maxima Brand Store.