1. Introduction
This manual provides comprehensive instructions for the safe and efficient operation and maintenance of the Hanchen HD-30 Heavy Duty Welding Positioner. This equipment is designed to facilitate annular welding, cutting, polishing, and assembly tasks by precisely tilting and rotating workpieces. Please read this manual thoroughly before operating the device.
2. Safety Information
WARNING: Failure to follow these safety instructions may result in serious injury or death.
- Always wear appropriate personal protective equipment (PPE) including welding helmet, gloves, and protective clothing.
- Ensure the equipment is properly grounded to prevent electrical shock.
- Do not operate the positioner in wet conditions or in the presence of flammable liquids or gases.
- Keep hands and clothing clear of moving parts during operation.
- Secure the workpiece firmly to the chuck or table before starting any operation.
- Disconnect power before performing any maintenance or adjustments.
- Ensure adequate ventilation in the work area to disperse welding fumes.
- Do not exceed the rated load capacity of 30kg.
3. Product Features
The Hanchen HD-30 Welding Positioner offers the following key features:
- Versatile Application: Suitable for circle welding, annular welding, cutting, polishing, and assembly, especially for workpieces under 30kg such as flanges and steel pipes.
- Precise Speed Control: Stepless speed regulation (1-15 r/min) via a knob, driven by a DC motor.
- Foot Pedal Operation: Allows for convenient control of table rotation during welding.
- Welding Gas Compatibility: Supports various welding processes including CO2, MIG, MAG, and TIG welding.
- Anti-Electromagnetic Design: Reduces high-frequency interference from TIG welding, enhancing weld quality.
- Adjustable Tilt Angle: The working table can be tilted from 0 to 100 degrees. The worm and gear turning structure provides a self-locking function for stable positioning.
- Chuck Compatibility: Designed to accommodate 100mm, 200mm, or 300mm chucks (optional) and center holes of 25mm or 65mm (optional).
4. Technical Specifications
| Parameter | Value |
|---|---|
| Model | HD-30 |
| Part Number | MX 118c |
| Power Input | AC 110V 60Hz |
| Rated Load Capacity | 30 kg (66 lbs) |
| Table Diameter | 315 mm |
| Table Height | 400 mm |
| Tilting Angle | 0 - 100° |
| Rotate Speed | 1 - 15 r/min (stepless) |
| Center Hole Diameter | 25 mm / 65 mm (optional) |
| Applicable Chuck Diameter | 100 mm / 200 mm / 300 mm (optional) |
| Net Weight | 38 kg (83.7 lbs) |
| Item Weight (Shipping) | 85.8 pounds |
| Material | Chuck 200mm (as specified for this variant) |
5. Component Identification
Familiarize yourself with the main components of the welding positioner:

Figure 1: Rear view showing the rotary table, ground screws, motor, rotate wheel, and controller.

Figure 2: Control panel with power switch, lamp indicator, auto/foot switch, rotation direction switch (Corrosion/Reversion), and speed control knob.
- Rotary Table: The circular platform where the workpiece or chuck is mounted.
- Chuck: (Optional, not always pre-installed) Used to securely hold cylindrical or irregularly shaped workpieces.
- Controller Box: Houses the electrical controls for power, speed, and rotation direction.
- Rotate Wheel: Manual wheel for adjusting the tilt angle of the table.
- Motor: Drives the rotation of the table.
- Foot Pedal: (Not explicitly shown in images, but mentioned in features) Connects to the controller for hands-free rotation control.
6. Setup and Installation
- Unpacking: Carefully remove the positioner from its packaging. Inspect for any shipping damage.
- Placement: Place the positioner on a stable, level surface capable of supporting its weight and the maximum workpiece load. Ensure adequate space around the unit for safe operation and workpiece manipulation.
- Power Connection: Connect the power cord to a grounded AC 110V 60Hz power outlet. Ensure the power switch on the control panel is in the "OFF" position before connecting.
- Chuck Installation (if applicable): If using an optional chuck, securely mount it to the rotary table using appropriate fasteners. Ensure it is centered and tightened to prevent wobble during rotation.
- Grounding: Verify that the positioner is properly grounded. The ground screws are typically located near the motor or frame.
- Foot Pedal Connection: Connect the foot pedal cable to the designated port on the control panel.
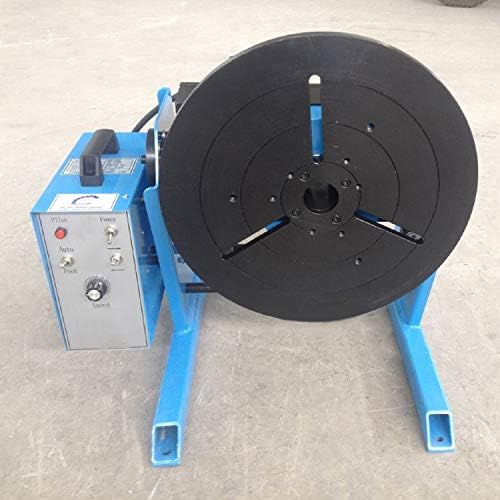
Figure 3: Front view of the positioner with a chuck mounted on the rotary table, ready for workpiece attachment.
7. Operation
- Power On: Flip the "Power" switch on the control panel to the "ON" position. The "Lamp" indicator should illuminate.
- Mount Workpiece: Securely attach the workpiece to the chuck or directly onto the rotary table. Ensure it is balanced and within the 30kg load limit.
- Adjust Tilt Angle: Use the "Rotate Wheel" to manually adjust the tilt angle of the rotary table to the desired position (0-100 degrees). The self-locking mechanism will hold the angle.
- Select Rotation Mode:
- Auto Mode: Flip the "Auto/Foot" switch to "Auto". The table will rotate continuously at the set speed.
- Foot Pedal Mode: Flip the "Auto/Foot" switch to "Foot". The table will rotate only when the foot pedal is pressed.
- Set Rotation Direction: Use the "Corrosion/Reversion" switch to select the desired rotation direction (clockwise or counter-clockwise).
- Adjust Rotation Speed: Turn the "Speed" knob to set the desired rotation speed (1-15 r/min). Start with a lower speed and gradually increase as needed for your welding application.
- Begin Operation:
- In Auto mode, the table will start rotating immediately.
- In Foot Pedal mode, press the foot pedal to start rotation and release to stop.
- Welding: Perform your welding operation while the workpiece rotates. The anti-electromagnetic design helps maintain weld quality.
- Power Off: After use, turn the "Power" switch to "OFF" and disconnect the power cord.

Figure 4: A pipe workpiece securely clamped in the chuck on the rotary table, demonstrating a typical setup for welding.

Figure 5: Examples of precise and consistent welds on different workpieces, showcasing the positioner's capability.
8. Maintenance
Regular maintenance ensures the longevity and optimal performance of your welding positioner.
- Cleaning: After each use, clean the rotary table and chuck to remove welding spatter and debris. Use a wire brush or scraper for stubborn spatter.
- Lubrication: Periodically check and lubricate moving parts, such as the worm gear mechanism for tilting and the main bearing for rotation, according to standard machinery lubrication practices.
- Electrical Inspection: Regularly inspect the power cord, foot pedal cable, and control panel for any signs of damage, fraying, or loose connections. Replace damaged components immediately.
- Fastener Check: Ensure all bolts and fasteners, especially those securing the chuck and the main frame, are tight.
- Storage: Store the positioner in a dry, clean environment when not in use.
9. Troubleshooting
| Problem | Possible Cause | Solution |
|---|---|---|
| Positioner does not power on. | No power supply; Power switch off; Damaged power cord. | Check power outlet; Ensure power switch is ON; Inspect and replace power cord if damaged. |
| Rotary table does not rotate. | Speed knob set to minimum; Auto/Foot switch in wrong position; Foot pedal not pressed (in Foot mode); Motor fault. | Increase speed; Select correct mode; Press foot pedal; Contact support if motor fault is suspected. |
| Rotation is inconsistent or jerky. | Overload; Workpiece unbalanced; Debris in mechanism; Motor issue. | Reduce load; Rebalance workpiece; Clean mechanism; Contact support. |
| Table tilt mechanism is stiff. | Lack of lubrication; Debris in worm gear. | Lubricate worm gear; Clean mechanism. |
10. Warranty and Support
Hanchen provides a 1-YEAR warranty for this product from the date of purchase. This warranty covers manufacturing defects and material faults under normal use.
For any questions, technical assistance, or warranty claims, please contact Hanchen customer support directly. Provide your model number (HD-30) and purchase details for faster service.
You can typically find support contact information on the Hanchen official website or through your original point of purchase.


