Introduction
This manual provides detailed instructions for the safe and efficient operation, maintenance, and troubleshooting of your KRUPS EC321050 12-Cup Programmable SAVOY Turbo Drip Coffee Maker. Please read all instructions carefully before first use and retain this manual for future reference.
Important Safety Information
- Always unplug the coffee maker from the outlet when not in use and before cleaning.
- Do not immerse the cord, plug, or coffee maker in water or other liquids.
- Close supervision is necessary when the appliance is used by or near children.
- Do not operate any appliance with a damaged cord or plug, or after the appliance malfunctions or has been damaged in any manner.
- Use only cold water in the water reservoir.
- Do not open the brew basket cover during the brewing cycle.
- The carafe is designed for use with this appliance only. It must not be used on a range top.
- Do not place the coffee maker on or near a hot gas or electric burner, or in a heated oven.
- Avoid contact with moving parts.
- Do not use the appliance for other than intended use.
Parts and Features
Familiarize yourself with the components of your coffee maker:

Figure 1: Angled view of the KRUPS EC321050 12-Cup Programmable SAVOY Turbo Drip Coffee Maker, showcasing its sleek black and silver design with the digital display and control panel.

Figure 2: Front view of the coffee maker, highlighting the digital control panel, glass carafe, and the KRUPS branding.

Figure 3: Detailed view of the digital display panel, showing the time, AUTO, REG/BOLD, 1-4 cup, KEEP WARM, and CLEAN indicators.
- Water Reservoir: For filling with cold water.
- Brew Basket: Holds the coffee filter and ground coffee.
- Permanent Filter: Reusable filter for ground coffee.
- Glass Carafe: 12-cup capacity for brewed coffee.
- Control Panel: Digital display with buttons for HR, MIN, AUTO, BOLD, BREW, 1-4 CUPS, and CLEAN.
- Heating Plate: Keeps the carafe warm after brewing.
- Oversized Showerhead: Ensures even saturation of coffee grounds.
- Flavor Mix Tube: Circulates coffee within the carafe for consistent flavor.
Setup and First Use
- Unpacking: Carefully remove all packaging materials and labels from the coffee maker.
- Cleaning: Before first use, wash the carafe, lid, and permanent filter in warm, soapy water. Rinse thoroughly and dry. Wipe the exterior of the coffee maker with a damp cloth.
- First Brew Cycle (Cleaning Cycle):
- Fill the water reservoir with cold water up to the 12-cup mark.
- Place the permanent filter (without coffee) into the brew basket.
- Place the empty carafe with its lid on the heating plate.
- Plug the coffee maker into a standard electrical outlet.
- Press the BREW button to start a full brewing cycle with only water.
- Once the cycle is complete, discard the water from the carafe.
Operating Instructions
Brewing Coffee
- Fill Water Reservoir: Open the lid and fill the water reservoir with fresh, cold water to the desired number of cups indicated on the water level indicator. Do not exceed the 12-cup maximum fill line.
- Add Coffee Grounds: Place the permanent filter into the brew basket. Add the desired amount of ground coffee (approximately 1 tablespoon per cup, adjust to taste). Ensure the filter is properly seated.
- Position Carafe: Place the glass carafe with its lid securely on the heating plate. Ensure the carafe is correctly positioned to activate the drip-stop mechanism.
- Select Brew Strength (Optional): Press the BOLD button for a stronger coffee flavor. The indicator light will illuminate.
- Select 1-4 Cups (Optional): If brewing 1 to 4 cups, press the 1-4 CUPS button. This optimizes the brewing process for smaller quantities.
- Start Brewing: Press the BREW button to start the brewing cycle. The brew indicator light will illuminate.
- Pause & Serve: During brewing, you can temporarily remove the carafe to pour a cup of coffee. The drip-stop feature will prevent coffee from dripping for a short period. Return the carafe to the heating plate within 20 seconds to prevent overflow.
- Keep Warm: After brewing, the coffee maker will automatically switch to the "Keep Warm" mode, maintaining the coffee's optimal temperature for up to 4 hours. The "KEEP WARM" indicator will be lit.
- Power Off: To turn off the coffee maker before the 4-hour keep warm cycle ends, press the power button.
Setting the Clock and Auto-Start Function
- Set Current Time:
- Press the HR button to set the hour.
- Press the MIN button to set the minutes.
- The clock will automatically set after a few seconds of inactivity.
- Set Auto-Start Time:
- Prepare the coffee maker for brewing as described in the "Brewing Coffee" section (water, coffee, carafe in place).
- Press the AUTO button. The "AUTO" indicator will flash.
- Use the HR and MIN buttons to set the desired auto-start time.
- Press the AUTO button again to confirm. The "AUTO" indicator will illuminate steadily.
- The coffee maker will automatically start brewing at the programmed time.
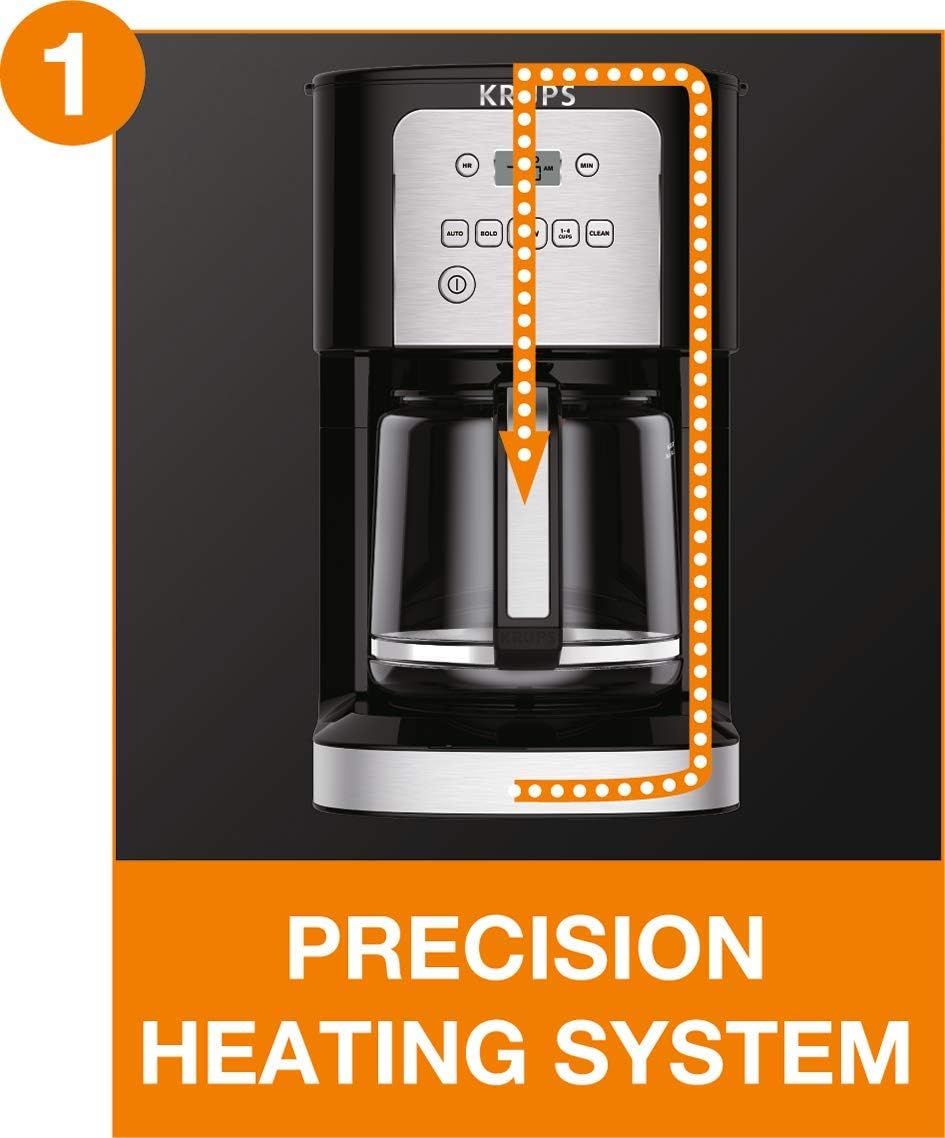
Figure 4: Diagram showing the Precision Heating System, which ensures water reaches the optimal temperature for brewing before it contacts the coffee grounds.

Figure 5: Diagram illustrating the Oversized Showerhead, designed to evenly distribute hot water over the coffee grounds for full flavor extraction.

Figure 6: Diagram illustrating the Flavor Mix Tube within the carafe, which circulates the brewed coffee to ensure a consistent and balanced flavor throughout the entire pot.
Care and Maintenance
Daily Cleaning
- Always unplug the coffee maker before cleaning.
- Wash the carafe, lid, and permanent filter in warm, soapy water after each use. These parts are also top-rack dishwasher safe.
- Wipe the exterior of the coffee maker with a soft, damp cloth. Do not use abrasive cleaners or scouring pads.
- Do not immerse the coffee maker base in water or any other liquid.
Descaling (Cleaning Cycle)
Mineral deposits from water can build up in your coffee maker over time, affecting its performance and coffee taste. The "CLEAN" indicator light will illuminate when descaling is recommended. Descale your coffee maker regularly, or at least every 2-3 months, depending on water hardness.
- Prepare Descaling Solution: Mix 4 cups of white vinegar with 8 cups of cold water. Alternatively, use a commercially available descaling solution designed for coffee makers, following the product's instructions.
- Fill Reservoir: Pour the descaling solution into the water reservoir.
- Start Descaling Cycle: Place the empty carafe with its lid on the heating plate. Press the CLEAN button. The "CLEAN" indicator will flash, and the coffee maker will begin the descaling process.
- Rinse Cycles: After the descaling cycle is complete, discard the solution. Fill the water reservoir with fresh, cold water and run two full brewing cycles with only water to rinse the coffee maker thoroughly.
Troubleshooting
| Problem | Possible Cause | Solution |
|---|---|---|
| Coffee does not brew. |
|
|
| Coffee is too weak or too strong. |
|
|
| Coffee overflows from the filter basket. |
|
|
| "CLEAN" light remains on after descaling. |
|
|
Specifications
| Feature | Detail |
|---|---|
| Model Number | EC321050 (7211002967) |
| Brand | KRUPS |
| Capacity | 12 Cups |
| Color | Black |
| Power | 800 watts |
| Dimensions (L x W x H) | 39.8 x 25.2 x 39.8 cm |
| Weight | 1.2 Kilograms |
| Special Features | Programmable, Auto-Start, Pause & Serve, Keep Warm (4 hours), Bold Brew, 1-4 Cup Setting, Flavor Mix Tube, Oversized Showerhead |
| Filter Type | Permanent Metal Filter (removable) |
| Operation Mode | Fully Automatic |
| Included Components | Coffee maker, Glass Carafe, Permanent Filter |
Warranty and Support
KRUPS products are designed for durability and ease of repair. This product is typically covered by a manufacturer's warranty. For specific warranty details, please refer to the warranty card included with your product or visit the official KRUPS website.

Figure 7: The "Repairable 10 Years" logo, indicating KRUPS' commitment to product longevity and repairability, with parts and service typically available for a decade.
For technical assistance, spare parts, or repair services, please contact KRUPS Customer Service. Contact information can usually be found on the KRUPS official website or in the product packaging.
Note: Always keep your proof of purchase for warranty claims.


