1. Introduction
This manual provides detailed instructions for the installation, operation, and maintenance of your GRIFEMA G4002-9 Kitchen Tap. Designed for modern kitchens, this tap features a flexible spout and a single-handle control for ease of use. Please read this manual thoroughly before installation and operation to ensure proper function and longevity of the product.
Key features include:
- Flexible spout for extended reach and versatility.
- Single handle for precise control of water flow and temperature.
- Durable chrome finish, resistant to scratches and easy to clean.
- Water-saving aerator for efficient water usage.
2. Safety Information
Please observe the following safety precautions during installation and use:
- Always turn off the main water supply before beginning any installation or maintenance work.
- Ensure all connections are secure to prevent leaks.
- If you are unsure about any part of the installation process, consult a qualified plumber.
- Do not use abrasive cleaners or harsh chemicals on the tap's finish, as this may cause damage.
- Keep small parts out of reach of children.
3. Package Contents
Verify that all components are present before beginning installation:
- 1 x GRIFEMA G4002-9 Kitchen Tap (Grey/Chrome)
- 2 x 40 cm Hose Pipes (Hot and Cold water supply lines)
- 1 x Installation Kit (includes mounting hardware, seals, and wrench)
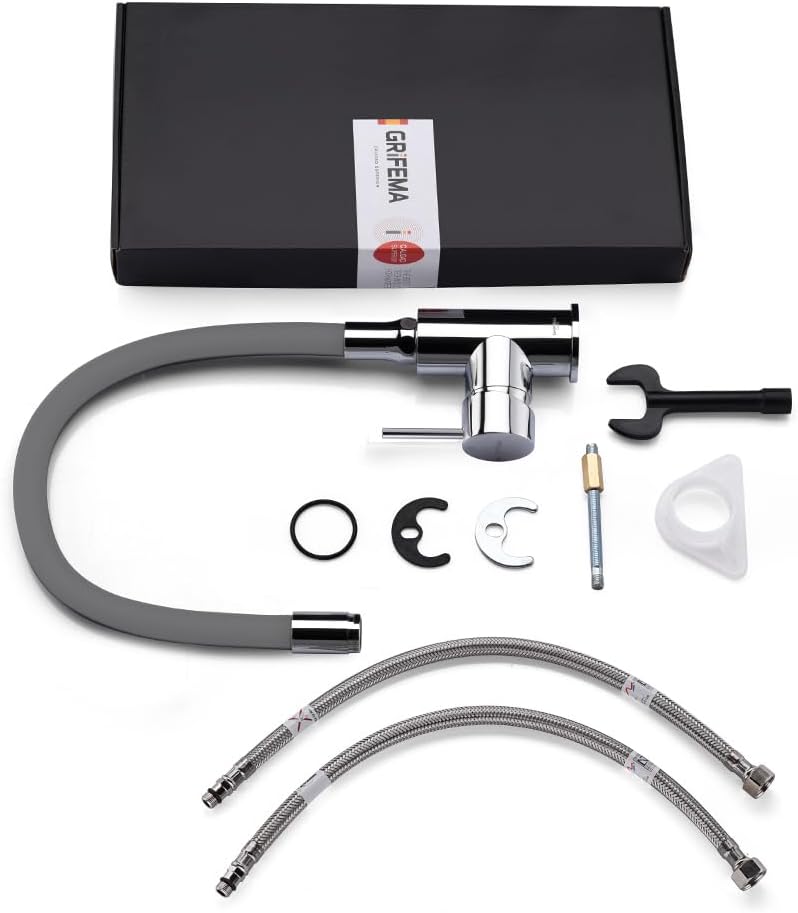
Figure 3.1: All components included in the GRIFEMA G4002-9 Kitchen Tap package. This image displays the main tap unit with its grey flexible spout, two braided stainless steel hose pipes, and a bag containing various installation hardware such as gaskets, a mounting nut, and a specialized wrench.
4. Setup and Installation
The GRIFEMA G4002-9 Kitchen Tap is designed for single-hole deck mount installation. Follow these steps carefully:
- Prepare the Installation Area: Ensure the main water supply is turned off. Clear the area around the sink hole where the tap will be installed.
- Insert the Tap: Place the main body of the tap into the pre-drilled hole on your sink or countertop. Ensure the tap is oriented correctly.
- Secure the Tap: From underneath the sink, slide the rubber gasket, then the metal washer, and finally the mounting nut onto the threaded shank of the tap. Use the provided wrench to tighten the mounting nut securely. Do not overtighten.
- Connect Water Supply Lines: Attach the two 40 cm hose pipes to the corresponding hot and cold water inlets on the underside of the tap. Connect the other ends of the hose pipes to your hot and cold water supply valves. Ensure a tight seal, using plumber's tape if necessary.
- Check for Leaks: Once all connections are made, slowly turn on the main water supply. Check all connections for any signs of leakage. If leaks are detected, turn off the water supply and re-tighten the connections.

Figure 4.1: Dimensional drawing of the GRIFEMA G4002-9 Kitchen Tap. This image illustrates key measurements including the total height (15.8 inches / 401mm), spout reach (8.5 inches / 216mm), and height from base to spout outlet (9.7 inches / 246mm). These dimensions are crucial for ensuring proper fit and clearance during installation.
5. Operating Instructions
The GRIFEMA G4002-9 Kitchen Tap is designed for intuitive operation:
- Water Flow and Temperature Control: The single lever handle controls both water flow and temperature.
- Lift the handle to increase water flow. Push down to decrease or stop flow.
- Move the handle to the right for cold water. Move the handle to the left for hot water.
- This tap features a "Cold Start" function (Kelogic system), meaning when the handle is in the central position, only cold water is initially supplied. Hot water flows only when the handle is moved to the left, promoting energy savings.
- Flexible Spout: The grey silicone spout is highly flexible and can be adjusted to direct water flow precisely where needed. It can be bent, twisted, and positioned in various angles to reach all areas of your sink.
- Water Saving Aerator: The tap is equipped with a NEOPERL water-saving aerator, which mixes air with water to provide a consistent flow while reducing water consumption.

Figure 5.1: Demonstrates the tap in use, with a person washing a lemon under the water stream. The flexible spout allows for easy positioning over the sink.

Figure 5.2: Shows the tap being used to rinse a plate. The height and flexibility of the spout accommodate various kitchen tasks.

Figure 5.3: Illustrates the "Cold Start, Kelogic" system, highlighting energy savings by supplying cold water first when the handle is centered. A diagram of the internal cartridge is also shown.

Figure 5.4: Details the NEOPERL water-saving aerator, which helps reduce water consumption by mixing air into the water stream. The aerator is shown as an insert at the end of the spout.

Figure 5.5: A collage demonstrating the versatility of the flexible spout, shown bent and positioned in four different configurations to highlight its adaptability for various tasks.
6. Maintenance
To maintain the appearance and functionality of your GRIFEMA G4002-9 Kitchen Tap, follow these maintenance guidelines:
- Cleaning the Finish: Clean the chrome finish regularly with a soft cloth and mild soap or a non-abrasive cleaner specifically designed for chrome fixtures. Rinse thoroughly with water and dry with a soft cloth to prevent water spots. Avoid abrasive sponges, scouring pads, or harsh chemical cleaners, as these can damage the finish.
- Cleaning the Aerator: If water flow becomes restricted, the aerator may be clogged with mineral deposits. Unscrew the aerator from the end of the spout, clean it by rinsing under water or soaking in a vinegar solution, and then reattach it.
- Flexible Spout Care: The silicone flexible spout is designed for durability. Clean it with mild soap and water. Avoid sharp objects that could puncture or cut the silicone.
7. Troubleshooting
Refer to the following table for common issues and their solutions:
| Problem | Possible Cause | Solution |
|---|---|---|
| Low Water Flow | Clogged aerator; partially closed shut-off valve; low water pressure. | Clean or replace aerator. Ensure shut-off valves are fully open. Check household water pressure. |
| Leaking from Spout | Worn cartridge; mineral deposits. | Contact customer support for a replacement cartridge. Clean any visible deposits. |
| Leaking at Base | Loose mounting nut; improperly seated gasket. | Tighten mounting nut. Ensure gaskets are correctly positioned. |
| Difficulty Adjusting Temperature | Faulty cartridge. | Contact customer support for a replacement cartridge. |
8. Specifications
| Feature | Detail |
|---|---|
| Brand | GRIFEMA |
| Model Number | G4002-9 |
| Product Dimensions | 6 x 17 x 35 cm (approx. 15.8 inches height) |
| Item Weight | 1.78 kg |
| Colour | Grey/Chrome |
| Style | Lever |
| Finish | Chrome |
| Material | Silicone, Metal |
| Installation Method | Deck Mount, Single Hole |
| Number of Handles | 1 |
| Special Features | Flexible Spout, Scratch Resistant, Cold Start (Kelogic), Water Saving Aerator |
| Hose Pipe Length | 2 x 40 cm |
9. Warranty and Support
GRIFEMA products are designed for quality and reliability. This product comes with a 12-month exchange-return policy, ensuring customer satisfaction. For any issues or support needs, please contact GRIFEMA customer service.
Additionally, all GRIFEMA products adhere to a 30-day refund policy. For further assistance, please refer to the contact information provided with your purchase or visit the official GRIFEMA website.


