1. Introduction
This manual provides instructions for the proper installation, operation, and maintenance of the CAPTIVE-AIRE Stainless Steel Perforated Ceiling Diffuser, specifically the 12-inch Round Supply Collar model (DI-PSP 24x24). Adhering to these guidelines will ensure the diffuser functions as intended, providing efficient air distribution and long-term durability.
The CAPTIVE-AIRE perforated ceiling diffuser is engineered to deliver replacement air in the vicinity of an exhaust hood without negatively impacting capture and containment. Its design promotes a laminar air discharge pattern, distinguishing it from traditional directional diffusers.
2. Product Features
- Designed to deliver replacement air near exhaust hoods without compromising performance.
- Double layer of perforated metal ensures a laminar air discharge pattern.
- Constructed with stainless steel perforation and trim for durability and aesthetic integration.
- Fully insulated shell prevents condensation.
- Compatible with standard ceiling grids.
- Available with 8", 10", or 12" duct size connections; this model features a 12" round supply collar.

Figure 1: Angled view of the CAPTIVE-AIRE Stainless Steel Perforated Ceiling Diffuser, showcasing its stainless steel construction and perforated surface.
3. Installation
The CAPTIVE-AIRE Perforated Ceiling Diffuser is designed for drop-in installation within a standard ceiling grid. Ensure all local building codes and safety regulations are followed during installation.
3.1 Pre-Installation Checklist
- Verify the ceiling grid opening matches the diffuser dimensions (24"x24" nominal for this model).
- Confirm the duct size connection (12" round) is compatible with existing ductwork.
- Ensure adequate clearance above the ceiling grid for the diffuser and duct connection.
- Gather necessary tools: measuring tape, screwdriver, wire cutters, safety gloves, safety glasses.
3.2 Installation Steps
- Carefully remove the ceiling tile from the desired installation location.
- Lift the diffuser into the ceiling grid opening. The diffuser is designed to rest on the grid rails.
- Connect the 12-inch round supply ductwork to the diffuser's collar. Ensure a secure and airtight connection using appropriate clamps or fasteners (not included).
- Install a sliding radial damper on the top side of the collar if airflow adjustment is required.
- Secure the diffuser to the building structure using steel hanging wires (minimum 2 places, diagonal corners) to prevent accidental dislodgement. Hanging wires are typically supplied by others.
- Verify the diffuser is level and properly seated in the ceiling grid.
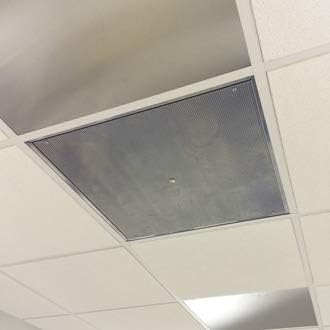
Figure 2: Top-down view of the diffuser seamlessly integrated into a standard ceiling grid.
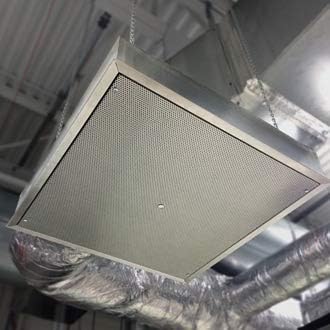
Figure 3: Angled view from below, showing the diffuser installed in a ceiling grid with visible ductwork and hanging wires above.
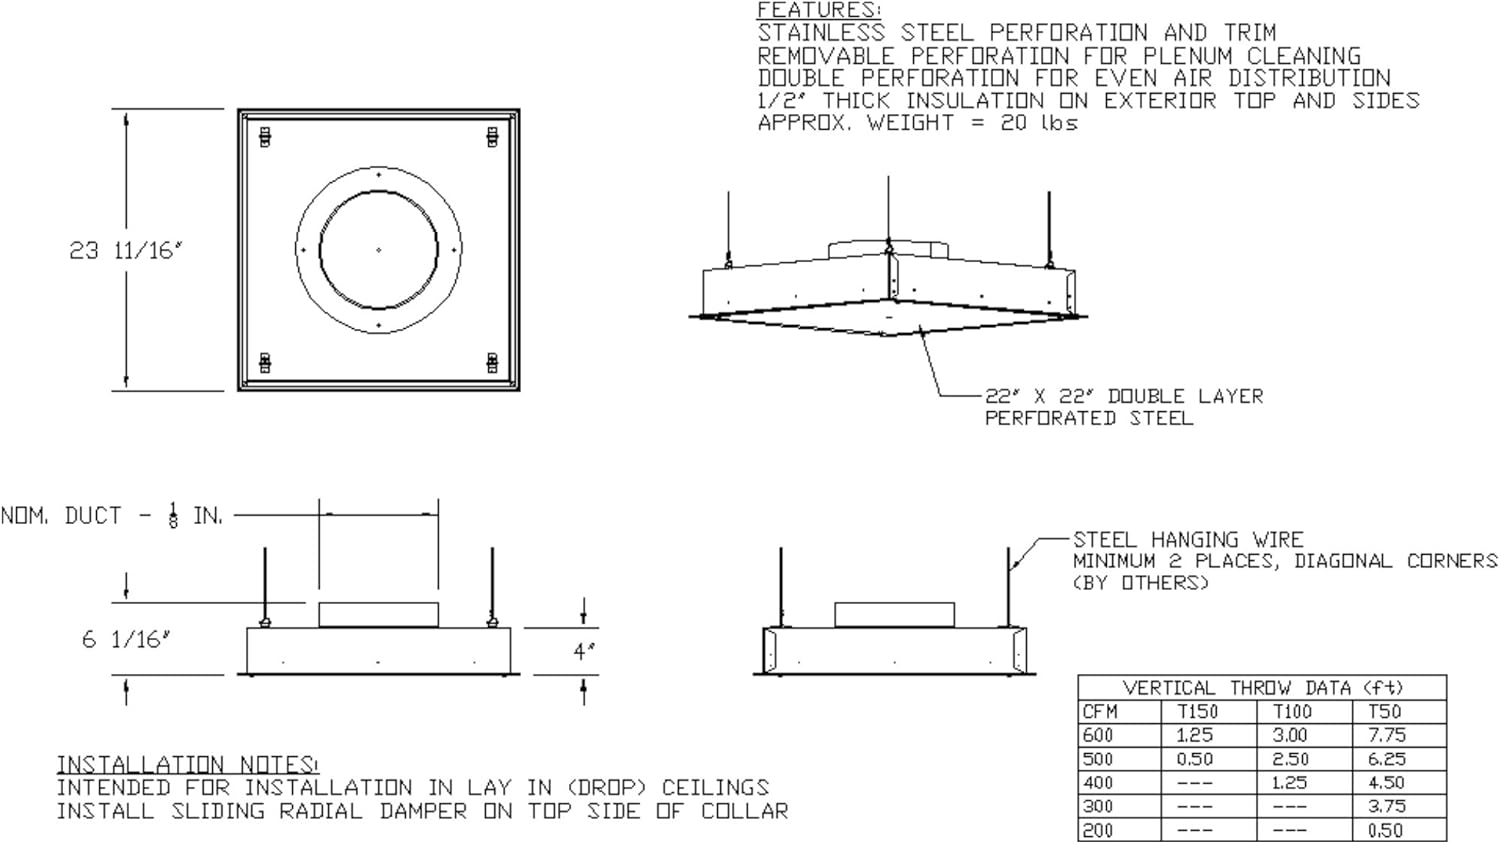
Figure 4: Technical diagram illustrating dimensions, features, and installation notes for the diffuser, including details on hanging wires and insulation.
4. Operation
The CAPTIVE-AIRE Perforated Ceiling Diffuser operates passively to distribute conditioned air. Once installed and connected to the HVAC system, it will continuously deliver replacement air. The double-layer perforated design ensures a laminar (smooth, non-turbulent) air discharge pattern, which is crucial for maintaining the efficiency of nearby exhaust hoods.
Unlike traditional directional diffusers that can create turbulence and degrade hood performance, this diffuser is specifically designed to minimize air disturbance, making it ideal for environments requiring precise air management.
If a sliding radial damper was installed, airflow can be adjusted by manipulating the damper mechanism located on the top side of the collar. This adjustment should be performed by qualified personnel to balance the air system.
5. Maintenance
Regular maintenance ensures the longevity and optimal performance of your CAPTIVE-AIRE Perforated Ceiling Diffuser.
5.1 Cleaning
- The diffuser features removable perforation for plenum cleaning. Periodically remove the perforated panel to access and clean the plenum area.
- Wipe the stainless steel surfaces with a soft, damp cloth and a mild, non-abrasive cleaner. Avoid harsh chemicals or abrasive materials that could scratch the finish.
- Ensure the perforated surface remains clear of obstructions to maintain proper airflow.
5.2 Inspection
- Periodically inspect the diffuser for any signs of damage, corrosion, or loose connections.
- Check the integrity of the hanging wires and ensure they are securely fastened.
- Verify that the insulation is intact and free from damage to prevent condensation issues.
6. Troubleshooting
This section addresses common issues that may arise with air diffusers. The CAPTIVE-AIRE Perforated Ceiling Diffuser is designed for reliability, but understanding potential problems can aid in diagnosis.
| Problem | Possible Cause | Solution |
|---|---|---|
| Reduced Airflow |
|
|
| Condensation on Diffuser Surface |
|
|
| Unusual Noise |
|
|
For issues not listed or if troubleshooting steps do not resolve the problem, contact a qualified HVAC technician or CAPTIVE-AIRE customer support.
7. Specifications
| Attribute | Detail |
|---|---|
| Brand | CAPTIVE-AIRE |
| Model Name | DI-PSP 24x24 |
| Part Number | DI-PSP 24x24 |
| Material | Stainless Steel |
| Finish Type | Stainless Steel |
| Color | Stainless Steel |
| Item Weight | Approximately 20 pounds |
| Installation Type | Drop-In (for standard ceiling grids) |
| Duct Connection Size | 12" Round Supply Collar (other sizes available for different models) |
| Insulation | 1/2" thick insulation on exterior top and sides |
| Perforation | Double layer perforated steel, removable for cleaning |
8. Warranty and Support
Specific warranty information for the CAPTIVE-AIRE Stainless Steel Perforated Ceiling Diffuser is typically provided with the product at the time of purchase or can be obtained directly from the manufacturer. Please refer to your purchase documentation for details regarding warranty coverage and terms.
For technical support, replacement parts, or further inquiries, please contact CAPTIVE-AIRE customer service or visit their official website. You can also find more information on the CAPTIVE-AIRE Store on Amazon.