1. Introduction
This manual provides instructions for the safe and effective use of your BTMETER 980G Non-Contact Digital Infrared Thermometer. This device is designed for measuring surface temperatures from a distance, making it suitable for various applications such as cooking, automotive maintenance, HVAC, and industrial tasks. It is important to note that this thermometer is not intended for measuring human body temperature.
2. Safety Information
- Laser Safety: The thermometer emits a Class 2 laser. Do not stare directly into the laser beam or direct it at other people or animals. Avoid direct eye exposure.
- Not for Human Temperature: This device is designed for industrial and household surface temperature measurements only. It is not calibrated for medical use or for measuring human body temperature.
- Operating Environment: Do not use the thermometer in environments with explosive gas, vapor, or dust.
- Maintenance: Do not attempt to disassemble or modify the device. Refer to the maintenance section for cleaning instructions.
- Battery Handling: Follow proper battery installation and disposal guidelines. Remove batteries if the device will not be used for an extended period.
3. Product Overview
Familiarize yourself with the components of your BTMETER 980G Infrared Thermometer:

Image: Labeled diagram showing the thermometer's laser, probe, trigger, battery compartment, and LCD display with indicators for battery, data hold, emissivity, laser pointer, unit selection, and MAX/MIN/AVG/HAL/LAL display.
- Thermometer Probe: The sensor that detects infrared radiation.
- Laser to Aim: A red laser dot to help pinpoint the measurement area.
- Trigger: Press to initiate a temperature scan.
- LCD Display: Shows temperature readings, mode indicators, and settings.
- Mode Button: Cycles through measurement modes (MAX/MIN/AVG/HAL/LAL).
- Up/Down Buttons: Adjust emissivity or alarm thresholds.
- ℃/℉ Button: Toggles between Celsius and Fahrenheit units.
- Laser/Backlight Button: Toggles the laser pointer and display backlight.
- Battery Cover: Located in the handle, for 9V battery access.
4. Setup
4.1 Battery Installation
The BTMETER 980G requires one 9V battery (included). To install:
- Open the battery compartment cover located at the bottom of the handle.
- Connect the 9V battery to the terminal clips, ensuring correct polarity (+ to + and - to -).
- Place the battery into the compartment and close the cover securely.

Image: The BTMETER 980G Infrared Thermometer shown alongside a 9V battery, indicating the power source.
5. Operation
5.1 Taking a Measurement
- Point the thermometer at the target surface.
- Press and hold the trigger to begin scanning. The laser pointer will activate (if enabled) to help aim. The display will show the current temperature.
- Release the trigger to hold the reading on the display for approximately 7 seconds. The 'HOLD' icon will appear.

Image: Visual guide showing the action of holding the trigger to scan and releasing it to hold the temperature reading on the display.
5.2 Distance-to-Spot Ratio (D:S)
The BTMETER 980G has a D:S ratio of 16:1. This means that at a distance of 16 units, the measurement spot diameter will be 1 unit. For accurate readings, ensure the target area is larger than the spot size. Measuring closer to the object will result in a smaller spot size and more precise readings.
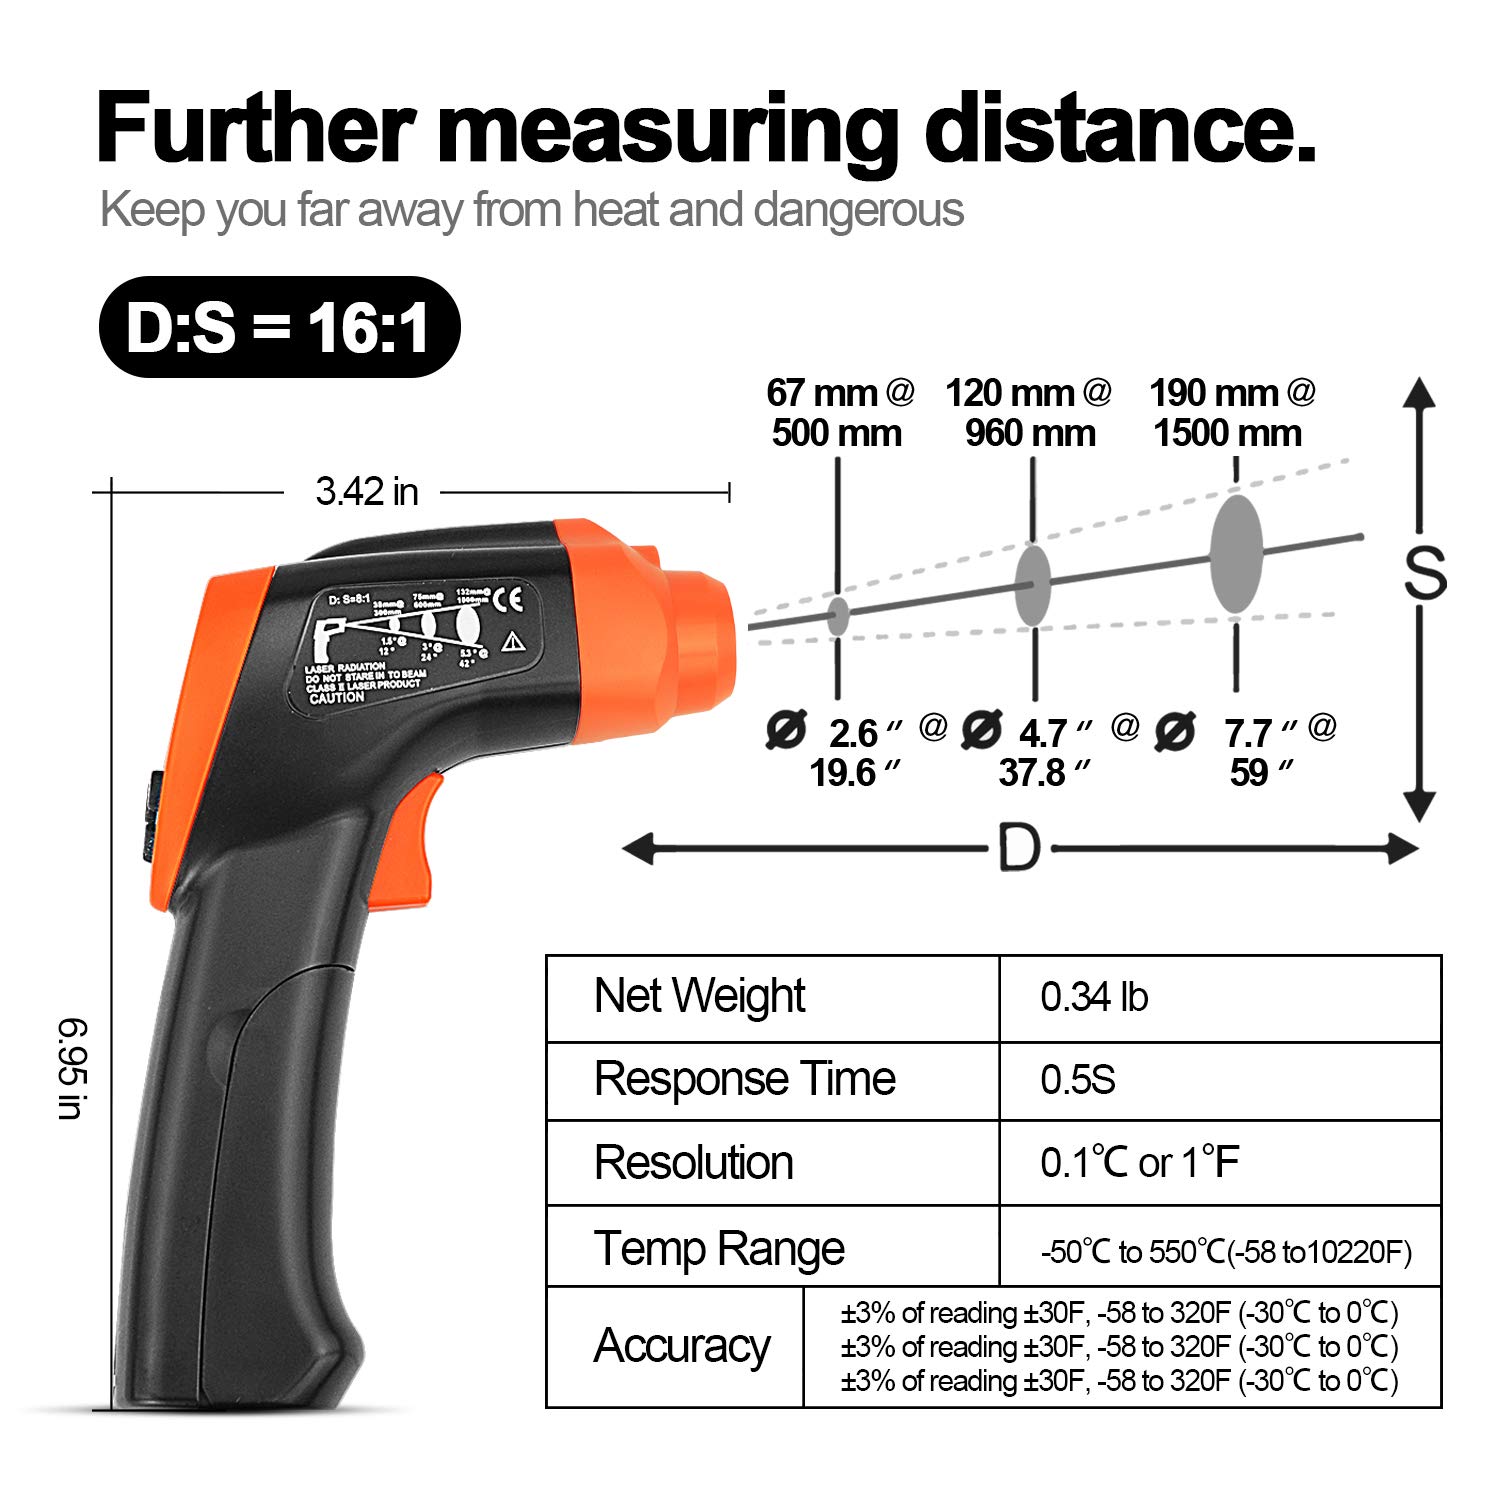
Image: Diagram illustrating the relationship between measurement distance (D) and the diameter of the measurement spot (S) for a 16:1 ratio.
5.3 Emissivity Adjustment
Emissivity (ε) is the ability of a material to emit thermal energy. Different materials have different emissivity values. For accurate measurements, adjust the emissivity setting (0.1 to 1.0) to match the target material. The default setting is 0.95, which is suitable for many organic materials and painted surfaces.
- Press the 'MODE' button until 'EMS' appears on the display.
- Use the Up/Down buttons to adjust the emissivity value.

Image: Examples showing recommended emissivity values for different materials like stainless steel (0.3) and water (0.96).
5.4 Unit Selection (℃/℉)
Press the ℃/℉ button to switch between Celsius and Fahrenheit temperature units.
5.5 Mode Functions (MAX/MIN/AVG/HAL/LAL)
Press the 'MODE' button repeatedly to cycle through the following functions:
- MAX: Displays the maximum temperature recorded during the current scan.
- MIN: Displays the minimum temperature recorded during the current scan.
- AVG: Displays the average temperature recorded during the current scan.
- HAL (High Alarm): Set a high temperature threshold. If the measured temperature exceeds this value, an alarm will sound and 'H' will display.
- LAL (Low Alarm): Set a low temperature threshold. If the measured temperature falls below this value, an alarm will sound and 'L' will display.
To set HAL or LAL values:
- Select HAL or LAL mode using the 'MODE' button.
- Use the Up/Down buttons to adjust the desired alarm temperature.

Image: The thermometer's display indicating a high temperature alarm ('H' and 'HAL') and a low temperature alarm ('L' and 'LAL').
5.6 Auto Shut-off
The thermometer will automatically shut off after approximately 10 seconds of inactivity to conserve battery life.
6. Maintenance
6.1 Cleaning
To clean the thermometer, wipe the casing with a damp cloth. Do not use abrasive cleaners or immerse the device in water. Keep the lens of the infrared sensor clean for accurate readings.
6.2 Battery Replacement
When the battery indicator on the LCD display shows low power, replace the 9V battery as described in Section 4.1. Dispose of used batteries responsibly.
7. Troubleshooting
- No Display/Device Not Turning On: Check if the 9V battery is installed correctly and has sufficient charge. Replace the battery if necessary.
- Inaccurate Readings:
- Ensure the target surface is larger than the measurement spot size.
- Verify the emissivity setting matches the material being measured.
- Check for obstructions or dirt on the infrared sensor lens.
- Ensure the distance to the target is appropriate for the 16:1 D:S ratio.
- Laser Not Working: Check if the laser pointer is enabled using the Laser/Backlight button.
- Display Backlight Not Working: Check if the backlight is enabled using the Laser/Backlight button.
8. Specifications
| Feature | Specification |
|---|---|
| Temperature Range | -58℉ to 1292℉ (-50℃ to 700℃) |
| Accuracy | ±3% of reading ±30℉ (-58 to 320℉) ±3% of reading ±30℉ (-30℃ to 0℃) |
| Distance Spot Ratio (D:S) | 16:1 |
| Response Time | 500ms (95% response) |
| Emissivity | Adjustable 0.1 to 1.0 |
| Display Type | LCD with Backlight |
| Auto Shut-off | 10 seconds (approx.) |
| Power Supply | 1 x 9V Battery |
| Material | Plastic |
| Product Dimensions | Approximately 6.95 x 3.42 inches |
9. Warranty and Support
BTMETER provides a 365-day guarantee for this digital infrared thermometer. For any product inquiries, technical support, or warranty claims, please contact BTMETER customer service through the retailer where the product was purchased or visit the official BTMETER website for contact information.


