1. Introduction
This manual provides detailed instructions for the safe and effective use of your Sherline Hydraulic Tongue Weight Scale Combo. This device is designed to accurately measure the tongue weight of trailers, which is crucial for safe towing. The combo includes an installed 0-5000 Lb. gauge and a spare 0-2000 Lb. gauge.
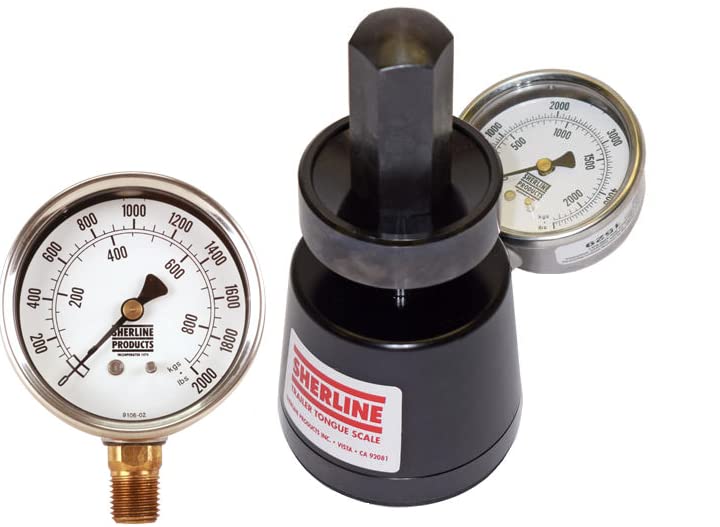
Image 1.1: Sherline Hydraulic Tongue Weight Scale Combo. This image shows the main scale unit with two gauges, one installed and one separate.
2. Safety Information
Always prioritize safety when using this equipment. Incorrect tongue weight can lead to unstable towing conditions and accidents.
- Ensure the scale is placed on a stable, level surface before taking measurements.
- Do not exceed the maximum weight capacity of the installed gauge (5000 Lb. or 2250 kg).
- Keep hands and feet clear of the scale and trailer hitch during measurement.
- Use appropriate personal protective equipment (PPE) if necessary, especially when handling tools for gauge replacement.
- Store the scale in a dry, protected environment when not in use.
3. Setup and Initial Use
The Sherline Hydraulic Tongue Weight Scale is designed for straightforward use. It comes with a 0-5000 Lb. gauge pre-installed.
3.1 Components Overview
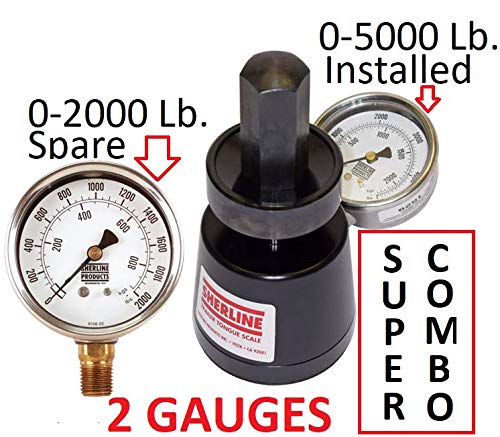
Image 3.1: Components of the Sherline Tongue Weight Scale Combo. This image highlights the main scale unit, the pre-installed 0-5000 Lb. gauge, and the separate 0-2000 Lb. spare gauge.
- Main Scale Unit: The hydraulic cylinder that measures the weight.
- Installed Gauge (0-5000 Lb. / 0-2250 kg): For heavier tongue weights.
- Spare Gauge (0-2000 Lb. / 0-900 kg): For lighter tongue weights, can be swapped with the installed gauge.
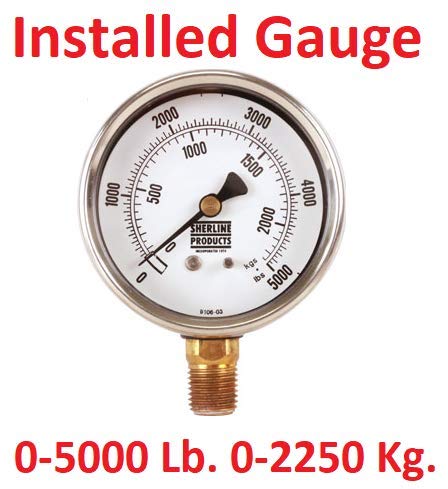
Image 3.2: Installed 0-5000 Lb. Gauge. This image provides a clear view of the higher capacity gauge, showing both pounds and kilograms.
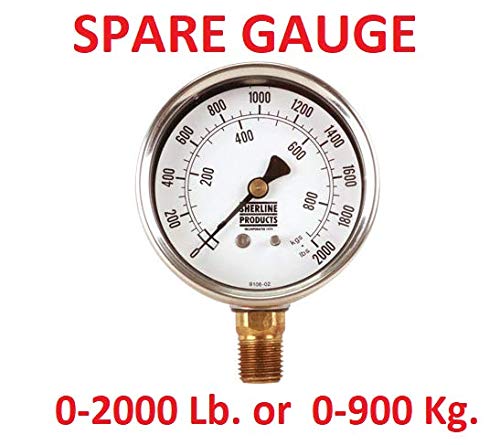
Image 3.3: Spare 0-2000 Lb. Gauge. This image shows the lower capacity gauge, also displaying measurements in pounds and kilograms.
4. Operating Instructions
To measure the tongue weight of your trailer:
- Ensure the trailer is level and disconnected from the towing vehicle.
- Place the Sherline Tongue Weight Scale on a firm, level surface directly under the trailer coupler or jack stand.
- Carefully lower the trailer coupler or jack stand onto the top of the scale.
- Read the tongue weight directly from the gauge in pounds (Lb) or kilograms (kg).
- Once the measurement is taken, carefully raise the trailer coupler or jack stand off the scale.
- Compare the measured tongue weight to the recommended tongue weight range for your specific trailer and towing vehicle. This information is typically found in your trailer or vehicle owner's manual.
Note: If the tongue weight exceeds the capacity of the 0-2000 Lb. gauge, use the 0-5000 Lb. gauge. If the tongue weight is too low for accurate reading on the 0-5000 Lb. gauge, consider swapping to the 0-2000 Lb. gauge.
5. Maintenance and Gauge Replacement
Regular maintenance ensures the longevity and accuracy of your Sherline Tongue Weight Scale. This section details how to replace a gauge.

Image 5.1: Gauge Replacement Procedure. This image illustrates the steps for disassembling the scale to replace a gauge, including visual aids for proper positioning and lubrication.
5.1 Gauge Replacement Procedure
- Secure the Scale: Hold your Tongue Weight Scale in a bench vise. Use rubber jaws on the vise to prevent damage to the scale body. You can also use folded rags between the vise jaws and the scale body.
- Remove the Gauge: With the scale body held securely and the gauge facing upward, use a 9/16" open-end wrench (not included) to unscrew the gauge from the body. The gauge base is brass, and a loose-fitting wrench may round off the flats, making future removal difficult.
- Remove the Piston: Once the gauge is removed, the piston can be pulled out.
- Replace O-ring (if needed): If you need to replace the O-ring, use a small flat blade screwdriver or a dental pick to carefully remove the old O-ring. Be cautious not to scratch the inside of the O-ring groove. Clean the O-ring groove and wipe some hydraulic oil on it for ease of assembly.
- Install and Lubricate Piston: Once the O-ring is installed and lubricated, you can insert the piston back into the base. Push it gently into the hole until the O-ring passes past the top lip of the hole (some twisting motion may help). Once the piston is in, push it down until there is approximately a ½" gap between the top of the base and the lower side of the piston.
- Correct Piston Position:
- Hold the body with the gauge straight up at 90 degrees. This allows any air pockets to form inside the cavity.
- Hold the base so the bottom of the base is between 90 to 95 degrees. At this angle, any air bubbles trapped in the cavity will escape through the gauge hole.
- Fill with Hydraulic Oil: With the piston in the correct position and the base at the correct angle, fill the base with Hydraulic oil. Hydraulic-jack oil is recommended, but any light weight oil will suffice. Fill until the oil overflows out of the gauge hole. This ensures minimal air in the system.
- Install New Gauge: Apply Teflon® tape (about 5 or 6 wraps) around the threads of the new gauge (original or new). As you begin to screw in the gauge, the excess oil will overflow out of the hole. This should be sufficient to displace any air during assembly. Thread the gauge in until it starts to get tight, then use the wrench to turn it one more revolution until the face of the gauge is pointing up.
6. Troubleshooting
- Inaccurate Readings:
- Ensure the scale is on a level surface.
- Verify the trailer is level when taking the measurement.
- Check for air in the hydraulic system (refer to gauge replacement steps for proper filling).
- Ensure the correct gauge capacity is being used for the expected tongue weight.
- Gauge Not Moving:
- Confirm the trailer weight is being applied directly to the scale.
- Check if the gauge is damaged. If so, replace it following the instructions in Section 5.
- Ensure there is sufficient hydraulic oil in the system.
- Oil Leakage:
- Inspect the O-ring and gauge threads for damage. Replace O-ring or re-tape threads if necessary.
- Ensure the gauge is tightened properly.
7. Specifications
| Feature | Detail |
|---|---|
| Brand | Sherline |
| Model | Hydraulic Tongue Weight Scale Combo |
| Installed Gauge Capacity | 0-5000 Lb. (0-2250 kg) |
| Spare Gauge Capacity | 0-2000 Lb. (0-900 kg) |
| Product Dimensions (L x W x H) | 11 x 7 x 7 inches |
| Item Weight | 6 Pounds |
| First Available | November 22, 2018 |
8. Warranty and Support
For warranty information or technical support, please contact Sherline customer service. Refer to the product packaging or the official Sherline website for the most current contact details and warranty terms.
Manufacturer: Sherline