1. Introduction
This manual provides essential instructions for the safe installation, operation, and maintenance of your MARINCO Presa Inox 16-30 A shore power inlet. This product is designed for marine applications, providing a robust and reliable connection point for shore power to your vessel. Please read this manual thoroughly before installation and use to ensure proper function and safety.
2. Safety Information
WARNING: Risk of Electric Shock. Always disconnect shore power before installing, servicing, or inspecting this device. Installation should only be performed by a qualified electrician or marine technician in accordance with all applicable electrical codes and standards.
- Ensure the vessel's electrical system is properly grounded.
- Do not operate if the inlet or shore power cord is damaged.
- Keep all electrical connections dry.
- Use only approved marine-grade wiring and connectors.
3. Product Overview
The MARINCO Presa Inox 16-30 A is a high-quality, corrosion-resistant shore power inlet. It features a durable stainless steel (Inox) construction and a protective cover to shield the electrical contacts from the marine environment. The inlet is designed for flush mounting on the vessel's hull or transom.
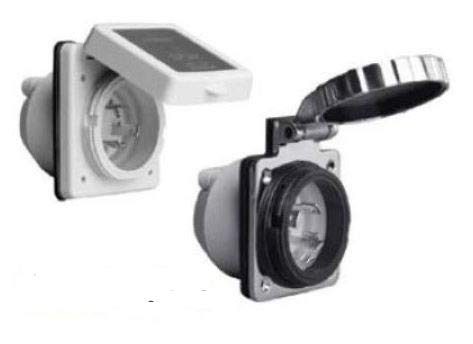
Image 1: MARINCO Presa Inox 16-30 A Shore Power Inlets. This image displays two examples of the MARINCO Presa Inox 16-30 A shore power inlet. The inlet on the left features a white, hinged protective cover, while the inlet on the right has a metallic, hinged protective cover. Both covers are shown in an open position, revealing the internal electrical contacts designed for connecting a shore power cord.
Key components include:
- Inox Housing: Stainless steel body for corrosion resistance.
- Protective Cover: Hinged cover (available in white or metallic finish) to protect contacts when not in use.
- Electrical Contacts: Internal terminals for wiring connection.
- Mounting Flange: For secure attachment to the vessel.
4. Setup and Installation
Before proceeding, ensure all power to the vessel is disconnected at the source.
- Select Mounting Location: Choose a flat, vertical surface on the vessel's exterior that is protected from direct impact and excessive spray. Ensure there is sufficient clearance behind the mounting surface for wiring and connection.
- Prepare Opening: Using the inlet as a template, mark and cut an appropriate opening in the mounting surface. Drill pilot holes for the mounting screws. Ensure the opening is clean and free of burrs.
- Seal the Opening: Apply a marine-grade sealant around the edge of the opening and on the back of the inlet's mounting flange to ensure a watertight seal.
- Wire Connections:
- Route the appropriate gauge marine-grade electrical cable from the vessel's main AC panel to the inlet location.
- Strip the insulation from the cable ends according to the terminal requirements.
- Connect the wires to the corresponding terminals on the back of the inlet. Typically, this involves connecting the Line (Hot), Neutral, and Ground wires. Refer to the wiring diagram provided with your specific vessel's electrical system or consult a qualified technician.
- Ensure all terminal screws are tightened securely to prevent loose connections and overheating.
- Mount the Inlet: Position the inlet into the prepared opening, aligning the mounting holes. Secure the inlet with appropriate marine-grade stainless steel fasteners. Do not overtighten.
- Test Connection: Once installed, ensure all connections are secure. Reconnect shore power and test the vessel's AC system for proper operation.
5. Operating Instructions
To connect to shore power:
- Ensure the shore power pedestal breaker is in the "OFF" position.
- Open the protective cover of the MARINCO Presa Inox inlet.
- Align the shore power cord plug with the inlet and insert it firmly.
- Secure the connection, if applicable, by twisting the locking ring on the shore power cord plug.
- Close the protective cover over the connection to provide additional weather protection.
- Turn the shore power pedestal breaker to the "ON" position.
To disconnect from shore power:
- Turn the shore power pedestal breaker to the "OFF" position.
- Unlock the shore power cord plug (if applicable) and carefully remove it from the inlet.
- Close the protective cover of the MARINCO Presa Inox inlet to protect the contacts.
6. Maintenance
Regular maintenance ensures the longevity and safe operation of your shore power inlet.
- Periodic Inspection: Regularly inspect the inlet for any signs of damage, corrosion, or wear. Check the protective cover for proper function and sealing.
- Cleaning: Keep the inlet and its contacts clean and free of salt residue, dirt, and debris. Use a soft cloth and fresh water. Avoid abrasive cleaners.
- Contact Care: If contacts appear corroded, gently clean them with a non-abrasive electrical contact cleaner. Ensure the inlet is completely dry before reconnecting power.
- Seal Integrity: Periodically check the sealant around the mounting flange for cracks or deterioration. Reapply sealant as necessary to maintain a watertight seal.
7. Troubleshooting
If you experience issues with your MARINCO Presa Inox 16-30 A, consider the following:
- No Power to Vessel:
- Check the shore power pedestal breaker; ensure it is "ON."
- Inspect the shore power cord for damage or loose connections at both ends.
- Verify the vessel's main AC breaker is "ON."
- Check for tripped breakers on the vessel's AC panel.
- Overheating at Inlet/Plug:
- Immediately disconnect power.
- This indicates a loose connection, corroded contacts, or an overloaded circuit. Consult a qualified technician.
- Water Intrusion:
- Ensure the protective cover is properly closed when not in use.
- Inspect the mounting sealant and reapply if compromised.
For persistent issues, contact a qualified marine electrician.
8. Specifications
| Model: | Presa Inox 16-30 A |
| Current Rating: | 16-30 Amperes (A) |
| Material: | Stainless Steel (Inox) |
| Application: | Marine Shore Power Inlet |
| ASIN: | B07KB2P62R |
| First Available: | November 14, 2019 |
Note: Specific voltage ratings may vary based on regional standards and product variants. Always refer to the product's direct labeling for precise voltage compatibility.
9. Warranty Information
MARINCO products are manufactured to high standards and are backed by a limited warranty against defects in materials and workmanship. The duration and terms of the warranty may vary by region and product type. Please retain your proof of purchase. For detailed warranty information, refer to the official MARINCO website or contact customer support.
10. Support and Contact
For technical assistance, troubleshooting beyond this manual, or warranty claims, please contact MARINCO customer support through their official website or authorized distributors. When contacting support, please have your product model (Presa Inox 16-30 A) and ASIN (B07KB2P62R) available.
Official MARINCO Website: www.marinco.com


