1. Introduction
This manual provides detailed instructions for the installation, setup, and operation of your MOES WiFi Smart Wall Touch Light Switch. Please read this manual thoroughly before installation and use to ensure proper function and safety.

Figure 1: MOES WiFi Smart Wall Touch Light Switch (1 Gang, Black)
2. Safety Information
- Electrical Installation: Installation should only be performed by a qualified electrician or a person with a thorough understanding of electrical wiring.
- Power Disconnection: Always disconnect power at the circuit breaker before installing, removing, or servicing the switch. Failure to do so may result in serious injury or death.
- Neutral Wire Required: This smart switch requires a neutral wire in your switch box to operate correctly. If you do not have a neutral wire, this switch is not compatible.
- Wi-Fi Network: Requires a 2.4GHz Wi-Fi network connection. It is not compatible with 5GHz Wi-Fi networks.
- Compatibility: Only compatible with 1 gang switch boxes. Not compatible with standard US 2/3/4 gang switch plates. This switch is not designed for 3-way switch configurations or as a dimmer switch.
- Indoor Use Only: This device is intended for indoor use in dry locations.
- Operating Voltage: Ensure your electrical system operates within the specified voltage range (240 Volts).

Figure 2: Key compatibility and wiring considerations.
3. Package Contents
- MOES WiFi Smart Wall Touch Light Switch (1 Gang)
- User Manual
- Mounting Screws
4. Product Features
- Touch Control: Features a toughened glass surface for touch operation.
- Voice Control: Compatible with Amazon Alexa (Amazon Echo/Dot/Tap) and Google Assistant for hands-free operation.
- Wi-Fi Remote Control: Control the wall switch wirelessly from anywhere using the 'Smart Life' app on your smartphone via Wi-Fi or 4G network. No separate hub is required.
- Timing Function: Schedule lights and appliances to turn on/off automatically at specific times.

Figure 3: Smart Switch in a home environment.
5. Specifications
| Specification | Value |
|---|---|
| Operation Mode | Automatically, Off, Smart Switch |
| Current Rating | 10 Amps |
| Operating Voltage | 240 Volts |
| Contact Type | Normally Open |
| Connector Type | Wireless |
| Terminal | Screw |
| Item Dimensions (L x W x H) | 4.7 x 2.9 x 1.5 inches |
| Circuit Type | 1-way |
| Actuator Type | Touch |
| Contact Material | Brass |
| International Protection Rating | IPX4 |
| Number of Positions | 3 |
| Controller Type | Amazon Alexa, Google Assistant |
| Control Method | Remote |
| Connectivity Protocol | Wi-Fi (2.4GHz only) |
| Wattage | 1000 watts |
| Item Weight | 7.4 ounces |

Figure 4: Product dimensions and wiring terminals.
6. Installation Guide
Before You Begin:
- Ensure power is OFF at the circuit breaker.
- Confirm your switch box has a neutral wire. This is essential for the smart switch to function.
- Verify your Wi-Fi network is 2.4GHz.
- This switch is for 1-gang setups only and is not a dimmer or 3-way switch.
Wiring Steps:
- Turn off power at the circuit breaker for the light switch you are replacing.
- Remove the existing wall plate and switch.
- Identify the wires: Live (usually black), Neutral (usually white), and Load (to the light fixture). A Ground wire (usually green or bare copper) may also be present.
- Connect the wires from your wall box to the corresponding terminals on the MOES Smart Switch:
- N: Connect the Neutral wire (usually white).
- L: Connect the Live wire (incoming power, usually black).
- L1: Connect the Load wire (to the light fixture). For 1-gang switches, only L1 is typically used.
- Ground: If present, connect the ground wire to the switch's ground terminal (if available) or safely cap it.
- Secure the switch into the wall box using the provided screws.
- Attach the glass panel.
- Restore power at the circuit breaker.
After installation, the indicator lights on the switch should blink quickly, indicating it is ready for Wi-Fi connection in Default Normal Mode.

Figure 5: Replacing a traditional switch with the smart touch switch.
7. App Setup and Pairing
To control your smart switch via smartphone, download the 'Smart Life' app from the App Store (iOS) or Google Play (Android).
- Download and Register: Install the 'Smart Life' app and register an account.
- Add Device: Open the app, tap '+' or 'Add Device', and select 'Light Switch' or 'Electrical Switch'.
- Confirm Indicator Status: Ensure the indicator light on your switch is blinking quickly. If not, you may need to reset the device.
- Connect to Wi-Fi: Follow the in-app instructions to connect the switch to your 2.4GHz Wi-Fi network. Enter your Wi-Fi password when prompted.
- Device Renaming: Once connected, you can rename the switch for easier identification (e.g., "Living Room Light").
Resetting the Device:
If the indicator lights are not blinking quickly, or if you need to reset the switch for any reason:
- Press and hold any button on the switch for approximately 20 seconds until the indicator light blinks quickly. This puts the device into Default Normal Mode for Wi-Fi connection.
- If the indicator light blinks very slowly after holding for 20 seconds, it is in AP (Access Point) mode. This is an alternative pairing mode if Default Normal Mode fails.
Video 1: Demonstrates how to reset or unlock the device by pressing and holding a button for 20 seconds, showing the indicator light changes for different pairing modes.
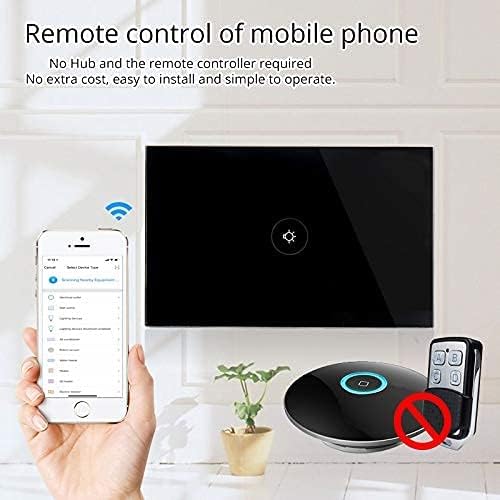
Figure 6: Remote control via mobile application.
8. Operation
Once installed and paired with the 'Smart Life' app, you can operate your switch in several ways:
- Manual Touch: Simply touch the glass panel to turn the connected light or appliance on or off.
- App Control: Use the 'Smart Life' app on your smartphone to remotely turn the switch on or off from anywhere with an internet connection.
9. Voice Control Integration
The MOES Smart Switch is compatible with Amazon Alexa and Google Assistant for convenient voice control.
- Link 'Smart Life' Account: In your Amazon Alexa or Google Home app, search for the 'Smart Life' skill/action and enable it.
- Log In: Log in with your 'Smart Life' account credentials.
- Discover Devices: Once linked, ask Alexa or Google Assistant to "Discover devices" or manually initiate device discovery in their respective apps.
- Voice Commands: You can now use voice commands such as "Alexa, turn on [device name]" or "Hey Google, turn off [device name]". Use the names you assigned in the 'Smart Life' app.

Figure 7: Voice control with Alexa and Google Home.
10. Timing Function
The 'Smart Life' app allows you to set schedules and timers for your smart switch, automating your lighting or appliances.
- Create Schedules: In the 'Smart Life' app, navigate to the device settings and select 'Schedule' or 'Timer'.
- Set On/Off Times: Configure specific times for the switch to turn on or off. You can set daily, weekly, or custom schedules.
- Sunrise/Sunset Automation: Some app versions allow for automation based on local sunrise and sunset times.

Figure 8: Setting schedules via the Smart Life app.
11. Troubleshooting
| Problem | Possible Cause | Solution |
|---|---|---|
| Switch not responding to touch. | No power, incorrect wiring, or device locked. | Check circuit breaker. Verify wiring (Live, Neutral, Load). Perform a device reset (hold button for 20 seconds). |
| Cannot connect to Wi-Fi. | Incorrect Wi-Fi band (5GHz), weak signal, incorrect password, or device not in pairing mode. | Ensure your router is broadcasting a 2.4GHz signal. Move closer to the router. Double-check Wi-Fi password. Reset the switch to enter pairing mode (blinking indicator). Try AP mode if normal mode fails. |
| Voice control not working. | 'Smart Life' skill not enabled, incorrect device name, or no internet connection. | Ensure the 'Smart Life' skill is enabled and linked in your Alexa/Google Home app. Verify device names match. Check internet connectivity. |
| Switch goes offline frequently. | Weak Wi-Fi signal, network congestion, or router issues. | Improve Wi-Fi signal strength (e.g., Wi-Fi extender). Reduce network congestion. Restart your router. |
12. Maintenance
- Cleaning: Gently wipe the glass panel with a soft, dry cloth. Avoid abrasive cleaners or solvents.
- Firmware Updates: Periodically check the 'Smart Life' app for available firmware updates to ensure optimal performance and security.
13. Warranty and Support
For warranty information or technical support, please refer to the documentation provided with your purchase or contact MOES customer service directly. Contact details can typically be found on the MOES official website or within the 'Smart Life' app's support section.
Video 2: Overview of MOES smart home products and their integration, demonstrating various smart life features like color temperature control, music sync lighting, and smart automation based on environmental sensors.


