
Introduction
Welcome to the instruction manual for your Celestron 70mm Travel Scope DX. This portable refractor telescope is designed for both terrestrial (land-based) and astronomical viewing, offering clear and magnified views of distant objects. Its lightweight and compact design, coupled with a convenient travel backpack, makes it an ideal companion for outdoor adventures and stargazing sessions. This manual will guide you through the setup, operation, and maintenance of your telescope to ensure optimal performance and enjoyment.
What's Included
Your Celestron 70mm Travel Scope DX package includes the following components:
- 70mm Refractor Telescope Optical Tube
- Adjustable Aluminum Tripod
- 20mm Eyepiece (for lower magnification)
- 10mm Eyepiece (for higher magnification)
- Erect Image Diagonal (corrects image orientation for terrestrial viewing)
- 2x Barlow Lens (doubles the magnification of any eyepiece)
- Smartphone Adapter (for connecting your smartphone to the eyepiece)
- Bluetooth Remote Shutter (for remote photo capture with smartphone)
- Moon Filter (reduces glare for comfortable lunar observation)
- Finderscope (for easier object location)
- Custom Travel Backpack
- User Manual and Astronomy Software Package (digital download)

Setup
Setting up your Celestron Travel Scope is quick and easy, requiring no tools.
- Set up the Tripod: Extend the tripod legs to your desired height. The tripod is designed to be lightweight and portable, fitting easily into the included backpack.
- Attach the Telescope Tube: Secure the telescope optical tube to the tripod mount. Ensure it is firmly attached using the provided screws or clamps.
- Install the Finderscope: The finderscope helps you locate objects in the sky or on land. Attach it to its designated bracket on the telescope tube.
- Insert the Erect Image Diagonal: Slide the erect image diagonal into the focuser of the telescope. This accessory is crucial for terrestrial viewing as it corrects the image orientation, making objects appear right-side up and correctly oriented.
- Attach an Eyepiece: Insert either the 20mm or 10mm eyepiece into the erect image diagonal. The 20mm eyepiece provides a lower magnification and wider field of view, ideal for initial object location. The 10mm eyepiece offers higher magnification for more detailed views.
- Attach the Smartphone Adapter (Optional): For capturing images or video, attach the smartphone adapter to the eyepiece. This adapter securely holds your smartphone, aligning its camera with the telescope's eyepiece.


Operating Your Telescope
Once your telescope is set up, you're ready to begin observing.
Locating Objects
Use the finderscope to initially locate your desired object. The finderscope provides a wider field of view, making it easier to pinpoint targets before switching to the main telescope's view.
Adjusting Magnification
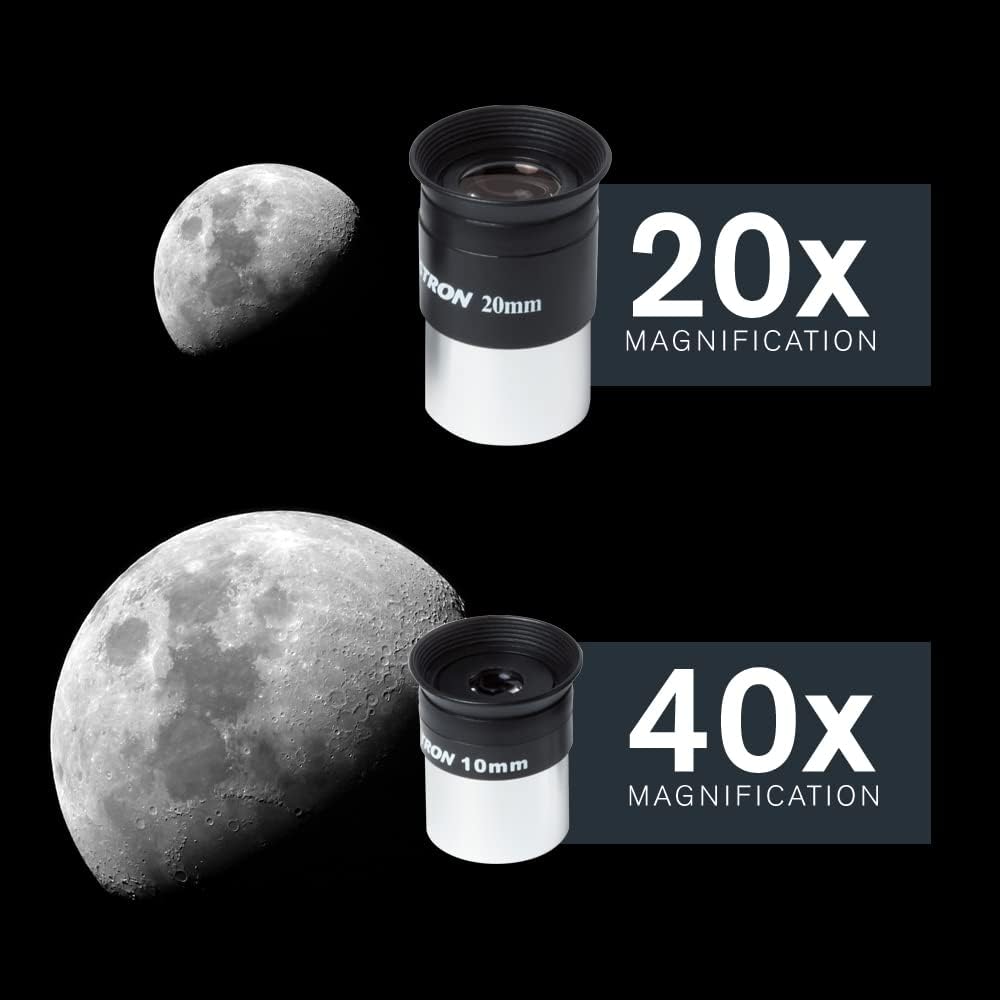
Your telescope comes with two eyepieces: a 20mm and a 10mm. The 20mm eyepiece offers 20x magnification, while the 10mm eyepiece provides 40x magnification. For even higher power, insert the 2x Barlow lens between the diagonal and the eyepiece. This will double the magnification of your chosen eyepiece (e.g., 20mm eyepiece with 2x Barlow becomes 40x, 10mm eyepiece with 2x Barlow becomes 80x).
Terrestrial Viewing
For observing land-based objects like wildlife or distant landscapes, ensure the erect image diagonal is installed. This will provide a correctly oriented view. The 70mm aperture allows for significant light gathering, making daytime observations clear and bright.

Astronomical Viewing
Your Travel Scope is excellent for observing celestial objects. You can clearly see craters on the Moon and even discern the rings of Saturn and the moons of Jupiter under good viewing conditions. The included Moon filter can be screwed onto the eyepiece to reduce the Moon's brightness, providing a more comfortable and detailed view.

Smartphone Integration
With the smartphone adapter, you can easily capture photos and videos through your telescope. Use the Bluetooth remote shutter to trigger your phone's camera without touching the telescope, minimizing vibrations and ensuring sharper images.
Maintenance
Proper care and maintenance will ensure the longevity and performance of your Celestron Travel Scope.
- Cleaning Optics: Use a soft, lint-free cloth specifically designed for optical lenses to gently wipe dust from the lenses. For stubborn smudges, use a small amount of optical cleaning fluid. Avoid touching the lens surfaces with your fingers.
- Storage: Always store your telescope and accessories in the provided travel backpack when not in use. This protects them from dust, moisture, and accidental damage. Ensure all caps are on the lenses and eyepieces.
- Handling: Handle the telescope with care, especially when adjusting its position or changing eyepieces. Avoid sudden movements or impacts.
Troubleshooting
Image Instability/Shaking
The included lightweight tripod is designed for portability. When fully extended or during high-magnification viewing, you may experience some image instability or shaking. To mitigate this:
- Use the Bluetooth Remote: When capturing photos with your smartphone, use the Bluetooth remote to avoid touching the telescope, which can cause vibrations.
- Consider a Sturdier Tripod: For more critical astronomical observations or if stability is a primary concern, consider using a heavier, more stable camera tripod with the telescope. The telescope is compatible with standard camera tripods.
- Shorten Tripod Legs: If possible, use the tripod at a shorter height to increase stability.
Specifications
| Feature | Specification |
|---|---|
| Brand | Celestron |
| Model Name | 70mm Travel Scope |
| Objective Lens Diameter | 70 Millimeters |
| Item Weight | 3.3 pounds (1.5 kg) |
| Eye Piece Lens Description | Generic High-Quality Eyepiece (20mm, 10mm) |
| Telescope Mount Description | Altazimuth Mount |
| Focus Type | Manual Focus |
| Power Source | Manual |
| Finderscope | Reflex |
| Compatible Devices | Smartphone |
Warranty and Customer Support
Celestron stands behind its products with an unbeatable warranty and dedicated customer support. Your purchase includes:
- Two-Year Warranty: Enjoy peace of mind with a comprehensive two-year warranty covering manufacturing defects.
- Unlimited Technical Support: Access unlimited technical support from Celestron's team of US-based experts, ready to assist you with any questions or issues.
For further assistance, please refer to the official Celestron website or contact their customer service directly.


