1. Introduction and Safety Information
This manual provides essential instructions for the safe and efficient operation of your Indesit YT M11 82K RX IT Heat Pump Tumble Dryer. Please read it thoroughly before installation, use, or maintenance. Keep this manual for future reference.
Important Safety Instructions:
- Ensure the appliance is properly earthed.
- Do not allow children to play with the appliance.
- Do not overload the dryer. Refer to the maximum load capacity (8 kg).
- Clean the lint filter after every cycle to prevent fire hazards.
- Do not dry unwashed items in the tumble dryer.
- Items that have been soiled with substances such as cooking oil, acetone, alcohol, petrol, kerosene, spot removers, turpentine, waxes, and wax removers should be washed in hot water with an extra amount of detergent before being dried in the tumble dryer.
- Items such as foam rubber (latex foam), shower caps, waterproof textiles, rubber-backed articles, and clothes or pillows fitted with foam rubber pads should not be dried in the tumble dryer.
- Remove all objects from pockets such as lighters and matches.
- The appliance must not be installed behind a lockable door, a sliding door, or a door with a hinge on the opposite side to that of the tumble dryer, in such a way that a full opening of the tumble dryer door is restricted.
2. Product Overview
Familiarize yourself with the main components of your Indesit YT M11 82K RX IT Tumble Dryer.

Figure 2.1: Front view of the Indesit YT M11 82K RX IT Tumble Dryer, showing the control panel, loading door, and lower filter access panel.

Figure 2.2: Close-up view of the tumble dryer drum interior, highlighting the textured surface designed for efficient drying and garment care.

Figure 2.3: View of the lower access panel opened, revealing the lint filter and condenser area, crucial for maintenance.
3. Setup and Installation
3.1 Unpacking
- Remove all packaging materials from the appliance.
- Check for any transport damage. If damage is found, do not install or operate the appliance and contact your retailer.
3.2 Positioning
- Place the dryer on a firm, level floor.
- Ensure adequate ventilation around the appliance. Do not block the air intake at the front or the ventilation openings at the rear.
- Avoid installing the dryer in rooms where the temperature may fall below 5°C, as this can affect performance.
3.3 Electrical Connection
- Connect the appliance to a properly earthed electrical outlet.
- Ensure the voltage and frequency match the specifications on the rating plate.
- Do not use extension cords or multiple adapters.
3.4 Water Drainage
The dryer collects condensed water in a removable tank. You can also connect the dryer to a permanent drain using the supplied drainage hose (if applicable) to avoid manually emptying the tank.
- To use the internal water tank: Ensure the tank is correctly seated before each cycle. Empty it after each cycle.
- For permanent drainage: Refer to the specific instructions in the full manual for connecting the drainage hose to a waste pipe.
4. Operating Instructions
4.1 Before Each Cycle
- Check garment care labels for suitability for tumble drying.
- Empty pockets of all items.
- Close zippers, hooks, and fastenings.
- Separate laundry by fabric type and desired dryness level.
- Ensure the water tank is empty and the lint filter is clean.
4.2 Loading the Dryer
- Open the dryer door.
- Load laundry loosely into the drum, ensuring not to exceed the maximum load capacity of 8 kg.
- Close the door firmly.
4.3 Program Selection
Turn the program selector knob to choose the desired drying program. The control panel features various programs for different fabric types and dryness levels (e.g., Cotton, Synthetics, Delicates, Iron Dry, Cupboard Dry).
4.4 Starting a Cycle
- After selecting the program, press the "Start/Pause" button to begin the drying cycle.
- The display will show the estimated remaining time.
4.5 End of Cycle
- The dryer will signal the end of the cycle.
- Remove laundry promptly to minimize creasing.
- Clean the lint filter and empty the water tank after every cycle.
5. Maintenance
Regular maintenance ensures optimal performance and extends the lifespan of your tumble dryer.
5.1 Cleaning the Lint Filter (After Every Cycle)
- Open the dryer door.
- Pull out the lint filter located inside the door opening.
- Remove any accumulated lint by hand or with a soft brush.
- Rinse the filter under running water if heavily soiled, then dry thoroughly before reinserting.
- Push the filter back into its position until it clicks.
5.2 Emptying the Water Tank (After Every Cycle)
- Pull out the water tank from its compartment (usually located at the top left or bottom left of the control panel).
- Pour the collected water into a sink.
- Push the water tank back into its compartment until it is securely in place.
5.3 Cleaning the Condenser Filter (Periodically)
The condenser filter is located behind the lower access panel (refer to Figure 2.3). Clean it every few cycles or as indicated by the appliance.
- Open the lower access panel.
- Unlock and remove the condenser filter.
- Rinse the filter thoroughly under running water to remove lint and debris.
- Dry the filter completely before reinserting it.
- Close the access panel securely.
5.4 Cleaning the Exterior
- Wipe the exterior surfaces with a soft, damp cloth.
- Do not use abrasive cleaners or solvents.
6. Troubleshooting
Before contacting customer service, please check the following common issues and solutions:
| Problem | Possible Cause | Solution |
|---|---|---|
| Dryer does not start. | No power supply; Door not closed properly; Program not selected; Start button not pressed. | Check power plug and fuse; Ensure door is firmly closed; Select a program; Press the Start/Pause button. |
| Clothes are not drying properly. | Lint filter blocked; Water tank full; Condenser filter blocked; Overloading; Incorrect program selected. | Clean lint filter; Empty water tank; Clean condenser filter; Reduce load size; Select appropriate program. |
| Dryer stops mid-cycle. | Water tank full; Power interruption; Safety thermostat activated. | Empty water tank; Check power supply; Allow dryer to cool down, then restart. |
| Excessive noise. | Foreign objects in drum; Appliance not level. | Check drum for loose items; Adjust leveling feet to ensure stability. |
If the problem persists after attempting these solutions, please contact customer support.
7. Specifications
| Feature | Detail |
|---|---|
| Brand | Indesit |
| Model Number | YT M11 82K RX IT |
| Type | Freestanding Heat Pump Tumble Dryer |
| Loading Type | Front-loading |
| Capacity | 8 kg |
| Energy Efficiency Class | A++ |
| Annual Energy Consumption | 234 kWh/year |
| Noise Level | 65 dB |
| Dimensions (H x W x D) | 84.9 cm x 59.5 cm x 64.9 cm |
| Weight | 44 kg |
| Condensation Efficiency Class | B |
| Standard Cotton Program Time | 194 minutes (full load) |
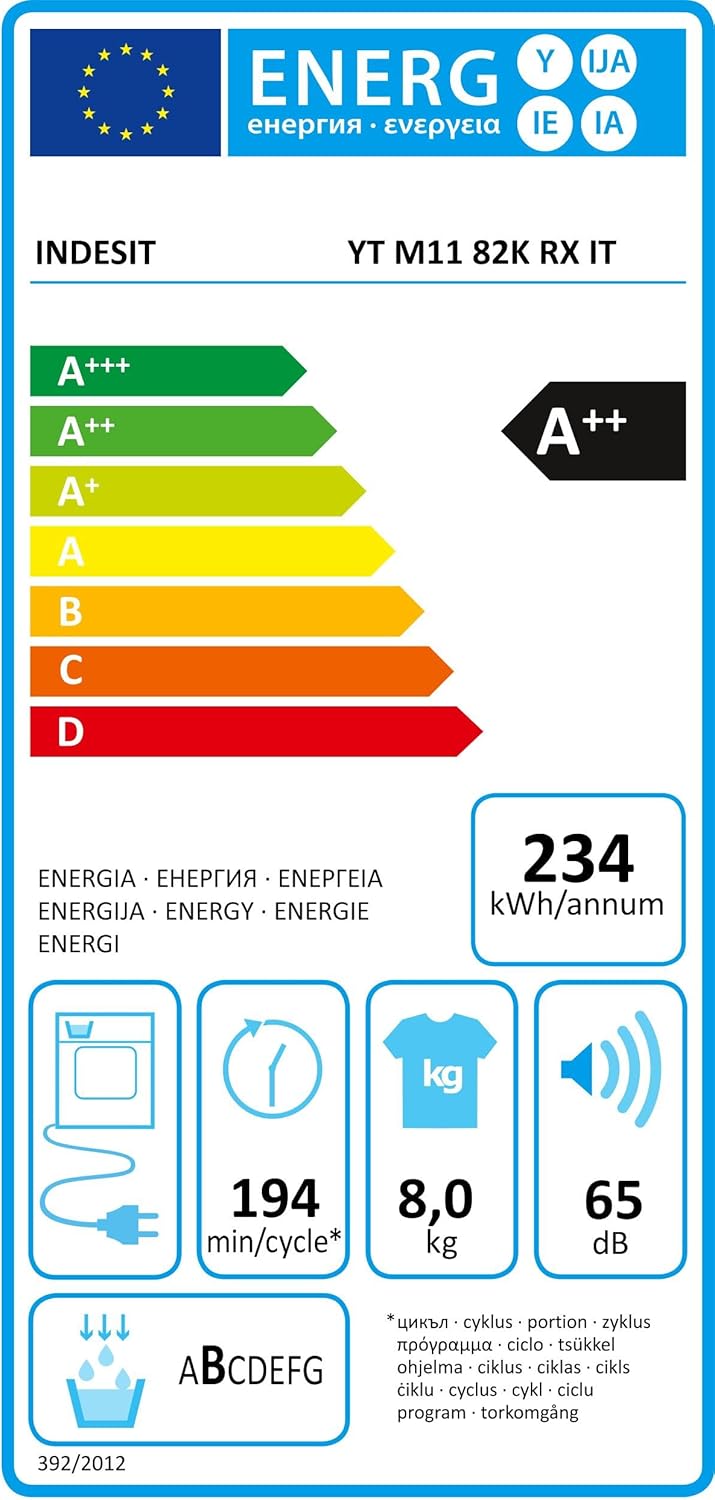
Figure 7.1: Energy label for the Indesit YT M11 82K RX IT, displaying energy efficiency class A++, annual energy consumption, capacity, and noise level.
For detailed product information and the official product fiche, please refer to the EU EPREL database: https://eprel.ec.europa.eu/qr/48871
8. Warranty and Support
Information regarding the specific warranty period and terms for your Indesit YT M11 82K RX IT Tumble Dryer can typically be found in a separate warranty document included with your purchase or on the manufacturer's official website.
Customer Support:
For technical assistance, spare parts, or to schedule a service appointment, please contact Indesit customer service. Contact details can usually be found on the Indesit official website or in your purchase documentation.
- Manufacturer: BEKO EUROPE MANAGEMENT S.R.L. (as per product fiche)
- Service Website: www.bekoeurope.com
- Email for Compliance Team: public_inquiry@europeanappliances.com
- Telephone: +39 02 83715807
- Address: VIA VARESINA, 204, 20156 MILANO, ITALY
Please have your appliance's model number (YT M11 82K RX IT) and serial number ready when contacting support.


