1. Introduction
This user manual provides detailed instructions for the operation and maintenance of your LOTUS Mini Portable Projector YG-300. Please read this manual thoroughly before using the projector to ensure proper functionality and to prevent damage.
The YG-300 is a compact and versatile video projection system designed for various applications, including presentations, conferences, training, and home theater setups. It projects light beams to display images and videos from compatible sources.
2. Package Contents
Upon unboxing, please verify that all items listed below are included in your package:
- YG-300 Projector Unit
- Power Adapter (AC/DC 12V, 1.5A)
- Remote Control
- Three-in-one AV Cable
- English User Manual

Figure 2.1: Included accessories with the YG-300 Mini Portable Projector.
3. Product Overview
3.1. Projector Front and Side View

Figure 3.1: Front view of the YG-300 projector, highlighting the projection lens and side ventilation.
3.2. Projector Top Panel Controls
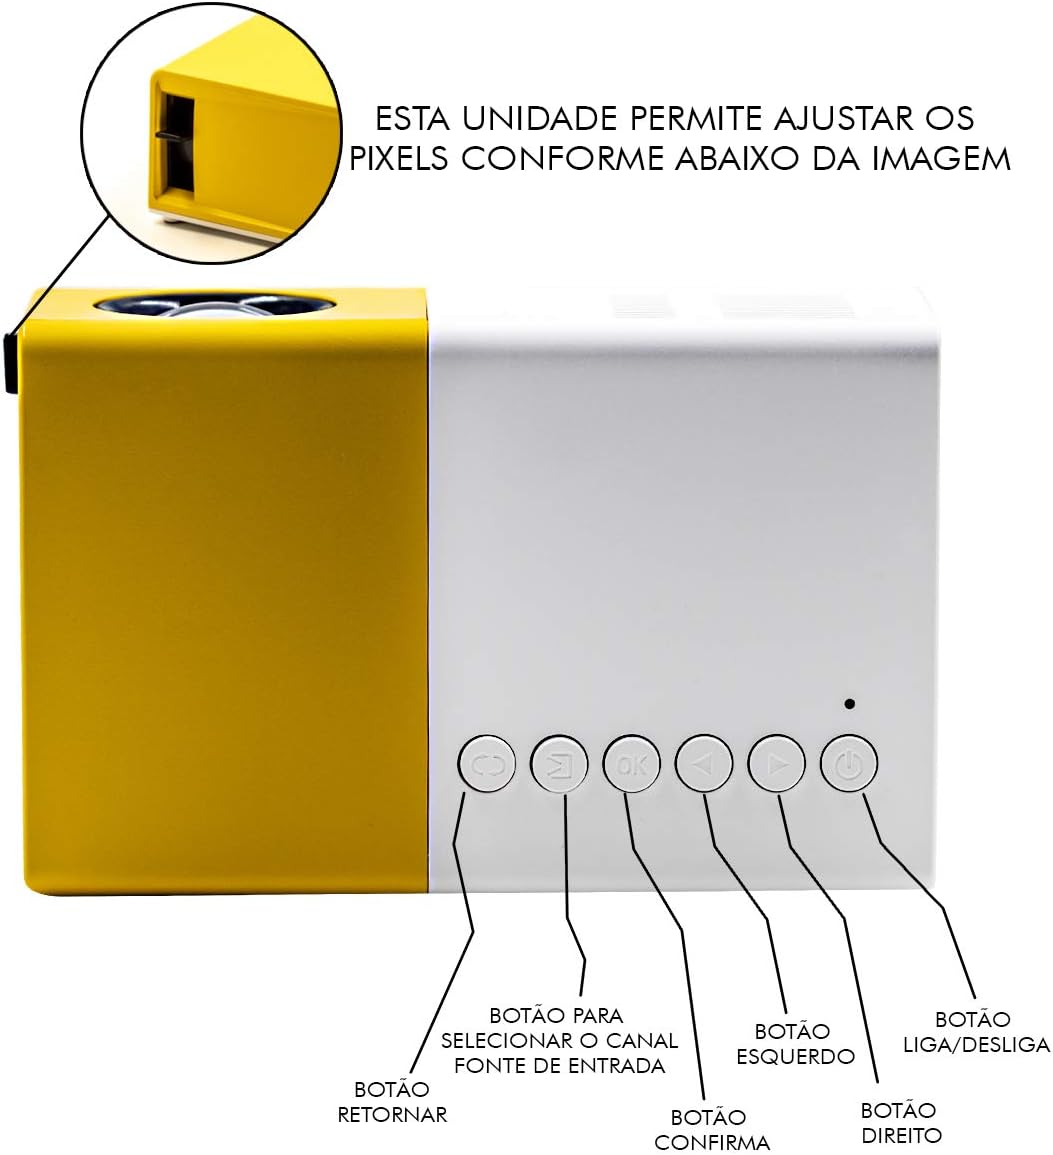
Figure 3.2: Top panel controls of the YG-300 projector. From left to right: Return button, Input Source selection button, OK (Confirm) button, Left navigation button, Right navigation button, and Power On/Off button.
3.3. Projector Rear Panel Ports
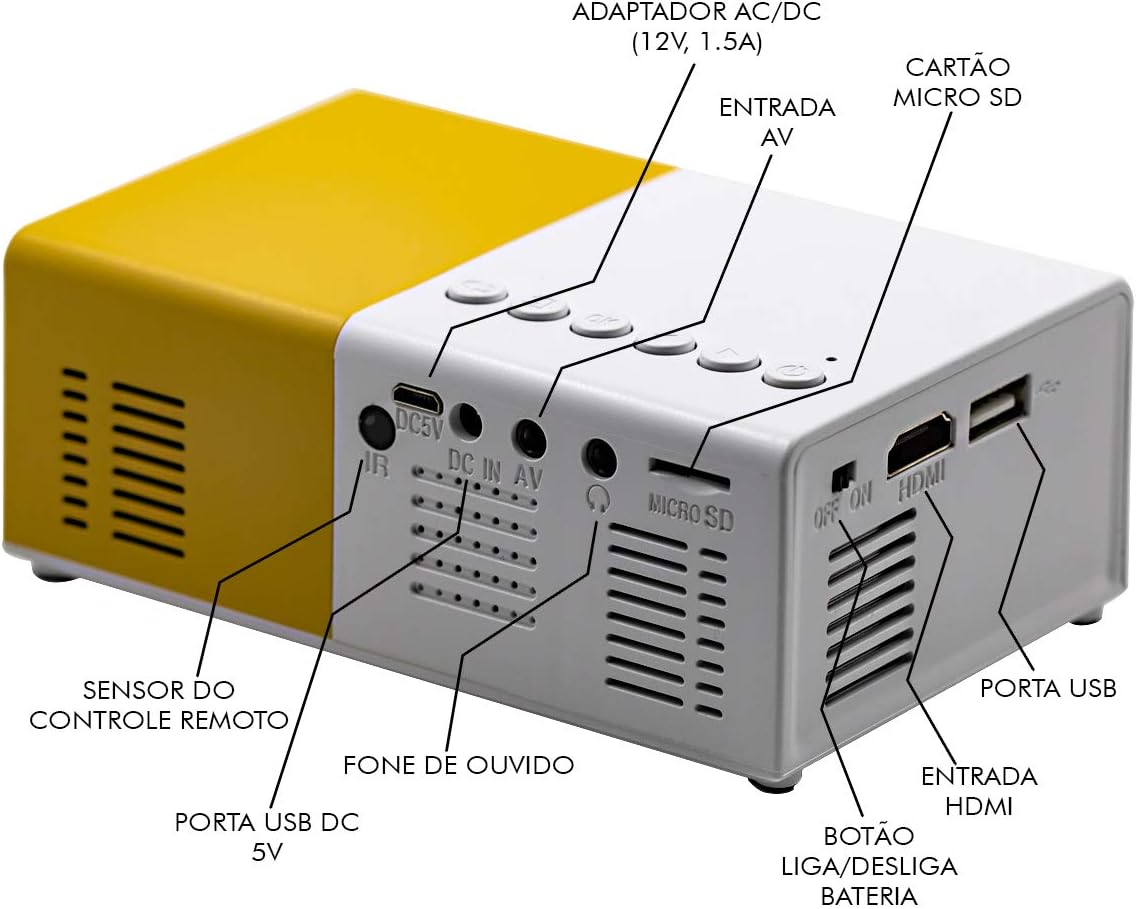
Figure 3.3: Rear panel of the YG-300 projector, detailing the connectivity options including USB, AV, Micro SD, HDMI, and audio output.
3.4. Remote Control Functions

Figure 3.4: Remote control for the YG-300 projector, showing buttons for power, menu access, source selection, directional navigation, OK, play/pause, volume control, and exit.
4. Setup
4.1. Power Connection
- Connect the provided power adapter to the "DC IN AV" port on the rear of the projector.
- Plug the power adapter into a standard electrical outlet.
- Ensure the power switch (if present, often near the DC IN port) is in the "ON" position.
4.2. Positioning the Projector
Place the projector on a stable, flat surface. For optimal image quality, position the projector between 1.2 to 3 meters (approximately 4 to 10 feet) from the projection surface. This distance will yield an image size between 20 to 80 inches.

Figure 4.1: Example setup of the YG-300 projector for home use.
4.3. Connecting Input Devices
The YG-300 supports multiple input sources:
- HDMI: Connect an HDMI cable from your device (e.g., laptop, game console, streaming stick) to the HDMI port on the projector.
- USB: Insert a USB flash drive into the USB port to play media files directly.
- Micro SD: Insert a Micro SD card into the Micro SD slot to play media files.
- AV: Use the provided three-in-one AV cable to connect to devices with AV output (e.g., older DVD players, set-top boxes).
5. Operating Instructions
5.1. Powering On/Off
- To power on, press the Power On/Off button on the projector's top panel or the remote control.
- To power off, press the Power On/Off button again.
5.2. Selecting Input Source
After powering on, use the Source button on the remote control or the Input Source Selection button on the projector's top panel to cycle through available input sources (HDMI, USB, Micro SD, AV).
5.3. Adjusting Image Focus
The projector features a manual focus adjustment. Rotate the focus ring located around the lens until the projected image appears clear and sharp.
5.4. Navigating Menus and Media
Use the directional buttons (Left, Right, Up, Down) and the OK button on the remote control or projector to navigate through menus and select media files. The Return button will take you back to the previous screen.
5.5. Volume Control
Adjust the volume using the Volume Up and Volume Down buttons on the remote control. You can also connect external speakers or headphones to the 3.5mm audio jack for enhanced sound.
6. Maintenance
6.1. Cleaning the Lens
Gently wipe the projector lens with a soft, lint-free cloth specifically designed for optical surfaces. Do not use abrasive cleaners or solvents.
6.2. Cleaning the Projector Body
Wipe the exterior of the projector with a soft, dry cloth. Avoid using liquid cleaners directly on the device.
6.3. Ventilation
Ensure that the ventilation grilles on the projector are not blocked to prevent overheating. Adequate airflow is crucial for the projector's longevity.
7. Troubleshooting
| Problem | Possible Cause | Solution |
|---|---|---|
| No image projected |
|
|
| Image is blurry |
|
|
| No sound |
|
|
| Projector overheats and shuts down |
|
|
8. Specifications
| Feature | Detail |
|---|---|
| Brand | LOTUS |
| Model | YG-300 |
| Manufacturer | LEJIADA |
| Brightness | 600 Lumens |
| Native Resolution | 800 x 480 pixels |
| Projection Distance | 1.2 - 3 meters (approx. 4 - 10 feet) |
| Image Size | 20 - 80 inches |
| Screen Ratio | 4:3 |
| Connectivity | HDMI, USB, 3.5mm Audio, Micro SD Card Slot |
| Product Dimensions | 12.5 x 8 x 5 cm (4.9 x 3.1 x 2 inches) |
| Product Weight | 480 g (1.06 lbs) |

Figure 8.1: Dimensions of the YG-300 projector and its remote control.
9. Warranty and Support
For warranty information and technical support, please refer to the contact details provided by your retailer or the manufacturer, LEJIADA. Keep your purchase receipt as proof of purchase for any warranty claims.
This product is designed for durability and performance. For any issues not covered in the troubleshooting section, please contact customer support.


