1. Introduction
Thank you for choosing the Brandstand CubieDuo. This device combines an alarm clock with magnetic wireless charging and USB-C ports, designed for convenience and functionality. This manual provides detailed instructions for setting up, operating, and maintaining your CubieDuo to ensure optimal performance and longevity.
2. Product Overview
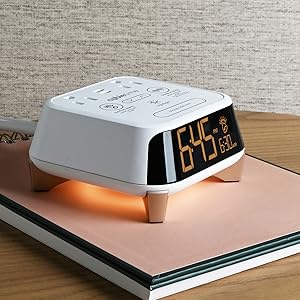
The Brandstand CubieDuo features an intuitive design with multiple charging options and an easy-to-read LED display.
Key Features:
- Easy-to-use alarm clock with simple knob and button controls.
- Magnetic wireless charging pad for compatible smartphones.
- Two USB-C charging ports for additional device charging.
- UL Spill Test passed for enhanced safety.
- Display dimmer with 3 brightness levels plus an 'Off' option.
Components:

The CubieDuo consists of a main unit with an LED time display on the front, a wireless charging pad on the top surface, and two USB-C charging ports located on the front panel below the display. Control buttons and a rotary knob are situated on the top surface for setting time and alarms.

3. Setup
3.1 Power Connection
- Unpack the CubieDuo and its power adapter.
- Connect the power adapter to the DC input port on the back of the CubieDuo.
- Plug the power adapter into a standard 120V AC wall outlet. The display will illuminate.
3.2 Battery Installation (Backup)
The CubieDuo includes a CR2032 battery for backup purposes, preserving time and alarm settings during a power outage. This battery is typically pre-installed.
- Locate the battery compartment on the bottom of the unit.
- If replacing, use a small screwdriver to open the compartment. Insert one CR2032 battery with the positive (+) side facing up.
- Close the compartment securely.
3.3 Initial Time Setting
Upon first power-up, the time may need to be set. Refer to Section 4.1 for detailed instructions on setting the time.
4. Operating Instructions
4.1 Setting the Time
- Press and hold the 'Time Set' button (often combined with a rotary knob) until the hour display flashes.
- Rotate the knob to adjust the hour. Pay attention to the AM/PM indicator.
- Press the 'Time Set' button again to switch to minute adjustment.
- Rotate the knob to adjust the minutes.
- Press the 'Time Set' button one more time to confirm and exit time setting mode.
4.2 Setting the Alarm
- Press and hold the 'Alarm Set' button until the alarm hour display flashes.
- Rotate the knob to adjust the alarm hour (observe AM/PM).
- Press the 'Alarm Set' button again to switch to alarm minute adjustment.
- Rotate the knob to adjust the alarm minutes.
- Press the 'Alarm Set' button to confirm. The alarm icon will appear on the display, indicating the alarm is active.
- To deactivate the alarm, press the 'Alarm Set' button once. The alarm icon will disappear.
Note: Some units may have a 'secret' switch located under an access plate on the bottom of the clock. This switch can be used to save the alarm time from night to night. Consult the specific labeling on your unit if you encounter difficulties with alarm retention.
4.3 Using Wireless Charging
The CubieDuo features a magnetic wireless charging pad compatible with Qi-enabled smartphones.
- Place your compatible smartphone directly onto the wireless charging pad on the top surface of the CubieDuo.
- Ensure the phone is centered on the pad for optimal connection. The magnetic alignment assists in proper placement.
- A charging indicator (e.g., an icon on the clock display or on your phone) will confirm that charging has begun.

4.4 Using USB-C Charging Ports
Two USB-C ports are available on the front of the unit for charging other devices.
- Connect your device's USB-C charging cable to one of the CubieDuo's USB-C ports.
- Connect the other end of the cable to your device.
- Charging will begin automatically.
4.5 Display Dimmer
Adjust the brightness of the LED display to your preference.
- Press the 'Snooze/Dimmer' button (located on the top surface) repeatedly to cycle through the three brightness levels (High, Medium, Low) and an 'Off' setting.
- Select the desired brightness.
4.6 Snooze Function
When the alarm sounds, press the 'Snooze/Dimmer' button to temporarily silence the alarm for a short period (typically 9 minutes). The alarm will sound again after the snooze period ends.
4.7 Daylight Savings Time Adjustment
The CubieDuo may include a feature for automatic or manual Daylight Savings Time adjustment. Consult the specific labeling or additional quick start guide provided with your unit for details on this function.
5. Maintenance
5.1 Cleaning
- Ensure the unit is unplugged from the power outlet before cleaning.
- Wipe the exterior surfaces with a soft, dry, or slightly damp cloth.
- Do not use abrasive cleaners, solvents, or harsh chemicals, as these can damage the finish.
- Avoid getting moisture into any openings.
5.2 Storage
If storing the unit for an extended period, unplug it and keep it in a cool, dry place away from direct sunlight and extreme temperatures.
6. Troubleshooting
If you encounter issues with your CubieDuo, refer to the following common problems and solutions:
| Problem | Possible Cause | Solution |
|---|---|---|
| Clock display is off or not working. | No power; display dimmer set to 'Off'. | Check power connection. Press 'Snooze/Dimmer' button to adjust brightness. |
| Wireless charging not working. | Phone not centered; phone case too thick; phone not Qi-compatible; foreign objects on pad. | Reposition phone; remove thick case; ensure phone is Qi-enabled; remove objects from pad. |
| USB-C ports not charging. | Cable faulty; device not compatible; power issue. | Try a different cable; ensure device is compatible; check main power connection. |
| Alarm does not sound or settings are lost. | Alarm not activated; power outage (if backup battery is dead); 'secret' switch not set. | Ensure alarm icon is visible; replace CR2032 backup battery; check the 'secret' switch on the bottom of the unit if applicable. |
| Display segments are missing or incomplete. | Internal display fault. | Contact Brandstand customer support for assistance. |
7. Specifications
| Brand | Brandstand |
| Model Number | BPEDO |
| Color | Black |
| Display Type | LED |
| Product Dimensions | 5.85"W x 2"H |
| Item Weight | 2 Pounds |
| Power Source | AC (Input Voltage: 120 Volts) |
| Connectivity Technology | USB, USB-C, Wireless |
| Special Features | Adjustable Brightness, Alarm, Daylight Savings, Charging Ports, Silent Clock, Snooze, Wireless Charging |
| Backup Battery | 1 CR2032 battery (included) |
| Material | Plastic |
| Mounting Type | Tabletop |
| UPC | 854831006317 |
8. Safety Information
Please read and follow these safety guidelines to prevent injury or damage to the device:
- Do not expose the unit to water or excessive moisture. The unit has passed UL Spill Test for enhanced safety, but it is not waterproof.
- Do not disassemble or attempt to repair the unit yourself. Refer all servicing to qualified personnel.
- Keep the unit away from heat sources, direct sunlight, and flammable materials.
- Ensure proper ventilation around the unit during operation.
- Use only the provided power adapter.
- Avoid placing metallic objects on the wireless charging pad, as this can interfere with charging and generate heat.


9. Warranty and Support
For warranty information and customer support, please refer to the documentation included with your purchase or visit the official Brandstand website. Brandstand is committed to providing quality products and assistance.
Manufacturer: Brandstand
For further assistance, please visit: Brandstand Store on Amazon


