1. Introduction
Thank you for choosing the Schulte Bathtub Screen. This manual provides essential information for the safe and correct installation, operation, and maintenance of your new bathtub screen. Please read these instructions carefully before beginning installation and retain them for future reference.
This product is designed to convert your bathtub into a functional shower area, effectively preventing water splashes. It features a modern black profile and 5mm safety glass with an Atelier decor finish, offering both aesthetic appeal and practical utility.
2. Safety Information
- Always handle glass components with extreme care. Safety glass, while robust, can shatter if impacted forcefully at the edges.
- Ensure all mounting hardware is securely fastened to a structurally sound wall. Improper installation can lead to product failure and injury.
- Wear appropriate personal protective equipment (e.g., safety glasses, gloves) during installation.
- Keep children and pets away from the installation area.
- Do not use abrasive cleaners or sharp objects on the glass or profiles, as this can damage the surfaces and anti-limescale treatment.
- If you are unsure about any part of the installation process, consult a qualified professional.
3. Package Contents
Please verify that all components are present and undamaged before beginning installation:
- Schulte Bathtub Screen (1 unit)
- Mounting Kit (includes screws, wall plugs, seals, and profiles)
- Assembly Instructions (detailed guide)
4. Installation
This bathtub screen is designed for straightforward installation. A detailed assembly guide is included in your package. The screen can be mounted on either the left or right side of your bathtub.
4.1 Tools Required (Not Included)
- Drill
- Drill bits suitable for your wall type
- Spirit level
- Measuring tape
- Pencil
- Screwdriver
- Silicone sealant (bathroom grade)
4.2 Pre-Installation Steps
- Unpack all components and check against the package contents list.
- Inspect all parts for any damage. Do not proceed with installation if any part is damaged.
- Ensure the wall where the screen will be mounted is clean, dry, and structurally sound.
4.3 Mounting the Bathtub Screen
Refer to the detailed assembly instructions provided in your package for precise measurements and drilling locations. The following is a general overview:
- Positioning: Determine whether to mount the screen on the left or right side of your bathtub. The design allows for flexible installation.
- Marking: Hold the wall profile against the wall, ensuring it is perfectly vertical using a spirit level. Mark the drilling points.
- Drilling: Drill holes at the marked points. Insert appropriate wall plugs.
- Attaching Wall Profile: Secure the wall profile to the wall using the provided screws.
- Installing Glass Panel: Carefully insert the glass panel into the wall profile. Ensure all seals are correctly positioned to prevent water leakage.
- Securing Glass: Fasten the glass panel within the profile according to the detailed instructions.
- Sealing: Apply a bead of bathroom-grade silicone sealant along the exterior joint between the wall profile and the wall, and along the bottom edge of the screen where it meets the bathtub. Allow adequate drying time before use.

Image: Diagram illustrating that the bathtub screen can be mounted on either the left or right side of the bathtub, offering installation flexibility.

Image: The Schulte Bathtub Screen, 80x140 cm, with a black profile and Atelier decor, shown installed in a modern bathroom setting, demonstrating its functional and aesthetic integration.
5. Operation
The Schulte Bathtub Screen features a single panel that is mobile and pivots up to 180 degrees against the wall. This design allows for easy access to the bathtub and provides a space-saving solution, especially in smaller bathrooms.
- To Open: Gently push the screen away from the bathtub towards the wall. The pivot mechanism allows it to fold flat against the wall.
- To Close: Pull the screen back into position over the bathtub. Ensure it is fully extended to prevent water splashes during showering.
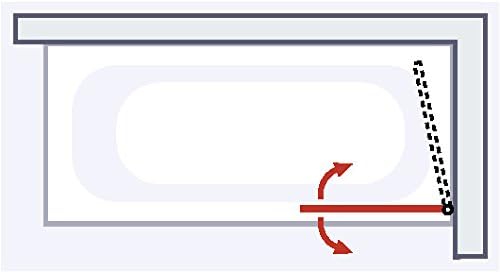
Image: A diagram illustrating the 180-degree pivoting capability of the bathtub screen, allowing it to fold against the wall for space-saving and easy access.
6. Maintenance and Cleaning
Regular cleaning and proper maintenance will ensure the longevity and appearance of your Schulte Bathtub Screen.
6.1 Cleaning the Glass
The 5mm safety glass features an anti-limescale treatment (Fixil) to reduce water spots and make cleaning easier.
- After each use, rinse the glass with clean water and wipe it down with a soft cloth or squeegee to remove water droplets.
- For general cleaning, use a mild, non-abrasive glass cleaner and a soft cloth.
- Avoid using abrasive sponges, scouring pads, or harsh chemical cleaners, as these can damage the anti-limescale coating and the glass surface.

Image: A visual comparison demonstrating the effectiveness of the Fixil anti-limescale treatment on glass, showing reduced water spots and easier cleaning compared to untreated glass.
6.2 Cleaning the Profiles and Seals
- Wipe the black profiles with a soft, damp cloth and a mild detergent.
- Regularly check the seals for any signs of wear or damage. Replace worn seals to maintain water tightness.
- Do not use abrasive cleaners on the profiles, as this can scratch or discolor the finish.
7. Troubleshooting
This section addresses common issues you might encounter with your bathtub screen.
- Water Leakage:
- Check if the silicone sealant along the wall and bathtub edges is intact. Reapply if necessary.
- Ensure the bottom seal of the screen is properly seated against the bathtub rim.
- Verify that all mounting screws are tight and the wall profile is securely fixed.
- Difficulty Pivoting/Folding:
- Check for any obstructions around the pivot mechanism.
- Clean the pivot points to remove any soap scum or debris.
- Apply a small amount of silicone-based lubricant to the moving parts if friction is high.
- Glass Appears Cloudy/Streaky:
- Ensure you are using a non-abrasive glass cleaner.
- Wipe down the glass thoroughly after each shower to prevent mineral buildup.
- The anti-limescale treatment may require occasional reapplication or specialized cleaning if hard water stains persist.
If you encounter issues not covered here, please refer to the detailed assembly instructions or contact Schulte customer support.
8. Specifications
| Feature | Detail |
|---|---|
| Model Number | 4060991055447 |
| Dimensions (L x W x H) | 80 x 2 x 140 cm |
| Weight | 14 Kilograms |
| Material | Safety Glass |
| Glass Thickness | 5 Millimeters |
| Color | Atelier Decor 5 (Black Profile) |
| Number of Panels | 1 |
| Special Features | 180° Pivoting, Foldable, Anti-limescale treatment (Fixil), Reversible mounting (left/right) |
| Assembly Required | Yes |
| Installation Type | Screw-in |
9. Warranty and Support
Schulte stands behind the quality of its products.
- Manufacturer's Warranty: This product comes with a 10-year product warranty.
- Spare Parts Availability: Schulte guarantees the availability of spare parts (excluding wear parts) for 10 years.
For warranty claims, technical support, or inquiries regarding spare parts, please contact Schulte customer service. Refer to the contact information provided in your product packaging or on the official Schulte website.


