
Introduction
This manual provides essential instructions for the safe and effective use of your Nerf Revoltinator Zombie Strike Toy Blaster. Please read all instructions carefully before assembly and operation. Keep this manual for future reference.

Image: The Nerf Revoltinator Zombie Strike Toy Blaster as packaged, showing its green and orange design with Zombie Strike branding.
Safety Information
- WARNING: Do not aim at eyes or face.
- Use only official Nerf darts. Other darts may not meet safety standards.
- Do not modify darts or blaster.
- Adult supervision is recommended for younger users.
What's Included
Your Nerf Revoltinator Zombie Strike Toy Blaster package includes:
- 1x Nerf Revoltinator Blaster
- 1x 18-Dart Clip
- 18x Official Nerf Zombie Strike Elite Darts
- Instructions (this manual)
Setup
1. Battery Installation
The Revoltinator blaster requires 4 x 1.5V AA (LR6) batteries for motorized functions, lights, and sounds. Demo batteries may be included but should be replaced for optimal performance.
- Locate the battery compartment on the underside of the blaster, near the front.
- Using a Phillips head screwdriver (not included), unscrew the battery compartment cover.
- Insert 4 new 1.5V AA (LR6) batteries, ensuring correct polarity (+/-) as indicated inside the compartment.
- Replace the battery compartment cover and secure it with the screw.

Image: Diagram illustrating the battery compartment location and the correct insertion of 4 AA batteries into the Nerf Revoltinator blaster.
2. Loading Darts into the Clip
Load the 18 official Nerf Zombie Strike Elite darts into the included clip.
- Hold the clip with the open end facing upwards.
- Insert one dart at a time into the clip, pushing it down until it clicks into place. Ensure darts are inserted straight and not bent.
- Repeat until all 18 darts are loaded. Do not overload the clip.

Image: A hand holding the orange 18-dart clip, highlighting its capacity and design.
3. Inserting the Loaded Clip
Once loaded, insert the clip into the blaster.
- Locate the clip well on the underside of the blaster.
- Push the loaded clip firmly into the clip well until it locks into place.
Operating Instructions
The Nerf Revoltinator features motorized blasting with lights and sounds.
- Powering On: Hold down the acceleration button (usually located below the main trigger) to power up the motor. You will hear a revving sound and see lights activate.
- Firing Darts: While holding the acceleration button, pull the main trigger to fire one dart. The blaster will emit blasting sounds and additional lights will activate with each shot.
- Rapid-Fire Blasting: Continue holding the acceleration button and rapidly pull and release the main trigger to unleash all 18 darts in quick succession.
- Lights and Sounds: The blaster features power shock electronic lights and sounds that activate when powered up and fired, enhancing the play experience.
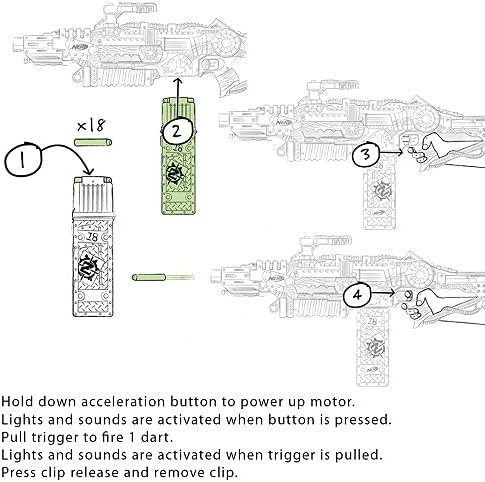
Image: Step-by-step diagram illustrating how to load darts into the clip, insert the clip into the blaster, hold the acceleration button to power up, and pull the trigger to fire.
Maintenance
1. Clearing Dart Jams
If a dart becomes jammed, follow these steps:
- Remove the dart clip from the blaster.
- Locate the access door on the side of the blaster. Open the access door.
- Carefully remove any jammed darts. Do not use excessive force or tools that could damage the blaster.
- Ensure the access door is fully closed before re-inserting the clip. The blaster will not operate if the access door is not securely closed.
- Re-insert the dart clip.

Image: Diagram illustrating the process of removing the clip, opening the access door, clearing jammed darts, and closing the access door before re-inserting the clip.
2. General Care
- Keep the blaster clean by wiping it with a dry cloth. Do not immerse in water.
- Store the blaster and darts in a cool, dry place away from direct sunlight.
- Remove batteries if the blaster will not be used for an extended period to prevent leakage.
Troubleshooting
| Problem | Possible Cause | Solution |
|---|---|---|
| Blaster does not power on or fire. |
|
|
| Darts are jamming frequently. |
|
|
| Trigger feels stiff or gets stuck. |
|
|
Specifications
| Model Number | E3060 |
| Brand | Nerf |
| Manufacturer | Hasbro |
| Dart Capacity | 18 Darts (via clip) |
| Power Source | 4 x 1.5V AA (LR6) Batteries |
| Features | Motorized Blasting, Electronic Lights, Electronic Sounds |
| Material | Foam (Darts) |
| Dimensions (L x W x H) | 30" x 2.63" x 12" (approximate) |
| Weight | 1 kg (approximate) |
| Recommended Age | 8 years and up |
Warranty and Support
For warranty information or customer support, please refer to the contact details provided on the product packaging or visit the official Nerf website. Keep your purchase receipt as proof of purchase.