
Phoncoo F5305S 4-Channel MOS FET Pulse Trigger Switch Controller User Manual
Model: F5305S
1. Product Overview
The Phoncoo F5305S is a versatile 4-channel MOS FET pulse trigger switch controller designed for various applications, including motor and LED control. This module allows for the control of up to four independent channels using Pulse Width Modulation (PWM) input signals. It functions as a voltage regulator, providing stable and efficient switching for your electronic projects.
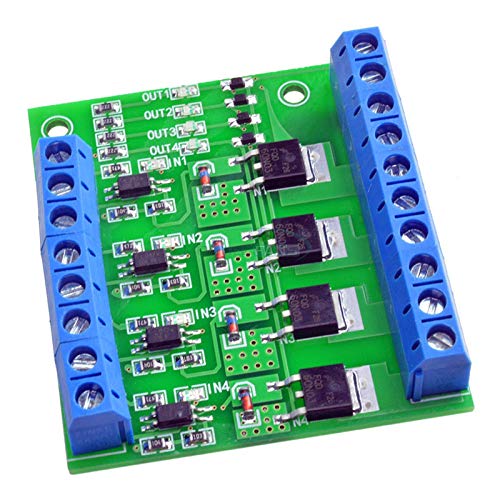
Image 1: Top-down view of the Phoncoo F5305S 4-Channel MOS FET Pulse Trigger Switch Controller module, showing the four MOS FETs and terminal blocks.
2. Key Features
- High-quality and reliable construction ensures durability and consistent performance.
- Each unit is pre-tested for functionality before shipment to guarantee operational readiness.
- Functions as a voltage regulator, providing stable control for connected devices.
- Lightweight design, approximately 0.062 kg (0.14 lb), for easy integration into projects.
- User-friendly operation, simplifying the control of motors and LEDs.
3. Specifications
| Parameter | Value |
|---|---|
| Brand Name | Phoncoo |
| Model Number | F5305S (Manufacturer Part Number: ph2ac10084) |
| Type | Voltage Regulator / Pulse Trigger Switch Controller |
| Weight | 0.062 kg (0.14 lb) |
| Operation Mode | Manual (via PWM input) |
| Size | Small |
4. Setup Instructions
4.1 Pinout Diagram
Understanding the pin assignments is crucial for correct wiring. The module features clearly labeled terminals for power input, PWM control signals, and output channels.

Image 2: Rear view of the F5305S module, detailing the pin assignments for power, PWM inputs, and output channels.
- DC+ / DC-: Main power input terminals for the module. Ensure correct voltage and polarity.
- PWM1-4 / GND1-4: Input terminals for the Pulse Width Modulation (PWM) control signals for each of the four channels. Connect your control source (e.g., microcontroller) here.
- OUT1-4+ / OUT1-4-: Output terminals for connecting your loads (e.g., motors, LEDs). Each channel is independent.
4.2 Connecting Inputs and Outputs
The module uses screw terminals for secure wiring connections. Always ensure power is disconnected before making or changing any connections.

Image 3: Top view of the F5305S module with screw terminals for wiring connections.
- Power Supply Connection: Connect your DC power supply to the DC+ and DC- terminals. Observe polarity.
- PWM Input Connection: Connect your PWM control signal source to the respective PWM input terminals (PWM1, PWM2, PWM3, PWM4) and their corresponding GND terminals.
- Load Connection: Connect your motors, LEDs, or other DC loads to the OUT+ and OUT- terminals for each channel. Ensure the load's current and voltage requirements are within the module's capabilities.
5. Operating Instructions
Once all connections are securely made and verified, you can begin operating the F5305S module.
- Apply Power: Turn on the main DC power supply connected to the module.
- Apply PWM Signal: Provide the desired PWM signal to the input terminals (PWM1-4). The duty cycle of the PWM signal will control the average power delivered to the corresponding output channel.
- Observe Output: The connected loads (e.g., motor speed, LED brightness) should respond according to the PWM input signal.
- Independent Control: Each of the four channels can be controlled independently by its respective PWM input.
6. Maintenance
To ensure the longevity and optimal performance of your F5305S module, follow these simple maintenance guidelines:
- Keep Dry: Protect the module from moisture and liquids to prevent short circuits and damage.
- Cleanliness: Keep the module free from dust and debris. Use a soft, dry brush or compressed air for cleaning.
- Avoid Static Discharge: Handle the module with care, especially in dry environments, to prevent damage from electrostatic discharge.
- Ventilation: Ensure adequate airflow around the module, especially if operating at higher loads, to prevent overheating.
7. Troubleshooting
If you encounter issues with your F5305S module, consider the following troubleshooting steps:
- No Output from a Channel:
- Check if the main power supply (DC+, DC-) is correctly connected and providing power.
- Verify that the PWM input signal for that specific channel is present and correctly wired.
- Ensure the load connected to the output is functional and correctly wired (polarity, continuity).
- Check for any visible damage to the MOS FET or associated components on that channel.
- Module Overheating:
- Confirm that the current drawn by the connected loads does not exceed the module's maximum current rating.
- Ensure there is sufficient ventilation around the module.
- Reduce the load or consider adding a heatsink if continuous high-power operation is required.
- Erratic Behavior:
- Check all wiring for loose connections or short circuits.
- Ensure the PWM input signal is stable and within the expected voltage levels.
- Verify that the power supply is stable and free from excessive noise.
8. Warranty and Support
This Phoncoo F5305S module is typically covered by a standard manufacturer's warranty against defects in materials and workmanship. For specific warranty details, duration, and terms, please refer to the information provided by your retailer or contact the manufacturer directly.
For technical assistance, troubleshooting beyond this guide, or inquiries regarding product functionality, please reach out to the seller or manufacturer's customer support channels. When contacting support, please have your product model (F5305S) and any relevant purchase information ready.