
Mixpresso EPLTR-8
Mixpresso 10 Cup Electric Percolator Coffee Pot User Manual
Model: EPLTR-8 | Brand: Mixpresso
1. Introduction & Product Overview
The Mixpresso 10 Cup Electric Percolator Coffee Pot is designed to brew rich, flavorful coffee with ease. Crafted from durable stainless steel, this percolator features a convenient keep warm function, ensuring your coffee stays hot for extended periods. Its classic design and user-friendly operation make it an ideal choice for home or office use.

Figure 1: Mixpresso 10 Cup Electric Percolator Coffee Pot.
2. What's Included
Your Mixpresso Electric Percolator package includes the following components:
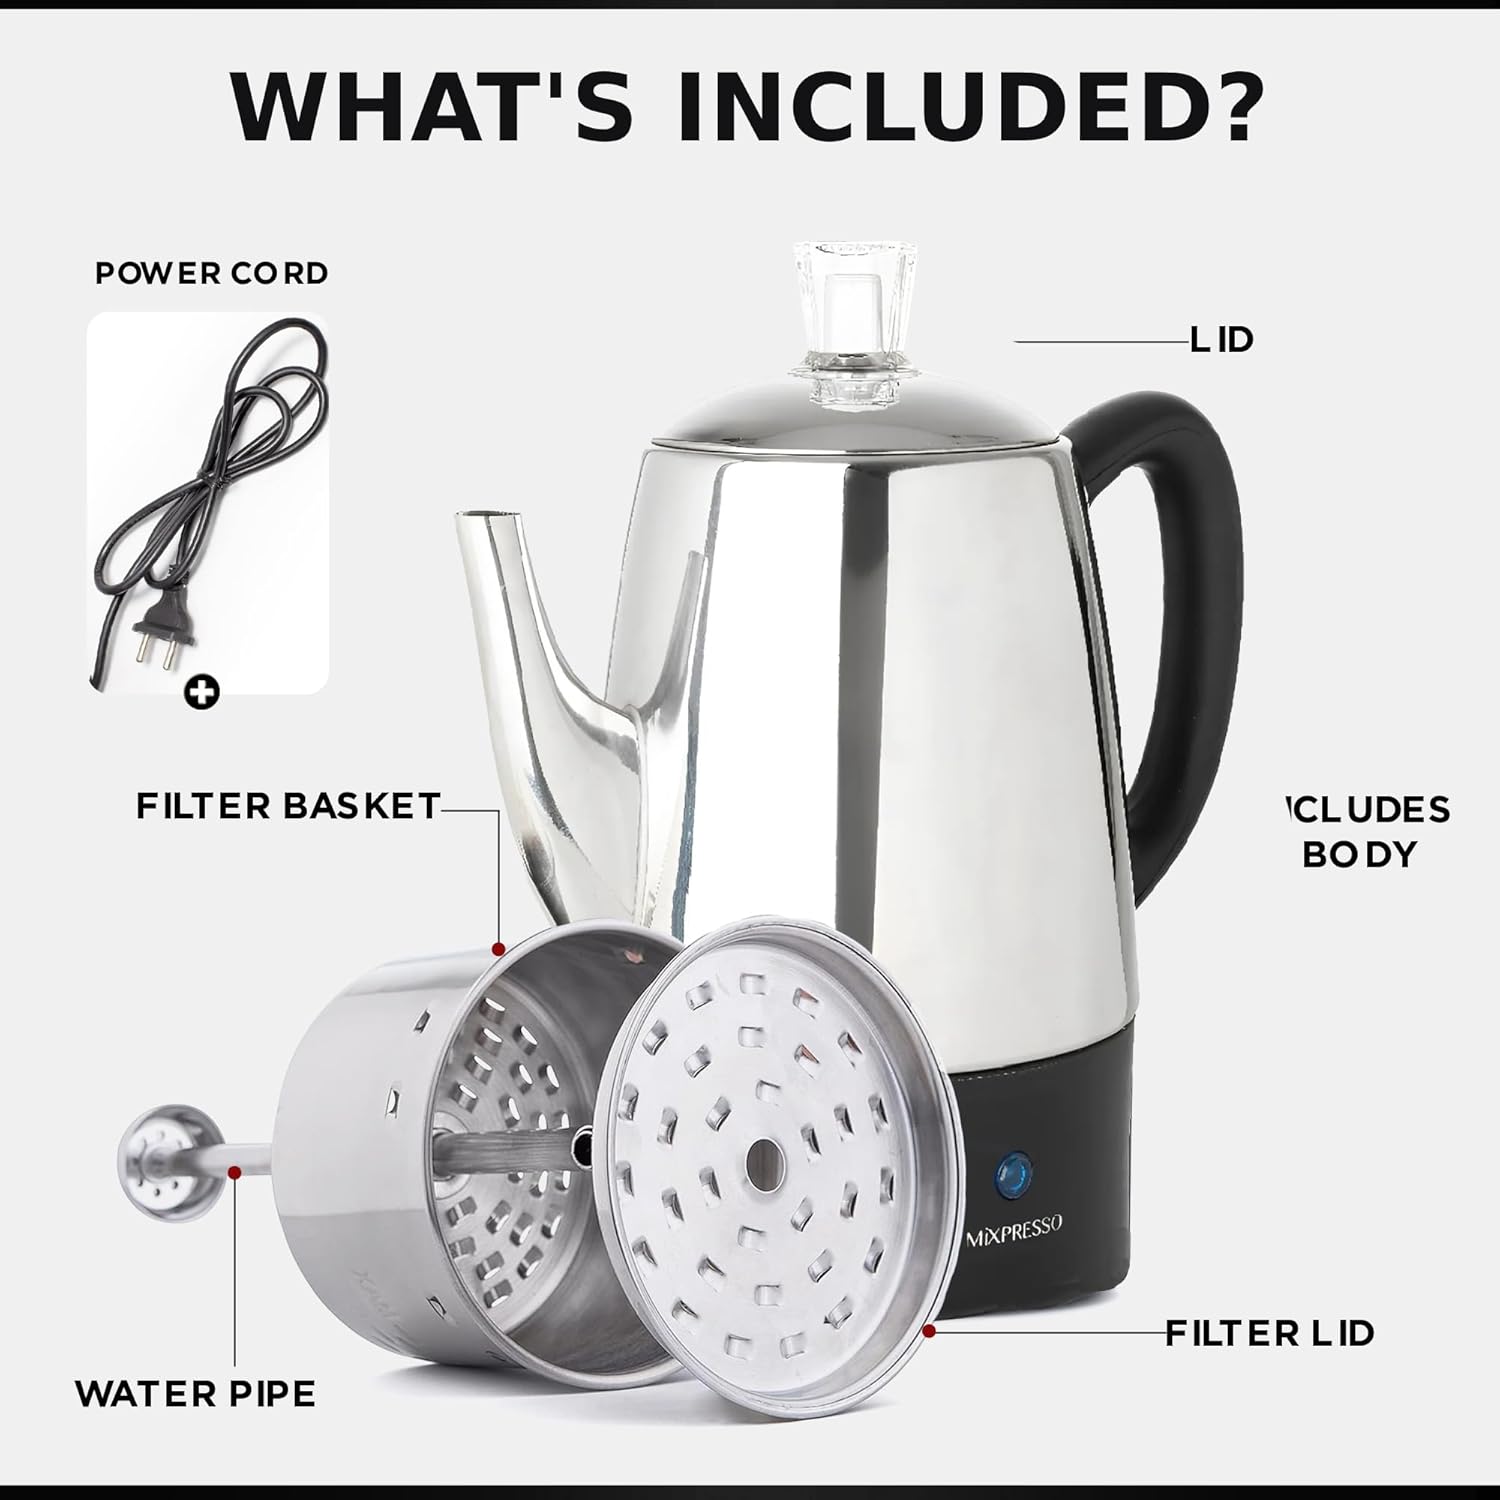
Figure 2: All components included with the percolator.
- Percolator Pot Body (Stainless Steel)
- Lid with Glass Knob
- Removable Stainless Steel Filter Basket
- Pump Tube
- Filter Lid
- Power Cord
3. Key Features
The Mixpresso Electric Percolator is equipped with several features designed for optimal coffee brewing and user convenience:
- 10-Cup Capacity: Brews up to 10 cups (54 oz) of coffee. Note: "Cups" refer to 5-6 oz servings.
- Stainless Steel Construction: Durable and easy-to-clean body with a modern aesthetic.
- Keep Warm Function: Automatically maintains coffee at an ideal serving temperature (up to 170°F) after brewing.
- Removable Filter Basket: Stainless steel filter basket eliminates the need for paper filters, simplifying cleanup.
- Glass Knob: Allows visual monitoring of the brewing process.
- Cool-Touch Handle: Ensures safe and comfortable pouring.
- Indicator Light: Signals when the coffee is ready.
- Easy-Pour Spout: Designed for smooth, drip-free serving.

Figure 3: Close-up of key features including the glass knob, stainless steel construction, and cool-touch handle.

Figure 4: Visual breakdown of the percolator's design elements and functions.
4. Setup & Assembly
Follow these steps to set up your Mixpresso Electric Percolator for first use or before each brewing cycle:
- Clean Before First Use: Before initial use, wash all removable parts (filter basket, pump tube, filter lid) in warm, soapy water. Rinse thoroughly and dry. Wipe the exterior of the pot with a damp cloth.
- Fill with Water: Fill the percolator pot with cold, fresh water up to the desired marked level inside the pot. Do not overfill.
- Assemble Internal Components: Place the pump tube into the center of the pot, ensuring it sits securely in the heating element well.
- Add Coffee Grounds: Place the removable stainless steel filter basket onto the pump tube. Add your desired amount of coarse ground coffee into the filter basket. For best results, use coffee ground specifically for percolators.
- Secure the Lid: Place the lid firmly onto the percolator pot. Ensure the glass knob is properly seated.
- Connect Power: Plug the power cord into the percolator's base and then into a standard 120V electrical outlet.

Figure 5: Step-by-step visual guide for preparing coffee.
5. Operating Instructions
Once assembled and plugged in, the percolator will begin the brewing process. Full percolation typically takes 7-10 minutes, depending on the amount of water and desired strength.
- Brewing Cycle: Water will heat and rise through the pump tube, showering over the coffee grounds in the basket. You will observe the coffee perking through the glass knob on the lid.
- Ready Indicator: The indicator light will illuminate when the brewing cycle is complete and the coffee is ready to serve.
- Keep Warm Function: After brewing, the percolator automatically switches to a "keep warm" mode, maintaining the coffee's temperature without re-percolating.
- Serving: Carefully pour coffee using the cool-touch handle and easy-pour spout. Pour slowly to avoid drips.
6. Maintenance & Cleaning
Proper maintenance ensures the longevity and optimal performance of your percolator:
- Daily Cleaning: After each use, unplug the percolator and allow it to cool completely. Discard used coffee grounds. Wash the filter basket, pump tube, and filter lid in warm, soapy water. Rinse thoroughly and dry.
- Pot Cleaning: Hand wash the interior and exterior of the percolator pot with warm, soapy water. Do not immerse the electrical base in water. Rinse thoroughly and dry immediately to prevent water spots.
- Descaling: Periodically descale your percolator to remove mineral buildup, especially if you have hard water. Fill the pot with a mixture of equal parts white vinegar and water. Run a brewing cycle without coffee grounds. After the cycle, unplug and let it sit for an hour, then discard the solution. Rinse thoroughly by running two cycles with fresh water.
- Storage: Store the percolator in a clean, dry place when not in use.
7. Troubleshooting
If you encounter any issues with your Mixpresso Electric Percolator, refer to the following common problems and solutions:
| Problem | Possible Cause | Solution |
|---|---|---|
| Coffee not brewing | Not plugged in; insufficient water; pump tube not seated correctly. | Ensure power cord is securely plugged in. Check water level. Re-seat pump tube firmly. |
| Weak coffee | Too few grounds; grounds too coarse; insufficient brewing time. | Increase coffee grounds. Use finer, percolator-specific grind. Allow full brewing cycle. |
| Bitter coffee | Too many grounds; grounds too fine; over-percolating. | Reduce coffee grounds. Use coarser grind. Ensure unit is not left on "perk" mode too long (it automatically switches to keep warm). |
| Grounds in coffee | Grounds too fine; filter basket not properly seated. | Use coarser grind. Ensure filter basket is correctly placed on the pump tube. |
8. Specifications
Detailed specifications for the Mixpresso 10 Cup Electric Percolator Coffee Pot:

Figure 6: Dimensions of the Mixpresso Electric Percolator.
| Attribute | Value |
|---|---|
| Brand | Mixpresso |
| Model Name | Electric Percolator Coffee Pot |
| Model Number | EPLTR-8 |
| Color | Stainless steel 10 cup |
| Product Dimensions | 6"D x 9"W x 11"H |
| Item Weight | 2.7 pounds |
| Coffee Maker Type | Percolator |
| Capacity | 10 Cups (54 oz) |
| Voltage | 120 Volts |
| Filter Type | Removable Stainless Steel Filter Basket |
| Special Features | Ready-to-Serve Indicator Light, Easy-Pour Spout, Keep Warm Function, BPA PC knob |
| Operation Mode | Manual |
| Country of Origin | China |
9. Warranty & Support
Mixpresso products are built for durability and everyday use. For specific warranty information, please refer to the product packaging or contact Mixpresso customer support directly. Protection plans are also available for extended coverage.
For further assistance, product inquiries, or to report any issues, please visit the official Mixpresso website or contact their customer service department. Keep your purchase receipt for warranty claims.
Visit the Mixpresso Store: Mixpresso Store on Amazon
Ask a question about this manual
Ask about setup, troubleshooting, compatibility, parts, safety, or missing instructions. Manuals+ will review the question and use this page’s manual context to help answer it.