Product Overview
The DOUXURY 9-inch LCD Reversing Camera System is designed to enhance vehicle safety and visibility, particularly for large vehicles. It features a quad-view monitor, allowing simultaneous display from multiple cameras, and includes an integrated DVR for recording. The system is built with IP69 waterproof cameras and offers 1080P HD night vision for clear imaging in various conditions.

Figure 1: The DOUXURY 9-inch LCD monitor and four included cameras, showcasing the quad-view capability. An SD card is also visible, indicating the DVR function.
Key Features:
- Quad-View Display: The 9-inch monitor supports simultaneous display from up to four cameras (front, rear, and two side views), eliminating blind spots.
- IP69 Waterproof Cameras: Cameras are rated IP69 for water resistance, featuring infrared LED lights for night vision and wide viewing angles.
- 1080P AHD Resolution: Provides clear, sharp images, suitable for 12-24V DC power systems in various large vehicles.
- Integrated DVR Recording: The system includes a DVR function that records video data to an included SD card, with local playback support.
- Wide Vehicle Compatibility: Designed for use with semi-trailers, trucks, 5th wheels, trailers, buses, and RVs.
Package Contents
Verify that all components are present and in good condition before proceeding with installation.

Figure 2: Comprehensive view of all items included in the DOUXURY Backup Camera System package.
| Item | Quantity | Description |
|---|---|---|
| 9-inch LCD Monitor | 1 | Main display unit with DVR function. |
| Rear View Camera | 2 | Cameras for rear visibility. |
| Side View Camera | 2 | Cameras for side visibility. |
| 66ft AV Cable | 1 | Long cable for camera connection. |
| 33ft AV Cable | 2 | Medium cables for camera connection. |
| 16ft AV Cable | 1 | Short cable for camera connection. |
| 32GB TF Card | 1 | Memory card for DVR recording. |
| Remote Control | 1 | For convenient system operation. |
| Power Cable | 1 | For connecting the system to power. |
| User Manual | 1 | Instruction guide for setup and operation. |
Setup and Installation
Proper installation is crucial for optimal performance. It is recommended to have this system installed by a qualified professional if you are not familiar with vehicle electrical systems.
1. Planning Camera Placement:
Determine the best locations for your cameras to achieve desired viewing angles. The system supports front, rear, and side camera placements.
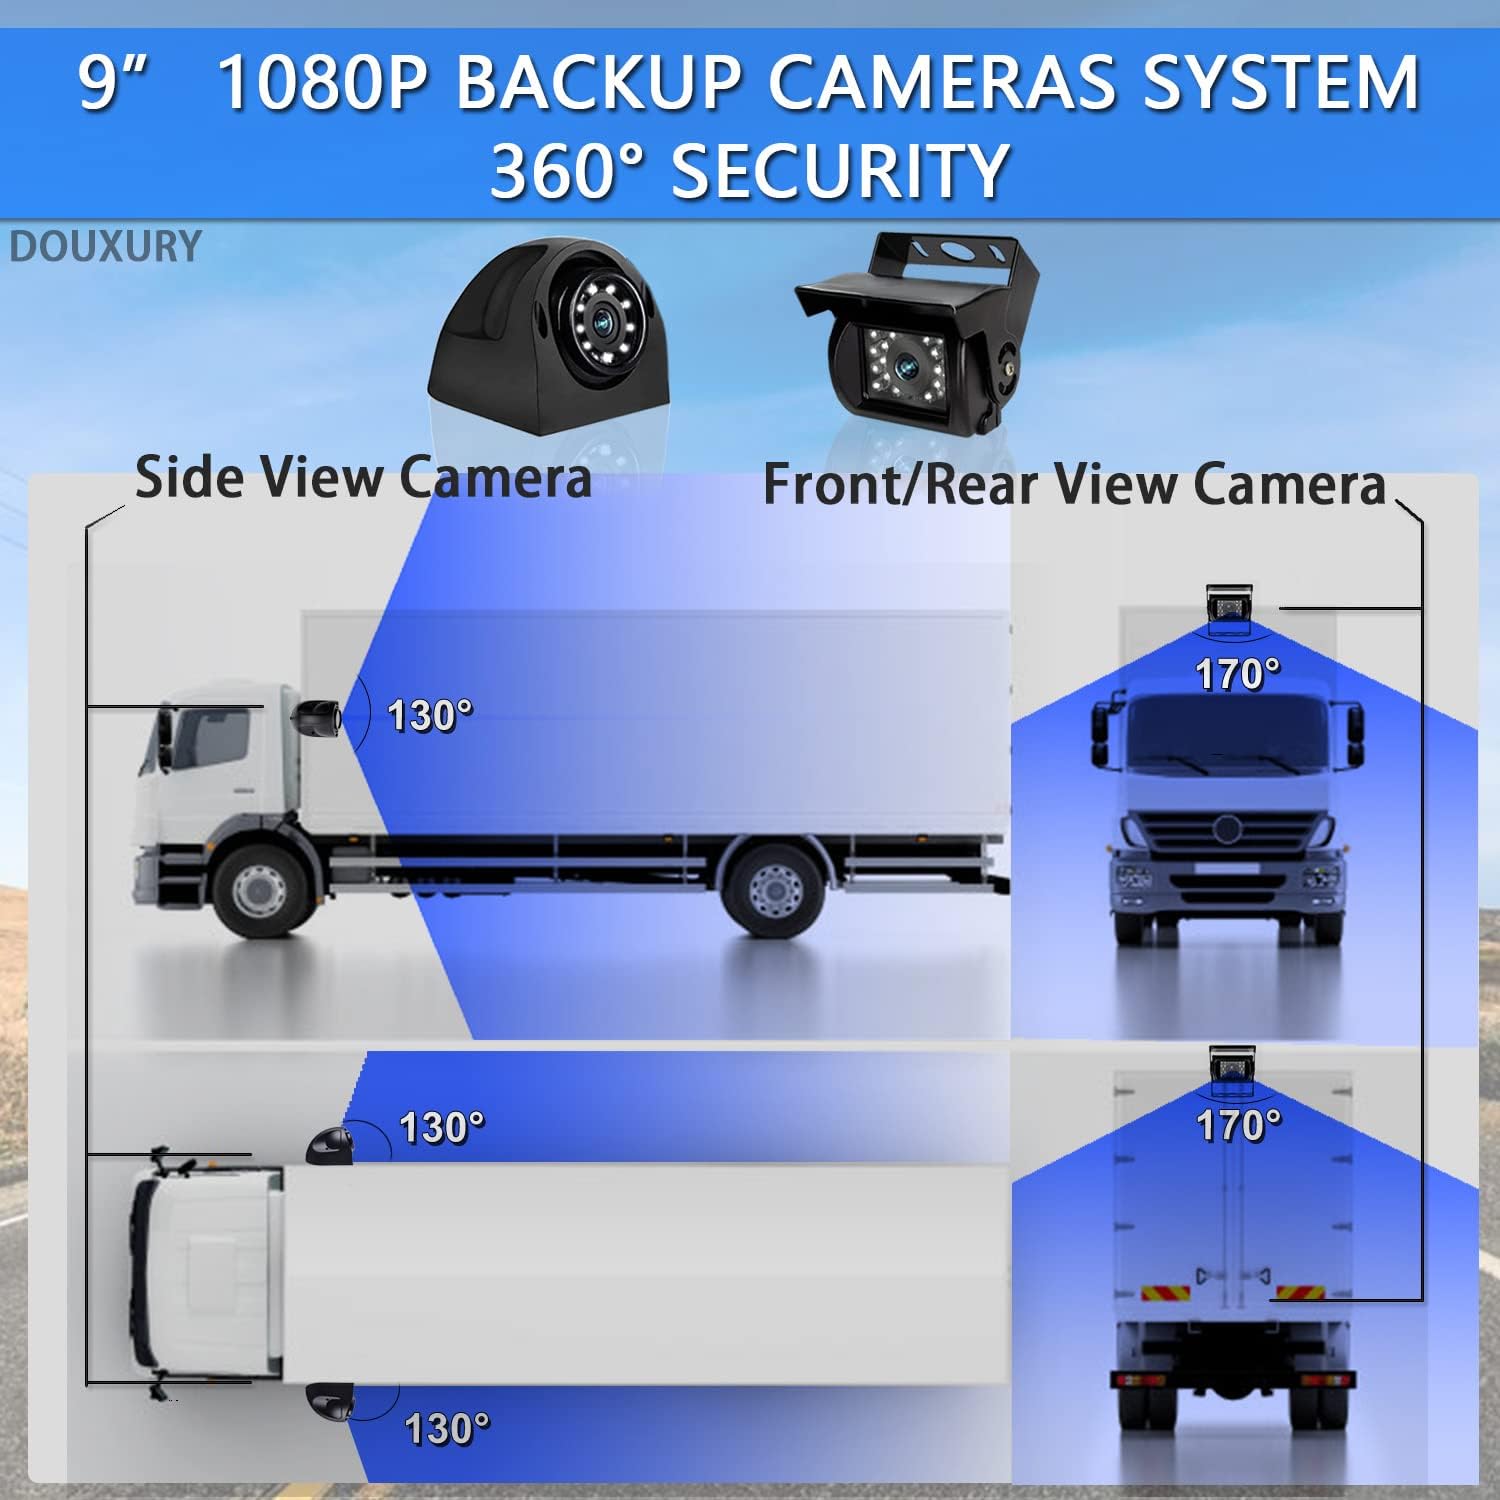
Figure 3: Camera placement and viewing angles for comprehensive 360-degree coverage.
2. Wiring Diagram:
Follow the wiring diagram carefully to connect the cameras to the monitor and the system to your vehicle's power supply. Ensure all connections are secure and waterproof.

Figure 4: Wiring connections for the monitor and cameras, including power and trigger wires.
- Power Connection: Connect the Red and Yellow wires to a 12-24V DC power source. Connect the Black wire to ground.
- Camera Connections: Connect each camera to its corresponding channel (CH1-CH4) on the monitor using the provided 4-pin AV cables.
- Trigger Wires: The Green, Blue, and Grey wires are trigger inputs for CH2, CH3, and CH4 respectively. These can be connected to turn signals or reverse lights to automatically switch views.
3. Mounting the Monitor and Cameras:
The monitor can be mounted on the dashboard or any suitable surface. Cameras should be securely mounted in their chosen locations, ensuring a clear line of sight.

Figure 5: Dimensions of the monitor and cameras for mounting reference.
Ensure all external connections, especially for cameras, are properly sealed to maintain the IP69 waterproof rating. Use the waterproof protective covers provided for cable connections.

Figure 6: IP69 waterproof features and night vision capability.
Operating Instructions
1. Powering On/Off:
Press the POWER button on the monitor or remote control to turn the system on or off.
2. Switching Camera Views:
Use the CH- or CH+ buttons on the monitor or remote to cycle through individual camera views (CH1, CH2, CH3, CH4). The monitor also supports quad-view display.

Figure 7: Monitor interface showing key features like split screen and recording.
3. DVR Recording Function:
The system automatically records video to the inserted 32GB TF card. Ensure the card is properly inserted before operation.
- Loop Recording: The system supports loop recording, overwriting the oldest footage when the SD card is full.
- Local Playback: Recorded videos can be played back directly on the monitor. Refer to the user manual for detailed navigation of recorded files.

Figure 8: DVR recording and playback interface.
4. Parking Assist Lines:
The monitor can display adjustable parking assist lines to aid in reversing. This feature can typically be toggled on or off via the menu settings.

Figure 9: Parking assist lines feature, showing both off and on states.
Maintenance
- Regular Cleaning: Clean the monitor screen and camera lenses periodically with a soft, damp cloth. Avoid abrasive cleaners.
- Cable Inspection: Periodically check all cables and connections for wear, damage, or loose fittings. Ensure waterproof seals are intact.
- Firmware Updates: Check the manufacturer's website for any available firmware updates for improved performance or new features.
- SD Card Management: Format the SD card regularly (e.g., monthly) to maintain optimal recording performance and prevent data corruption. Back up important footage before formatting.
Troubleshooting
| Problem | Possible Cause | Solution |
|---|---|---|
| Monitor does not power on. | No power supply; loose power cable connection; blown fuse. | Check power connections; ensure vehicle ignition is on; inspect fuse in power cable. |
| No image on screen / "No Signal". | Loose camera cable connection; faulty camera; incorrect channel selected. | Verify all camera cables are securely connected; try switching channels; test camera on another channel if possible. |
| Image is blurry or distorted. | Dirty camera lens; moisture inside lens; cable interference. | Clean camera lens; check for condensation (allow to dry); ensure cables are not routed near strong electrical interference sources. |
| Night vision not working. | IR LEDs obstructed or faulty; insufficient ambient light. | Ensure IR LEDs are clear; verify power to camera. |
| DVR not recording. | SD card full or faulty; SD card not inserted correctly. | Insert or reinsert SD card; format SD card (backup data first); try a different SD card. |
If the problem persists after attempting these solutions, please contact customer support.
Specifications
| Feature | Detail |
|---|---|
| Brand | DOUXURY |
| Model Number | The 2023 Latest Version |
| Color | Black |
| Screen Size | 9 Inches |
| Display Technology | LCD |
| Special Features | DVR, Quad View, IP69K Waterproof, Night Vision Function |
| Compatible Devices | Semi-truck, Trailer, Van, RV |
| Product Dimensions | 2.48L x 0.29W x 0.2H meters |
| Installation Type | Dashboard mount, Surface mount |
| Video Recording Resolution | 640p |
| Voltage | 12-24 Volts DC |
| Optical Sensor Technology | Infrared, CMOS |
| Lens Type | Wide Angle |
Warranty and Support
DOUXURY provides comprehensive customer support for this product:
- 24-Hour Online Customer Service: Assistance is available around the clock.
- 30-Day Money-Back Guarantee: If you are not satisfied, you may return the product within 30 days for a full refund.
- 365-Day Replacement Warranty: The product is covered by a 365-day replacement warranty for manufacturing defects.
- Lifetime Support: Ongoing technical support is provided for the lifetime of the product.
For any questions, troubleshooting assistance, or warranty claims, please contact DOUXURY customer service. Your inquiries will receive full attention.


