
1. Introduction
This manual provides detailed instructions for the Hilitand DC 12V 8-Channel Multifunction Timed Relay Module. This module is designed for various timing control applications, featuring eight independent relay channels and multiple functional modes. Please read this manual thoroughly before operation to ensure correct usage and optimal performance.
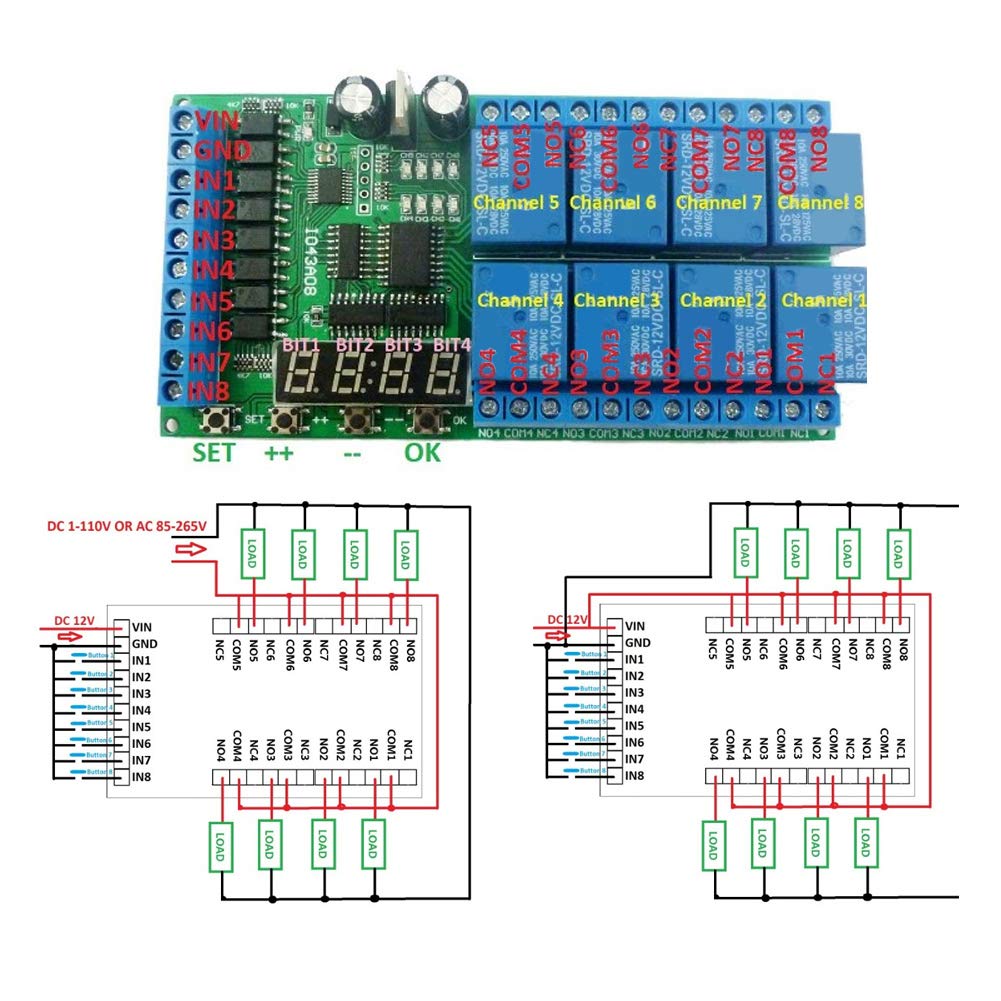
Figure 1.1: Top view of the Hilitand DC 12V 8-Channel Multifunction Timed Relay Module.
2. Product Features
- 8 Independent Channels: Each relay channel can be independently triggered with its own delay settings, ensuring no interference between channels.
- Multiple Functional Modes: Offers 6 types of functional modes, each with three sub-modes (no cycle, 2-99 cycle, always cycle) for versatile applications.
- High-Quality Components: Utilizes high Q value SMD electrolytic capacitors for good responsiveness and low signal attenuation in high-frequency circuits.
- Clear Digital Display: Features a digital tube display for easy monitoring of status and settings.
- User-Friendly Interface: Equipped with 'SET', 'OK', '++', and '--' buttons for intuitive configuration.
3. Specifications
| Parameter | Value |
|---|---|
| Working Voltage | DC 12V |
| Maximum Load (AC) | 10A / 250VAC, 10A / 125VAC |
| Maximum Load (DC) | 10A / 30VDC, 10A / 28VDC, 10A / 12VDC |
| Dimensions (L x W x H) | 12 x 7 x 2 cm (approx. 4.7 x 2.8 x 0.8 inches) |
| Weight | Approx. 130 grams (4.6 oz) |
| Model Number | Hilitand2epb7vg90a |
| Manufacturer | Hilitand |
| Country of Origin | China |
| Contact Type | Normally Open |
| UPC | 792117528651 |
4. Component Overview
The Hilitand DC 12V 8-Channel Multifunction Timed Relay Module consists of several key components for its operation and control.

Figure 4.1: Labeled components of the relay module. Key components include input terminals (VIN, GND, IN1-IN8), control buttons (SET, ++, --, OK), digital display, and relay output terminals (NO, COM, NC for each channel).
- VIN/GND: Power input terminals (DC 12V).
- IN1-IN8: Input trigger terminals for each of the 8 channels.
- SET Button: Used to enter and navigate through the setting menus.
- ++ Button: Used to increment values or move forward in menus.
- -- Button: Used to decrement values or move backward in menus.
- OK Button: Used to confirm selections or exit settings.
- Digital Display: Shows current status, remaining time, or parameter values.
- Relay Output Terminals (NO/COM/NC): Each of the 8 relays provides Normally Open (NO), Common (COM), and Normally Closed (NC) contacts for connecting external loads.
5. Setup and Wiring
Proper wiring is crucial for the safe and correct operation of the relay module. Ensure all power is disconnected before making any connections.
5.1 Power Connection
- Connect your DC 12V power supply to the VIN (positive) and GND (negative) terminals.
- Ensure the power supply matches the module's voltage requirement (DC 12V).
5.2 Input Trigger Connections
- External trigger signals can be connected to the IN1 through IN8 terminals. The specific trigger logic (e.g., high-level trigger, low-level trigger) depends on the selected functional mode.
5.3 Load Connections
Each relay channel provides three terminals: Normally Open (NO), Common (COM), and Normally Closed (NC). Connect your load according to the desired switching behavior.
- Normally Open (NO): The circuit is open (disconnected) when the relay is de-energized and closes (connects) when the relay is energized.
- Normally Closed (NC): The circuit is closed (connected) when the relay is de-energized and opens (disconnects) when the relay is energized.
- Common (COM): This is the common terminal for the switch.

Figure 5.1: Example wiring diagram for connecting loads to the relay module. This diagram illustrates connections for DC 1-110V or AC 85-265V loads.

Figure 5.2: Another example wiring diagram showing alternative load connections. Always refer to the specific requirements of your application.
6. Operating Instructions
The module's operation is controlled via the 'SET', 'OK', '++', and '--' buttons and indicated by the digital display.
6.1 Button Functions
- Short Press: A key press lasting less than 2 seconds.
- Long Press: A key press lasting more than 2 seconds.
- SET Button: Short press to enter the 'Channel Status' setting mode.
- OK Button: Short press to exit the current setting mode. Long press for 5 seconds to toggle Power Saving Status.
- ++ Button: Used to increase parameter values or navigate forward in menus.
- -- Button: Used to decrease parameter values or navigate backward in menus.
6.2 Module Statuses
- Working Status: After power-on, the module enters this status. The digital display shows the remaining duration for an active channel. Parameters can be viewed and adjusted via the 'channel selection' menu.
- Set Status: Activated by a short press of the 'SET' button. Allows configuration of channel parameters. Exit by short pressing the 'OK' button.
- Power Saving Status: In this status, the digital display tubes are turned off to conserve power, but all other functions continue to operate correctly. Enter or exit this status by long pressing the 'OK' button for 5 seconds. Restarting the module will also exit Power Saving Status.
6.3 Functional Modes
The module supports 6 types of functional modes, each with three sub-modes: 'no cycle', '2-99 cycle', and 'always cycle'. The specific details and configuration steps for each of these 6 modes are not provided in the available product information. Please refer to the manufacturer's official documentation or support channels for detailed programming instructions for each mode.
6.4 Factory Reset
To restore the module to its factory default settings:
- Press and hold both the '++' and '--' buttons simultaneously for 3 seconds.
- The digital display will illuminate, indicating the reset process has begun.
- After the reset, the module will operate with its default parameters upon the next power cycle.
7. Maintenance
To ensure the longevity and reliable operation of your Hilitand DC 12V 8-Channel Multifunction Timed Relay Module, follow these general maintenance guidelines:
- Keep Clean: Regularly clean the module with a soft, dry cloth. Avoid using liquids or abrasive cleaners.
- Environmental Conditions: Operate and store the module in a dry environment, away from excessive dust, moisture, and extreme temperatures.
- Inspect Connections: Periodically check all wiring connections to ensure they are secure and free from corrosion.
- Avoid Overload: Do not exceed the specified maximum load ratings for the relays to prevent damage.
8. Troubleshooting
If you encounter issues with your relay module, consider the following troubleshooting steps:
- Module Not Powering On:
- Verify that the DC 12V power supply is correctly connected to VIN and GND.
- Check the power supply voltage and ensure it is within the specified range.
- Inspect for any loose connections or damaged wires.
- Relay Not Activating:
- Ensure the input trigger signal (IN1-IN8) is correctly applied and meets the module's requirements for the selected mode.
- Check the configured timing parameters for the specific channel.
- Verify that the module is not in Power Saving Status if you expect the display to be active.
- Incorrect Timing:
- Re-enter the Set Status and verify the programmed delay times.
- Confirm the selected functional mode and sub-mode are appropriate for your application.
- Digital Display Off (but module working):
- The module might be in Power Saving Status. Long press the 'OK' button for 5 seconds to exit this mode.
- Module Unresponsive:
- Try performing a Factory Reset (refer to Section 6.4).
- Disconnect and reconnect power to restart the module.
If problems persist after attempting these steps, please contact customer support.
9. Warranty and Support
Specific warranty details for the Hilitand DC 12V 8-Channel Multifunction Timed Relay Module are not provided in the available product information. For warranty claims or detailed support, please:
- Refer to the warranty information provided at the time of purchase.
- Contact the seller or retailer from whom you purchased the product.
- Visit the official Hilitand website for potential support resources or contact information.
Always retain your proof of purchase for warranty purposes.