1. Introduction
This manual provides comprehensive instructions for the assembly, operation, maintenance, and troubleshooting of your Aivituvin AIR12 Outdoor/Indoor Pet Shelter. Please read this manual thoroughly before assembly and use to ensure proper function and the safety of your pet. Keep this manual for future reference.
2. Product Features
The Aivituvin AIR12 pet shelter is designed to provide a comfortable and secure environment for small animals, suitable for both indoor and outdoor use.
- Durable Construction: Crafted from 100% natural fir wood, treated with waterproof paint, and featuring an asphalt roof for enhanced weather resistance.
- Weather Protection: PVC door flaps are included to shield pets from wind and rain, maintaining a dry interior.
- Spacious Interior: Designed to comfortably accommodate 1-2 cats or other small animals such as rabbits and small dogs. Inner dimensions are approximately L23.6" x W20.9" x H18.3".
- Easy Cleaning Access: Features a large opening roof and a front door that facilitate convenient cleaning and maintenance.
- Simple Assembly: Engineered for straightforward assembly with pre-aligned screw holes, typically requiring only a screwdriver.
- Ventilation: Equipped with three strategically placed vent holes to ensure adequate air circulation, promoting a healthy and comfortable living space.
- Elevated Design: Raised off the ground by plastic-covered feet to protect against moisture and cold.

Figure 2.1: Key Features of the Aivituvin AIR12 Pet Shelter
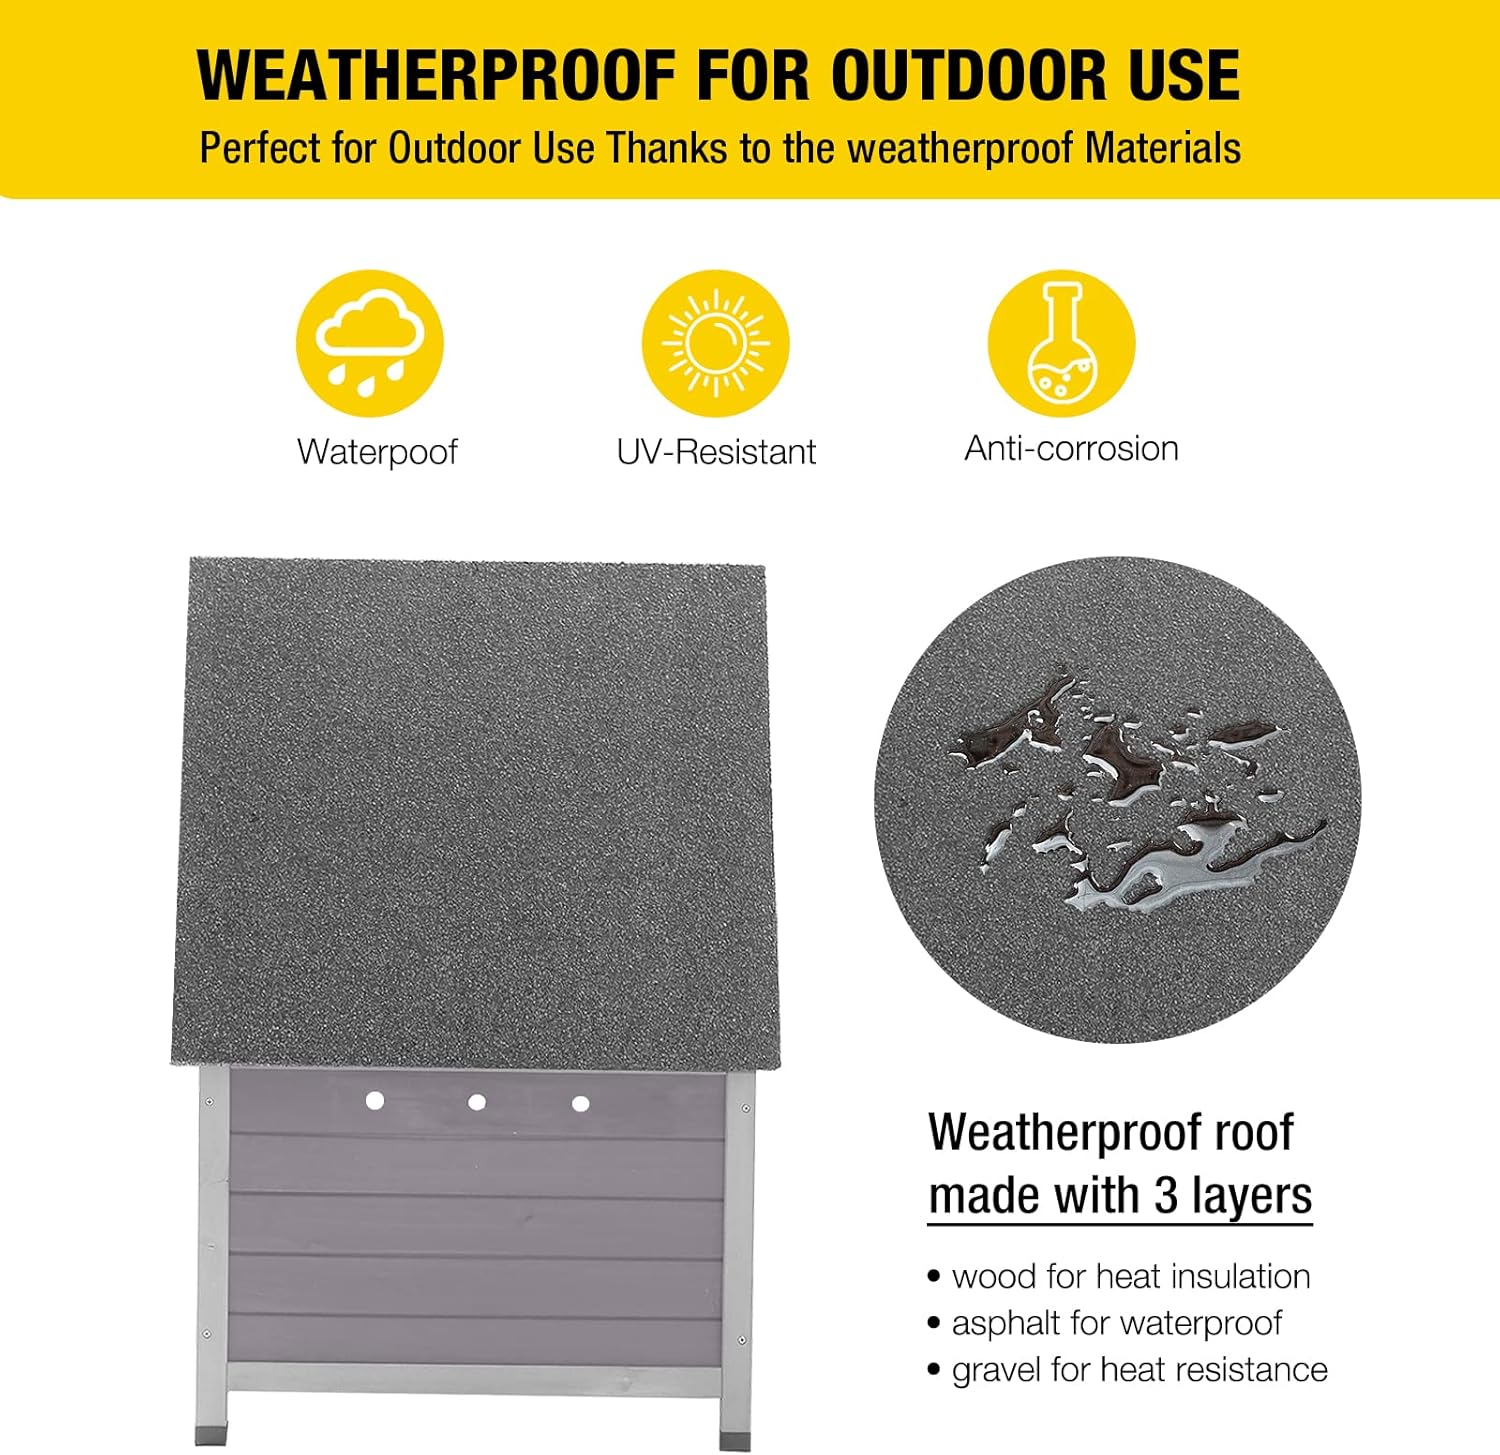
Figure 2.2: Weatherproof Roof Construction
3. Safety Information
Please observe the following safety guidelines to prevent injury to pets or damage to the product:
- Ensure all components are securely fastened during assembly.
- Place the pet shelter on a stable, level surface.
- Regularly inspect the shelter for any signs of wear, damage, or loose parts. Repair or replace as necessary.
- Keep small children away from the assembly area and ensure they do not play inside or on top of the shelter without supervision.
- Do not use harsh chemicals for cleaning, as these may be harmful to pets.
- Ensure adequate ventilation, especially if placing the shelter in an enclosed space.
4. Package Contents
Verify that all parts are present before beginning assembly. If any parts are missing or damaged, please contact customer support.
- Roof Panel (1)
- Side Panels (2)
- Front Panel (1)
- Back Panel (1)
- Base Panel (1)
- PVC Door Flaps (1 set)
- Hardware Pack (screws, metal supports, plastic feet)
- Instruction Manual (this document)
5. Assembly Instructions
Assembly typically requires a Phillips head screwdriver. An electric drill may be used for faster and more secure fastening, but exercise caution to avoid overtightening.
- Prepare Components: Unpack all components and lay them out on a clean, flat surface. Identify each panel and hardware piece.
- Assemble Base: Attach the side panels, front panel, and back panel to the base panel using the provided screws. Ensure all panels are aligned correctly.
- Install Feet: Secure the plastic feet to the bottom corners of the base panel.
- Attach Roof Supports: Install the metal supports for the openable roof mechanism to the side panels and roof panel as indicated in the diagrams.
- Secure Roof: Attach the roof panel to the assembled structure. Ensure the hinges and metal supports allow for smooth opening and closing.
- Install Door Flaps: Insert the PVC door flaps into the designated slots on the front panel.
- Final Check: Verify that all screws are tightened and the structure is stable.

Figure 5.1: Example Assembly Steps (Refer to included manual for full diagrams)
6. Operating Instructions (Usage)
Your Aivituvin AIR12 pet shelter is designed for versatile use:
- Placement: The shelter can be placed indoors or outdoors. For outdoor use, choose a sheltered location to maximize protection from extreme weather.
- Pet Introduction: Allow your pet to explore the shelter at their own pace. Placing familiar bedding or toys inside can encourage use.
- PVC Door Flaps: The clear PVC flaps provide an entry/exit point while helping to retain warmth and keep out drafts. Pets typically adapt quickly to pushing through them.
- Ventilation: The integrated vent holes ensure continuous airflow, which is crucial for your pet's comfort and health.

Figure 6.1: Cat Utilizing the Pet Shelter Entrance

Figure 6.2: Versatile Use for Cats and Rabbits
7. Maintenance and Care
Regular maintenance will extend the life of your pet shelter and ensure a hygienic environment for your pet.
- Cleaning: The large opening roof and removable bottom floor (Figure 7.1) make cleaning easy. Use a damp cloth with mild, pet-safe soap to wipe down surfaces. Rinse thoroughly and allow to air dry completely before your pet re-enters.
- Inspection: Periodically check all screws and joints for tightness. Tighten any loose fasteners.
- Wood Care: While the wood is treated, prolonged exposure to harsh weather may require re-sealing or re-painting over time to maintain its waterproof properties.
- Roof Maintenance: Inspect the asphalt roof for any damage or lifting, especially after strong winds or heavy rain.
- Ventilation Holes: Ensure the three vent holes (Figure 7.2) remain clear of debris to allow proper airflow.

Figure 7.1: Removable Bottom Floor for Easy Cleaning

Figure 7.2: Ventilation Holes
8. Troubleshooting
If you encounter issues with your pet shelter, consider the following common solutions:
- Pet Not Using Shelter: Pets may be wary of new items. Place familiar bedding, toys, or treats inside to encourage exploration. Allow time for your pet to adjust. Some pets may be sensitive to the smell of new wood; airing out the shelter for a few days can help.
- Water Leakage: Ensure the shelter is placed on a level surface. Check that the roof is properly seated and all screws are tight. Inspect the asphalt roof for any damage.
- Instability: Verify that all assembly screws are fully tightened. Ensure the shelter is on a flat, stable surface.
- Difficulty with PVC Flaps: Some pets may initially hesitate with the flaps. Gently guide them through a few times, or temporarily prop one flap open until they are comfortable.
9. Specifications
| Feature | Detail |
|---|---|
| Model Name | AIR12 |
| Brand | Aivituvin |
| Material | Fir Wood |
| Color | Grey |
| Item Dimensions (LxWxH) | 23.6 x 20.9 x 18.3 inches |
| Inner Dimensions (LxWxH) | 23.6" x 20.9" x 18.3" (approximate) |
| Item Weight | 16.8 pounds |
| Specific Uses | Indoor, Outdoor |
| Target Audience | Dogs, House-Cats, Rabbits, Small Animals |
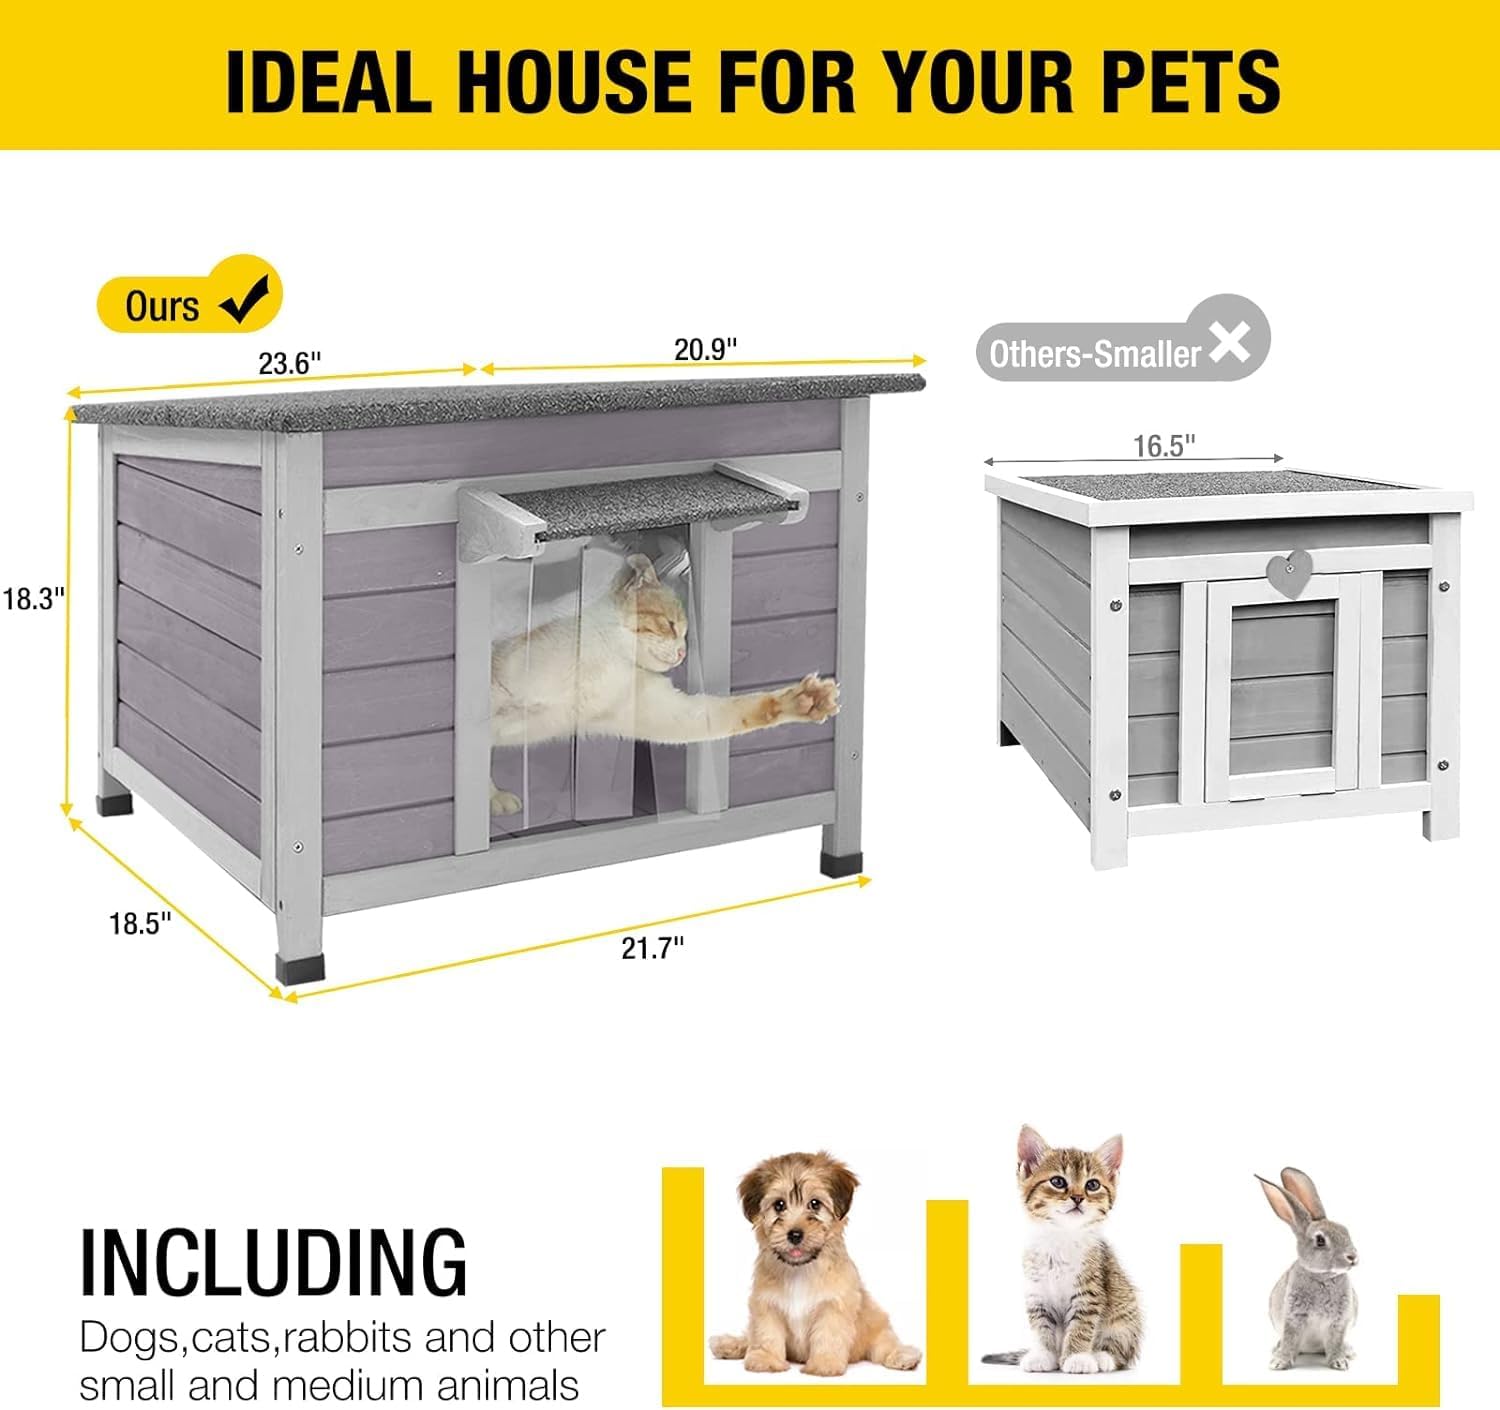
Figure 9.1: Product Dimensions Overview
10. Warranty Information
The Aivituvin AIR12 Outdoor/Indoor Pet Shelter comes with a 1-year warranty from the date of purchase. This warranty covers manufacturing defects and material flaws under normal use. It does not cover damage caused by misuse, accidents, improper assembly, or normal wear and tear. Please retain your proof of purchase for warranty claims.
11. Contact and Support
For any questions, concerns, or support needs regarding your Aivituvin AIR12 pet shelter, please contact Aivituvin customer service. Refer to the contact information provided with your purchase or visit the official Aivituvin website for assistance.
Online Support: Visit the Aivituvin Store on Amazon


