Introduction
The Audiolab 6000A is a versatile 100-watt stereo integrated amplifier featuring an onboard ESS 9018K2M DAC and Bluetooth connectivity. Designed to deliver high-fidelity audio, it offers multiple input options and three distinct operating modes to suit various audio setups.
Key features include:
- Integrated amplifier design
- 50 watts per channel into 8 Ohms
- Bluetooth enabled for wireless streaming
- High-performance ESS 9018K2M DAC
- Three selectable operating modes: Integrated, Pre-Power, and Pre-Amplifier
Setup
Unpacking and Contents
Carefully remove the Audiolab 6000A from its packaging. The package typically includes:
- Audiolab 6000A Integrated Amplifier
- Power Cable
- Remote Control
- User Manual (this document)
Placement
Place the amplifier on a stable, level surface away from direct sunlight, heat sources, and excessive moisture. Ensure adequate ventilation around the unit to prevent overheating. Do not block the ventilation grilles on the top or sides of the amplifier.
The compact design of the 6000A allows for flexible placement, including under monitor stands, provided there is sufficient space for heat dissipation.
Connections
Before making any connections, ensure the Audiolab 6000A is switched off and disconnected from the mains power supply.
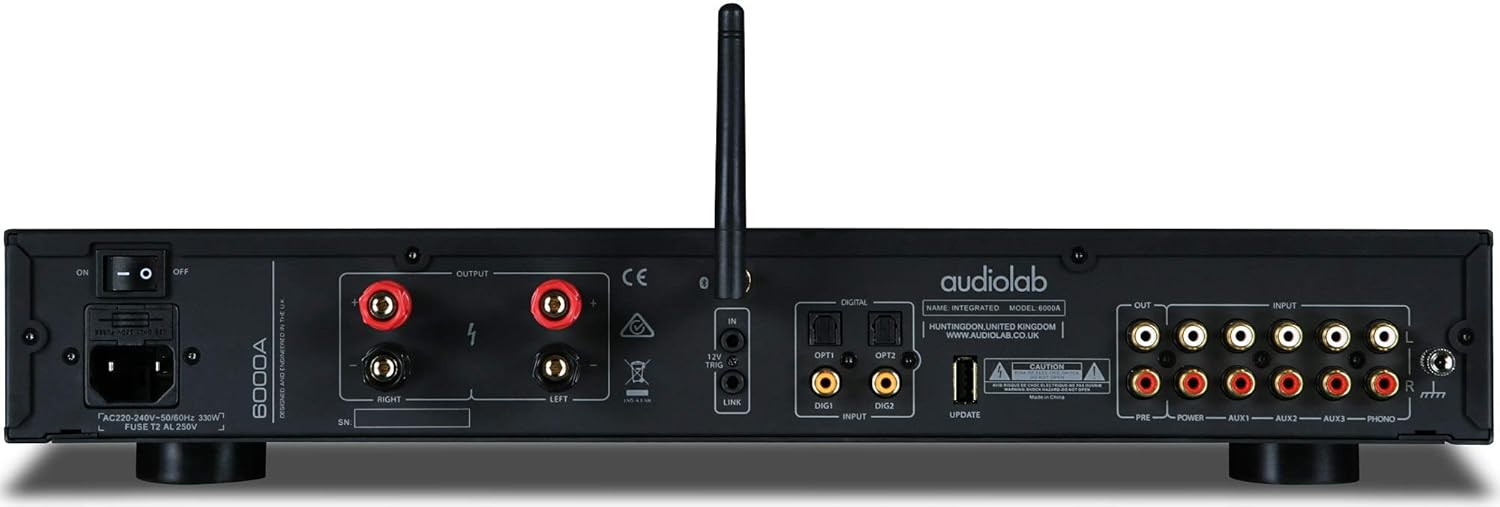
Figure 1: Rear Panel Connections
This image displays the rear panel of the Audiolab 6000A, highlighting the comprehensive array of input and output terminals. From left to right, you can see the power input with an on/off switch, speaker binding posts for left and right channels, a 12V trigger output, digital inputs (two optical, two coaxial), a USB input, and analog RCA inputs (three line-level, one phono). There are also pre-out and power-in RCA connections for flexible system integration.
Speaker Connections
Connect your loudspeakers to the speaker binding posts on the rear panel. Ensure correct polarity: connect the positive (+) terminal of the amplifier to the positive (+) terminal of the speaker, and the negative (-) terminal of the amplifier to the negative (-) terminal of the speaker. Use high-quality speaker cables for optimal performance. The 6000A supports banana plugs, spade connectors, or bare wire.
Analog Inputs
The 6000A provides multiple analog RCA inputs:
- AUX1, AUX2, AUX3: For connecting line-level sources such as CD players, tuners, or network streamers.
- PHONO: A dedicated input for turntables with a Moving Magnet (MM) cartridge. Ensure your turntable is properly grounded to the ground terminal next to the PHONO input.
Digital Inputs
Utilize the integrated DAC by connecting digital sources:
- OPT1, OPT2: Optical (Toslink) inputs for devices like TVs, game consoles, or digital audio players.
- COAX1, COAX2: Coaxial (S/PDIF) inputs for CD transports, media servers, or other digital sources.
- USB: Connect your computer (PC or Mac) to this input for high-resolution audio playback. Install any necessary drivers as per Audiolab's website if required for your operating system.
Bluetooth Pairing
To pair a Bluetooth device:
- Select the Bluetooth input on the 6000A using the 'SEL' knob.
- On your mobile device, enable Bluetooth and search for available devices.
- Select "Audiolab 6000A" from the list. Once paired, the display will confirm the connection.
Pre-out and Power-in Connections
The 6000A offers flexibility for system expansion:
- PRE OUT: Connect to an external power amplifier or active subwoofers.
- POWER IN: Allows the 6000A's power amplifier section to be used independently, bypassing the pre-amplifier. This is useful for integrating into a home theater system where an AV receiver handles pre-amplification.
Power Connection
Once all audio connections are made, connect the supplied power cable to the IEC inlet on the rear panel and then to a suitable mains power outlet. Ensure the power switch on the rear panel is in the 'OFF' position before connecting to mains power.
Operating the Audiolab 6000A
Front Panel Controls

Figure 2: Front Panel Overview
This image shows the sleek front panel of the Audiolab 6000A, featuring three rotary knobs labeled 'SEL', 'MODE', and 'VOL' from left to right, along with a central OLED display. A headphone jack and power button are also visible on the right side.
- SEL (Source Select) Knob: Rotate to cycle through available input sources (e.g., AUX1, OPT1, USB, Bluetooth). Press to confirm selection or enter sub-menus.
- MODE Knob: Rotate to select the amplifier's operating mode (Integrated, Pre-Power, Pre-Amplifier) or to navigate menu options. Press to confirm selection.
- VOL (Volume) Knob: Rotate clockwise to increase volume, counter-clockwise to decrease volume.
- OLED Display: Shows the selected input, volume level, and menu options.
- Power Button: Press to turn the unit on or off (standby).
- Headphone Output: A 6.35mm (1/4 inch) jack for connecting headphones.
Operating Modes
The Audiolab 6000A offers three primary operating modes, selectable via the MODE knob:
- Integrated Mode: This is the standard mode where the 6000A functions as a complete integrated amplifier, handling both pre-amplification and power amplification.
- Pre-Power Mode: In this mode, the pre-amplifier section is bypassed, allowing the 6000A to act solely as a power amplifier. This is useful when connecting an external pre-amplifier or an AV receiver's pre-outs.
- Pre-Amplifier Mode: The 6000A functions as a standalone pre-amplifier, sending its output to an external power amplifier. The internal power amplifier section is disengaged.
Ensure the correct mode is selected for your system configuration. Accidental changes to the mode knob can render the amplifier non-functional until the correct mode is re-selected.
DAC Filters
The integrated ESS 9018K2M DAC offers selectable digital filters to fine-tune the sound to your preference or the characteristics of the audio source. These filters can typically be accessed through the unit's menu system (using the SEL or MODE knob to navigate and select).
- Fast Filter: Often provides a more detailed and precise soundstage, suitable for well-recorded music.
- Slow Filter: Can help to tame harshness or boosted high frequencies in certain recordings, offering a smoother sound.
- Phase Filter: May be used to adjust phase characteristics, potentially improving the overall smoothness and naturalness of the sound, particularly with older recordings.
Experiment with these filters to find the setting that best complements your music and listening environment.
Remote Control
The Audiolab 6000A comes with a remote control for convenient operation. The remote allows control over input selection, volume adjustment, mute, and other menu functions. Familiarize yourself with the remote's layout for optimal use. Note that some buttons on the remote may be designed for other Audiolab products and may not have a function with the 6000A.
Maintenance
To ensure the longevity and optimal performance of your Audiolab 6000A, follow these maintenance guidelines:
- Cleaning: Dust the unit regularly with a soft, dry, lint-free cloth. For stubborn marks, lightly dampen the cloth with water or a mild, non-abrasive cleaner. Avoid using harsh chemicals or abrasive materials, which can damage the finish.
- Ventilation: Periodically check that the ventilation grilles are clear of dust and obstructions. Proper airflow is crucial for preventing overheating.
- Connections: Occasionally check all cable connections to ensure they are secure. Loose connections can lead to signal loss or degraded sound quality.
- Power Off: If the unit will not be used for an extended period, it is advisable to switch it off at the rear power switch and disconnect it from the mains supply.
Troubleshooting
If you experience issues with your Audiolab 6000A, consult the following common troubleshooting steps:
No Power
- Ensure the power cable is securely connected to both the amplifier and the mains outlet.
- Check that the rear panel power switch is in the 'ON' position.
- Verify the mains outlet is functioning by plugging in another device.
No Sound
- Check that the correct input source is selected on the amplifier.
- Ensure the volume is not set to minimum or muted.
- Verify that speaker cables are correctly and securely connected to both the amplifier and speakers, observing polarity.
- If using headphones, ensure they are fully inserted and that the main speaker output is not automatically muted.
- Confirm the amplifier is in the correct operating mode (e.g., Integrated mode if using internal pre-amp and power amp).
- For digital inputs, ensure the source device is outputting audio in a compatible format and that the correct digital input is selected.
Distorted Sound
- Reduce the volume level.
- Check speaker connections for any loose strands or short circuits.
- Ensure the input source is not overdriving the amplifier (e.g., line level output from a source is too high).
- Inspect audio cables for damage or poor connections.
Remote Control Not Working
- Check and replace the batteries in the remote control.
- Ensure there are no obstructions between the remote and the amplifier's IR receiver.
- Point the remote directly at the amplifier's front panel.
Volume Knob Issues
- If the volume decreases regardless of turn direction, this may indicate a specific unit fault. Try using the remote control for volume adjustment. If the issue persists, contact customer support.
If the problem persists after attempting these steps, please contact Audiolab customer support or your authorized dealer for further assistance.
Specifications
| Feature | Specification |
|---|---|
| Model | 6000A |
| Output Power | 2 x 50W (8 Ohms) |
| DAC | ESS Sabre32 ES9018K2M |
| Bluetooth | Yes |
| Analog Inputs | 3 x RCA Line-level, 1 x RCA Phono (MM) |
| Digital Inputs | 2 x Optical, 2 x Coaxial, 1 x USB Type B |
| Operating Modes | Integrated, Pre-Power, Pre-Amplifier |
| Dimensions (L x W x H) | 13 x 17.5 x 3.15 inches |
| Weight | 21.3 Pounds |
| Voltage | 100 Volts |
| Manufacturer | Audiolab |
| Country of Origin | China |
Warranty and Support
Audiolab products are manufactured to the highest standards and are designed for reliable performance. This product is covered by a limited warranty against manufacturing defects. The specific terms and duration of the warranty may vary by region and retailer. Please retain your proof of purchase for warranty claims.
For technical support, service, or warranty inquiries, please contact your authorized Audiolab dealer or visit the official Audiolab website for contact information in your region. Providing your product model (6000A) and serial number will help expedite support.
Online Resources: For additional information, FAQs, and potential driver downloads (for USB audio), please visit the official Audiolab website: www.audiolab.co.uk


