Introduction
The PROAIM FLYCAM Zest Pro is a modular handheld stabilizer designed for professional video camera applications, including HD broadcast and feature film production. It provides robust yet lightweight aluminum construction, supporting payloads ranging from 5kg to 15kg (11lb to 33lb). This manual provides detailed instructions for the assembly, operation, and maintenance of your Zest Pro stabilizer to ensure optimal performance and longevity.
Safety Information
- Always ensure all components are securely fastened before operation.
- Do not exceed the maximum payload capacity of 15kg (33lb).
- Handle the stabilizer with care to prevent damage to the equipment or injury to yourself and others.
- Keep the stabilizer away from water and extreme temperatures.
- Regularly inspect all parts for wear and tear. Replace damaged components immediately.
Package Contents
Verify that all items listed below are included in your package:
- Flycam Zest Pro Electronic Video Camera Stabilizer
- Battery Plate: V-Mount
- Weight Plates: 20pcs (0.125 kg / 0.27 lb each)
- HDMI/SDI/DC Power Cables (in-built)
- Extra Cables (DC Power/HDMI male to male/RC to RC male/RC male to BNC male cable)
- 2 x RC Female to BNC male Connector
- Monitor Mount
- Storage Bag
Setup
1. Assembling the Stabilizer
Carefully remove all components from the storage bag. Begin by attaching the gimbal to the center post and securing the base platform. Ensure all locking mechanisms are tightened.

Image: The Flycam Zest Pro stabilizer fully assembled, showing the camera platform, center post, gimbal, and base platform with counterweights.
2. Mounting the Camera
Attach your camera to the camera platform using the ¼"-20 or ⅜"-16 screws. The camera platform features X-Y adjustments for precise horizontal balancing. Utilize the knurled knobs for front-to-back and side-to-side adjustments.

Image: Close-up of the camera platform with X-Y adjustment knobs for fine-tuning camera position.
3. Balancing the Stabilizer
Achieving proper balance is crucial for smooth operation. The Zest Pro features a micro-balance system for precise adjustments. The telescopic center post with laser-engraved guide scale markings assists in vertical balancing. The adjustable base platform, along with the included weight discs, allows you to achieve perfect dynamic balance.

Image: The telescopic center post with visible scale markings for vertical balance adjustments.
Use the 20 provided weight plates (0.125 kg / 0.27 lb each) on the base platform to fine-tune the balance according to your camera's weight and setup. The goal is for the stabilizer to remain level and stable when held freely.

Image: The adjustable base platform with multiple counterweight plates attached for balancing.
4. Power Connections and Monitor Mounting
The Zest Pro includes a V-mount battery plate and an HDMI splitter with multiple output ports (15V, 12V, 7.2V, and 5V) to supply power to your LCD monitor and other accessories. Easily mount your monitor on the 200mm/450mm rods. The 200mm rod system allows for height adjustment, enabling you to position the monitor wherever needed on the central post.
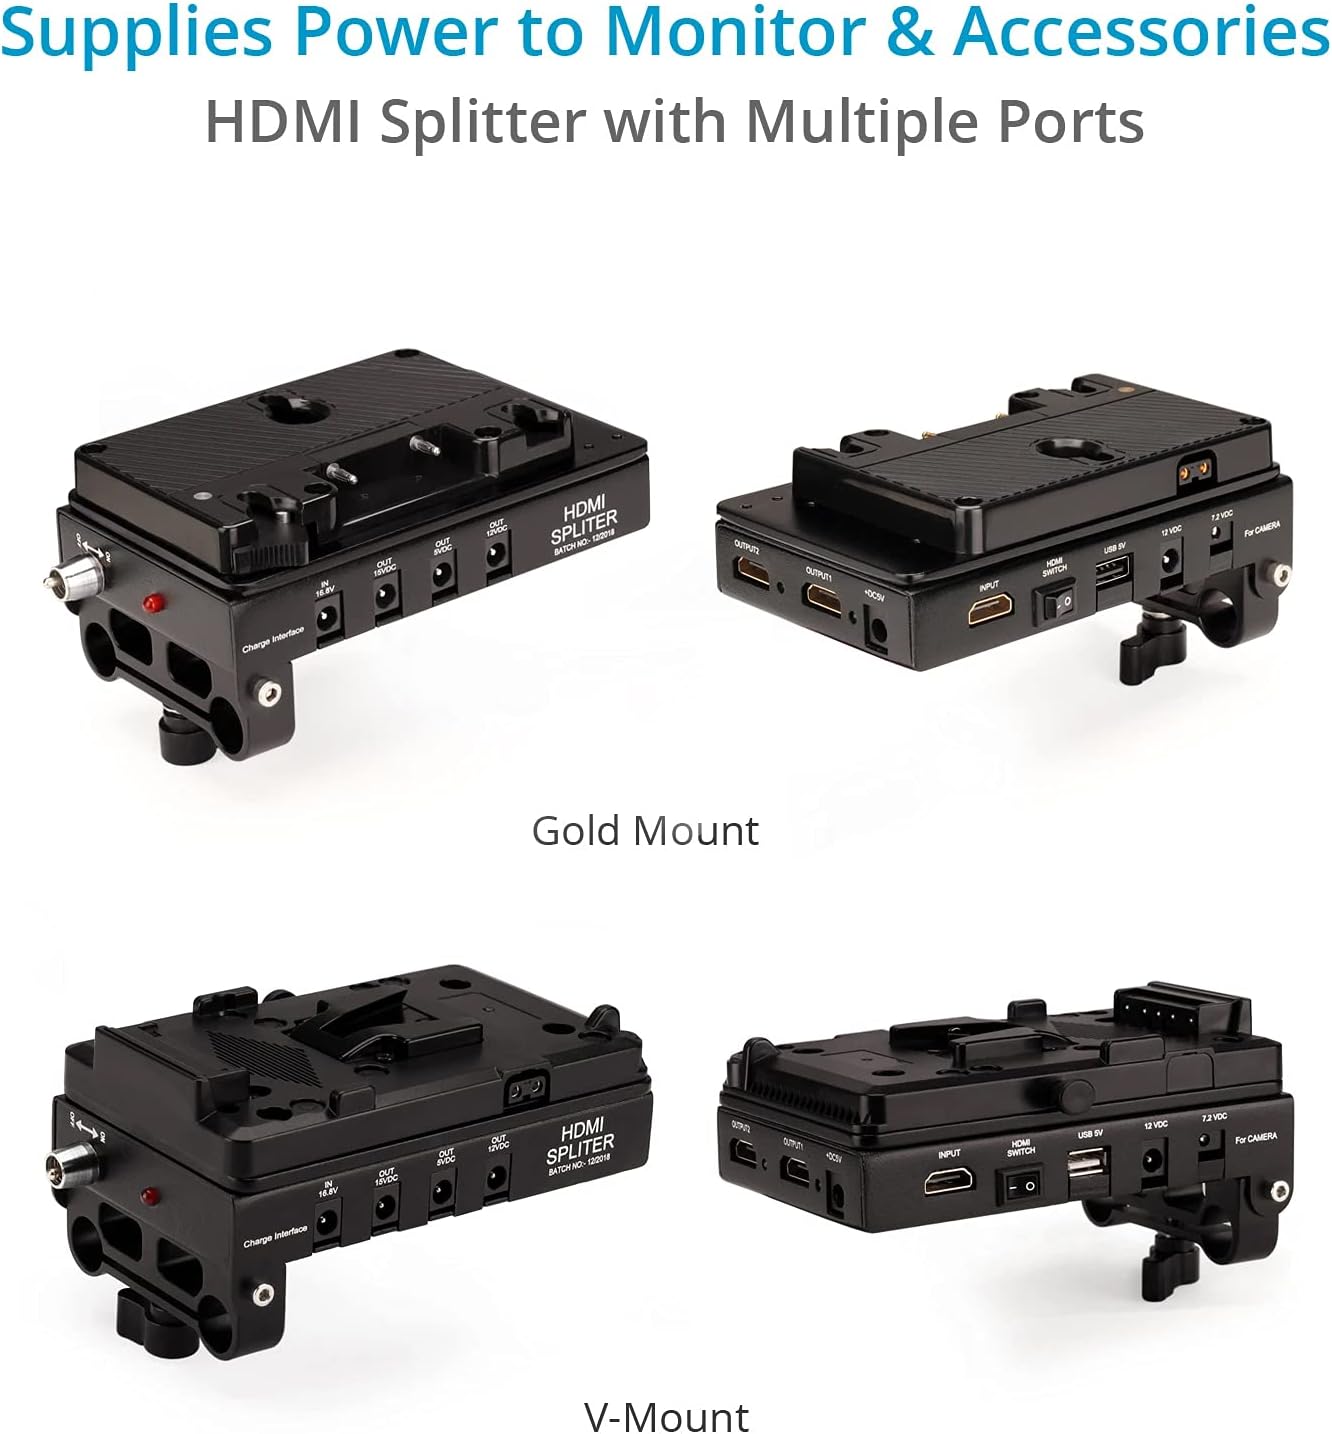
Image: The HDMI splitter and V-mount battery plate, showing various power output ports for accessories.
Operating the Stabilizer
Once assembled and balanced, the Zest Pro allows for ultra-smooth camera movements. The 3-axis gimbal provides rotational control, and the new handle design offers improved grip and swiveling capabilities.

Image: Close-up of the 3-axis gimbal and ergonomic handle for precise control.
1. Basic Operation
Hold the stabilizer by the handle, allowing the camera to float freely. Use subtle movements of your wrist and arm to guide the camera. Practice walking with a smooth, gliding motion to minimize vertical bounce.
2. Adjusting for Different Shots
The telescopic center post allows for quick height adjustments, enabling you to switch between high-angle and low-angle shots. For low mode operation, the sled can be inverted. Ensure re-balancing is performed after significant configuration changes.

Image: The stabilizer shown at its minimum (40 cm) and maximum (60 cm) height settings, demonstrating versatility for various shot types.
3. Using with Arm and Vest (Optional)
For extended use and heavier setups, the Zest Pro is compatible with a body-worn arm and vest system (sold separately). This transfers the weight from your arm to your body, allowing for longer operating times and even smoother vertical stabilization by eliminating footsteps movement.
Video: Demonstration of the Flycam Zest Pro Video Camera Stabilizer with V-mount battery, showcasing its use in various filming scenarios, including with an arm and vest system. This video highlights the stabilizer's capabilities for smooth, professional footage.
Video: A detailed look at the FLYCAM Zest Pro Video Camera Stabilizer with Power Connections, demonstrating its assembly, balancing, and use in a professional setting. The video emphasizes the stabilizer's robust design and integrated power solutions.
Maintenance
- Keep the stabilizer clean by wiping it with a soft, dry cloth after each use.
- Store the stabilizer in its provided high-quality storage bag to protect it from dust and damage.
- Regularly check all screws and connections for tightness.
- Avoid exposing the stabilizer to harsh chemicals or abrasive materials.

Image: The durable storage bag designed to protect the Flycam Zest Pro stabilizer during transport and storage.
Troubleshooting
| Problem | Possible Cause | Solution |
|---|---|---|
| Unstable footage / Wobbling | Improper balancing (static or dynamic) | Re-balance the camera platform and adjust counterweights on the base platform. Ensure the drop time is correct. |
| Camera drifting to one side | Horizontal imbalance | Adjust the X-Y knobs on the camera platform to center the camera's weight. |
| Excessive vertical bounce | Incorrect vertical balance or walking technique | Adjust the height of the center post. Practice a smooth, "heel-to-toe" walking motion. Consider using an arm and vest system. |
| Power accessories not working | Loose cable connections, discharged battery, or incorrect voltage output selected. | Check all cable connections. Ensure the V-mount battery is charged. Verify the correct voltage output is selected on the HDMI splitter for your accessory. |
Specifications
| Feature | Detail |
|---|---|
| Construction | High-grade CNC Aluminum |
| Load Capacity | 5-15 kg / 11-33 lb |
| Head Dimension (X, Y Axis) | 8 x 17cm with Lever |
| Camera Mounting Screws | ¼"-20 & ⅜"-16 |
| Main Post Diameter | 30 mm |
| Telescopic Post Diameter | 25 mm |
| Height Range | 62-100 cm / 24-39 inches |
| Number of Counterweight Plates | 20pcs |
| Weight of Each Plate | 0.125 kg / 0.27 lb |
| Base Platform Rods Diameter | 15mm |
| Base Platform Rod Lengths | 200mm & 450mm |
| HDMI Splitter Output Ports | 1 x 15V, 1 x 12V, 1 x 7.2V and 1 x 5V |
| Product Weight (without packing) | 7.36 kg / 16.2 lb |
Warranty & Support
PROAIM offers a 100% Customer Satisfaction Guarantee. For warranty claims, technical support, or any inquiries regarding your FLYCAM Zest Pro stabilizer, please contact PROAIM customer service through their official website or the retailer where the product was purchased. Keep your proof of purchase for warranty validation.


