
1. Introduction
This manual provides detailed instructions for the installation, configuration, and maintenance of your MSI MPG Z390 Gaming Plus motherboard. Designed for Intel 8th and 9th Generation Core, Pentium Gold, and Celeron processors, this motherboard offers a robust platform for high-performance computing.
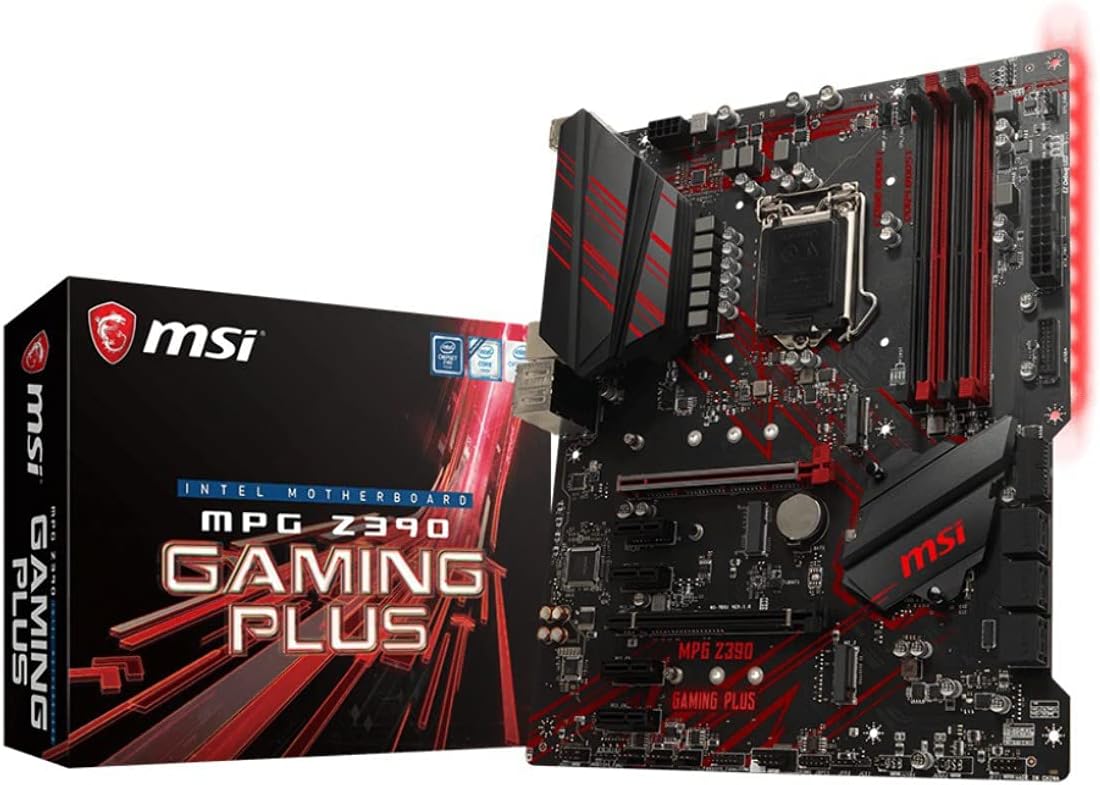
Image 1.1: MSI MPG Z390 Gaming Plus Motherboard and Packaging
Please read this manual thoroughly before beginning installation to ensure proper setup and to maximize the performance and longevity of your system.
2. Key Features
The MSI MPG Z390 Gaming Plus motherboard includes several features designed to enhance your computing experience:
- Supports 9th i9-9900K, i7-9700K, i5-9600K and 8th Generation Intel Core / Pentium Gold / Celeron processors for LGA 1151 socket.
- Supports dual channel DDR4 Memory, up to 4400(OC) MHz.
- Features 2x TURBO M.2 slots and Intel Optane Memory Ready for high-speed storage.
- Equipped with Turbo USB 3.1 GEN2 for fast data transfer.
- Includes an Extended Heatsink design for improved thermal performance.
- Intel CNVi Ready: Supports Intel CNVi Wi-Fi module, IEEE802.11 AC wave2.
- Optimized for esports, streaming, and gaming.
- Operating system support for Windows 10 64-bit.
3. Package Contents
Verify that all items are present in your motherboard package:
- MSI MPG Z390 Gaming Plus Motherboard
- Cables and Connectors (e.g., SATA cables)
- Quick Setup Guide / User Manual
If any items are missing or damaged, please contact your retailer or MSI support.
4. Motherboard Layout and Components
Familiarize yourself with the layout of the motherboard before installation. This section highlights key components and connectors.

Image 4.1: Top-down view of the MSI MPG Z390 Gaming Plus Motherboard
Key areas include the LGA1151 CPU socket, four DDR4 DIMM slots, multiple PCIe expansion slots, two M.2 slots for NVMe SSDs, and six SATA 6Gb/s ports. The motherboard also features various headers for front panel connectivity, USB ports, and fan control.

Image 4.2: Angled view showing CPU socket and DDR4 memory slots

Image 4.3: Angled view showing PCIe expansion slots and M.2 slots
5. Installation Guide
5.1. Pre-Installation Checklist
- Ensure you have a compatible CPU (LGA1151, Intel 8th/9th Gen).
- Gather necessary tools: Phillips screwdriver, anti-static wrist strap (recommended).
- Prepare your PC case by installing standoffs if not pre-installed.
- Unplug the power supply from the wall outlet.
5.2. CPU Installation
- Open the CPU socket lever and lift the load plate.
- Carefully align the CPU with the socket, matching the golden triangle on the CPU to the triangle on the socket. Do not force the CPU into the socket.
- Lower the load plate and secure it with the lever.
5.3. CPU Cooler Installation
Install your CPU cooler according to its manufacturer's instructions. Ensure proper thermal paste application and secure mounting for optimal cooling.
5.4. Memory (RAM) Installation
- Open the clips on both ends of the DIMM slot.
- Align the notch on the DDR4 memory module with the key in the DIMM slot.
- Press down firmly on both ends of the memory module until the clips snap into place.
5.5. Storage Device Installation
- M.2 SSDs: Insert the M.2 SSD into the M.2 slot at an angle, then push it down and secure it with the provided screw.
- SATA Drives: Connect SATA data cables to the motherboard's SATA ports and to your SSDs/HDDs. Connect SATA power cables from your power supply to the drives.
5.6. Expansion Card Installation
Insert your graphics card or other PCIe expansion cards into the appropriate PCIe slots and secure them with the case's retention mechanism.
5.7. Connecting Peripherals and Power
Connect all necessary cables to the motherboard, including front panel connectors (power switch, reset switch, USB, audio), fan headers, and the main 24-pin ATX power connector and 8-pin CPU power connector from your power supply.

Image 5.1: Rear I/O Panel for external device connections
Connect your monitor to the graphics card or the motherboard's integrated graphics output (HDMI, DVI) if using a compatible CPU.
5.8. Mounting the Motherboard
Carefully place the motherboard into the PC case, aligning the screw holes with the standoffs. Secure the motherboard with screws.
6. Initial Setup and Operation
6.1. First Boot
After assembly, connect your monitor, keyboard, and mouse. Power on the system. The system should display the MSI logo and enter the BIOS/UEFI setup or begin the operating system installation process.
6.2. BIOS/UEFI Configuration
To enter the BIOS/UEFI setup, press the Delete key during the boot process. Here you can configure boot order, enable XMP for memory, adjust fan speeds, and monitor system status.
6.3. Driver Installation
After installing your operating system, install the necessary drivers for the motherboard's components (chipset, audio, LAN, etc.). These can typically be found on the MSI support website for your specific motherboard model.
7. Maintenance
7.1. Cleaning
Regularly clean your PC to prevent dust buildup, which can lead to overheating. Use compressed air to clear dust from fans, heatsinks, and other components. Ensure the system is powered off and unplugged before cleaning.
7.2. BIOS/UEFI Updates
Periodically check the MSI website for BIOS/UEFI updates. Updates can provide improved compatibility, stability, and new features. Follow the instructions provided by MSI carefully when performing a BIOS update to avoid system damage.
7.3. Driver Updates
Keep your system drivers updated to ensure optimal performance and compatibility with new software and hardware. Download drivers only from the official MSI website or trusted component manufacturers.
8. Troubleshooting
This section addresses common issues you might encounter.
- No Power: Check all power connections (24-pin ATX, 8-pin CPU, GPU). Ensure the power supply is switched on.
- No Display: Verify monitor connection and input source. Reseat the graphics card and RAM modules. Check if the CPU requires integrated graphics or if a dedicated GPU is installed.
- System Not Booting: Listen for beep codes (if your system has a speaker) or check diagnostic LEDs on the motherboard (if present) for error indications. Reseat all components.
- System Instability: Ensure all components are compatible and properly seated. Check temperatures. Update drivers and BIOS.
For more complex issues, consult the detailed troubleshooting section in the full user manual available on the MSI support website or contact MSI technical support.
9. Specifications
| Feature | Specification |
|---|---|
| Brand | MSI |
| Model Name | MPG Z390 GAMING PLUS |
| CPU Socket | LGA 1151 |
| Compatible Processors | 8th Generation Intel Core, 9th Generation Intel Core, Intel Celeron, Intel Pentium Gold |
| Chipset Type | Intel Z390 |
| RAM Memory Technology | DDR4 |
| Memory Clock Speed | 4400 MHz (OC) |
| Number of USB 2.0 Ports | 6 |
| Wireless Type | 802.11a/b/g/n/ac (Intel CNVi Ready) |
| Platform | Windows 10 |
| Item Weight | 1.52 pounds |
| Product Dimensions | 12 x 9.6 x 1.2 inches |
| Manufacturer | MSI Computer |
10. Warranty and Support
MSI products are covered by a limited warranty. For detailed warranty terms and conditions, please refer to the warranty card included with your product or visit the official MSI website. Keep your proof of purchase for warranty claims.
For technical support, driver downloads, and additional resources, please visit the official MSI support website:
You can also find frequently asked questions (FAQs) and community forums on the MSI website for further assistance.