Product Overview
The BMW 61-12-2-448-168 Cable is an Original Equipment Manufacturer (OEM) part designed specifically for the repair of tail lights. As a genuine BMW component, it ensures compatibility and maintains the high quality and effectiveness expected from your vehicle's original parts. This cable is crucial for restoring proper functionality to your vehicle's tail light system, providing a direct fit replacement.
Key Features
- Genuine OEM - direct fit: Engineered to precisely match the original specifications of your BMW vehicle, ensuring seamless integration and performance.
- Provides quality engine effectiveness: While primarily for tail lights, using genuine parts contributes to the overall integrity and reliable operation of the vehicle's electrical system.
- BMW performance: Designed to meet BMW's rigorous standards for durability and functionality, ensuring long-lasting and dependable operation.
- Waterproof: Features a waterproof design to protect against moisture ingress, enhancing longevity and reliability in various environmental conditions.
What's in the Box
Upon opening the package, you will find the following component:
- 1 x BMW Genuine REPAIR CABLE TAIL LIGHTS:611013
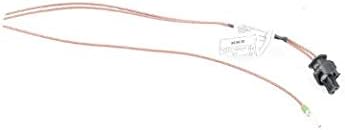
Figure 1: The BMW 61-12-2-448-168 Tail Light Repair Cable. This image shows the brown-colored cable with a black connector on one end and exposed wire on the other, designed for repairing vehicle tail light wiring.
Installation Guide
This repair cable is intended for use in automotive electrical systems, specifically for tail light repairs. Due to the complexity of vehicle electrical systems and the importance of proper installation for safety and functionality, professional installation by a qualified technician is highly recommended. Incorrect installation can lead to electrical malfunctions, damage to vehicle components, or safety hazards.
General Installation Considerations (for professional reference):
- Safety First: Always disconnect the vehicle's battery before beginning any electrical work to prevent accidental short circuits or electrical shock.
- Identify the Fault: Accurately diagnose the specific wiring fault within the tail light assembly that requires this repair cable.
- Access the Tail Light Assembly: Depending on the vehicle model, this may involve removing interior trim panels, trunk liners, or the tail light housing itself.
- Prepare Wiring: Carefully cut and strip the damaged wires as necessary. Ensure clean cuts and proper wire gauge matching.
- Connect the Repair Cable: Use appropriate automotive-grade connectors (e.g., crimp connectors, solder and heat shrink) to securely join the repair cable to the existing vehicle wiring. Ensure polarity is correct.
- Secure Connections: Insulate all connections thoroughly to prevent short circuits and protect against moisture and abrasion. The cable's waterproof feature aids in this.
- Test Functionality: Before reassembling, reconnect the battery and test the tail light functionality (running lights, brake lights, turn signals, reverse lights) to ensure the repair is successful.
- Reassemble: Carefully reassemble all removed components, ensuring no wires are pinched or damaged.
Refer to your vehicle's specific service manual for detailed wiring diagrams and tail light assembly removal procedures.
Operation
The BMW 61-12-2-448-168 Repair Cable is a passive component of your vehicle's electrical system. Once correctly installed, its operation is integrated with the vehicle's existing tail light system. It facilitates the flow of electrical current to the tail lights, enabling them to illuminate as intended when the vehicle's lighting system is activated (e.g., headlights on, brake pedal pressed, turn signal engaged).
There are no user-adjustable settings or direct operational controls for the cable itself. Its function is to ensure reliable electrical connectivity for the tail lights.
Maintenance
As an automotive electrical component, the BMW 61-12-2-448-168 Repair Cable requires minimal direct maintenance once installed. However, periodic inspection of the vehicle's wiring harness, especially in areas exposed to environmental elements, is recommended as part of routine vehicle maintenance.
- Visual Inspection: During routine vehicle checks, visually inspect the area where the cable is installed for any signs of wear, fraying, corrosion, or damage to the insulation.
- Cleanliness: Ensure the connections and surrounding areas are free from dirt, debris, and moisture. While the cable is waterproof, excessive accumulation can still lead to issues over time.
- Secure Connections: Verify that all connections remain secure and tight. Loose connections can lead to intermittent electrical issues.
- Avoid Stress: Ensure the cable is not subjected to excessive pulling, bending, or abrasion from other vehicle components.
If any damage or unusual wear is observed, it is advisable to consult a qualified automotive technician for assessment and potential repair.
Troubleshooting
If you experience issues with your tail lights after installing the BMW 61-12-2-448-168 Repair Cable, consider the following common troubleshooting steps. Note that complex electrical issues should always be diagnosed and repaired by a professional.
| Symptom | Possible Cause | Recommended Action |
|---|---|---|
| Tail light not illuminating |
|
|
| Intermittent tail light operation |
|
|
| Other electrical issues after installation |
|
|
If the issue persists after basic checks, it is strongly advised to have the vehicle inspected by a certified BMW service center or a qualified automotive electrician.
Technical Specifications
| Attribute | Detail |
|---|---|
| Brand | BMW |
| Manufacturer | BMW |
| Item Model Number | 61-12-2-448-168 |
| Manufacturer Part Number | 61-12-2-448-168 |
| ASIN | B07HM7WWH5 |
| Position | Rear (for tail lights) |
| Special Features | Waterproof |
| Item Weight | 4 pounds (approximate shipping weight) |
| Package Dimensions | 11 x 7 x 5 inches |
| Date First Available | September 23, 2018 |
Warranty and Support
As a Genuine BMW OEM part, this product is manufactured to the highest standards. Specific warranty details for OEM parts can vary and are typically covered under the vehicle's original warranty or a separate parts warranty provided by BMW. It is recommended to retain your purchase receipt.
For detailed warranty information, technical support, or assistance with installation, please contact your authorized BMW dealership or visit the official BMW website. You can also visit the BMW Store on Amazon for more information on genuine BMW parts.


