
DJI MAVIC 2 PRO
DJI Mavic 3 Pro Drone User Manual
Model: MAVIC 2 PRO
Product Overview
The DJI Mavic 3 Pro is a flagship triple-camera drone designed for professional aerial photography and videography. It features a powerful Hasselblad camera system, extended flight time, and advanced obstacle sensing capabilities.

Figure 1: DJI Mavic 3 Pro with DJI RC, Intelligent Flight Battery, propellers, charger, storage cover, control sticks, data cables, Micro SD card, USB card reader, cleaning cloth, landing pad, and waterproof backpack.
Key Features:
- Hasselblad Main Camera: 4/3 CMOS sensor, 24mm format equivalent, f/2.8-f/11, 20 MP. Supports RAW photos with up to 12.8 stops dynamic range.
- Medium Tele Camera: 1/1.3-inch CMOS, 70mm equivalent, 3x Optical Zoom, f/2.8, 48 MP.
- Tele Camera: 1/2-inch CMOS, 166mm equivalent, 7x Optical Zoom, 28x Hybrid Zoom, f/3.4, 12 MP.
- Omnidirectional Obstacle Sensing and APAS 5.0: Eight vision sensors for safe flight.
- Extended Flight Time: Up to 43-minute max flight time.
Setup
Follow these general steps to set up your DJI Mavic 3 Pro drone:
- Charge Batteries: Fully charge the Intelligent Flight Battery and the DJI RC Remote Controller using the provided 65W Portable Charger.
- Attach Propellers: Securely attach the low-noise propellers to the motor arms. Ensure correct propeller types are matched to their respective motors.
- Insert Micro SD Card: Insert the 128 GB Micro SD Card into the drone's designated slot. This is essential for recording high-quality footage.
- Unfold Drone: Carefully unfold the drone's arms until they lock into place.
- Power On: Press and hold the power button on both the drone and the remote controller until they power on and connect.
- Pre-Flight Check: Perform a visual inspection of the drone for any damage or obstructions. Ensure all components are properly secured.
Operating Instructions
Flight Operation:
The DJI Mavic 3 Pro offers intuitive controls via the DJI RC Remote Controller. Familiarize yourself with the joystick functions and dedicated buttons for takeoff, landing, and camera control.
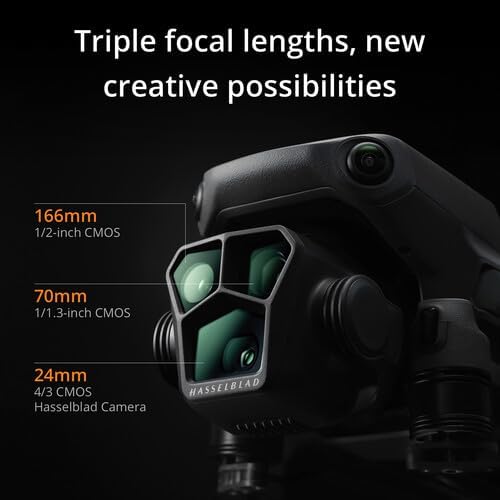
Figure 2: DJI Mavic 3 Pro drone and DJI RC Remote Controller, ready for operation.
- Takeoff: Place the drone on a flat, open surface. Use the automatic takeoff function or manually initiate takeoff using the control sticks.
- Flight Modes: Select appropriate flight modes (e.g., Normal, Sport, Cine) based on your flying environment and desired footage.
- Obstacle Avoidance: The omnidirectional obstacle sensing system helps prevent collisions. Always be aware of your surroundings and do not rely solely on automated systems.
- Landing: Use the automatic landing function or manually land the drone in a clear area. The included landing pad can be used for precise landings.
Camera System:
The Mavic 3 Pro features a triple-camera system for versatile imaging:
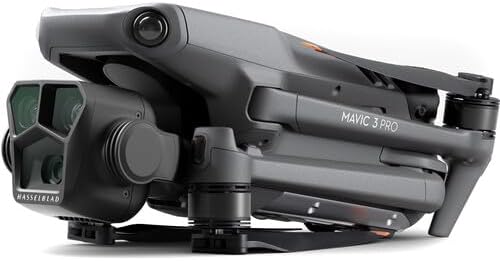
Figure 3: Detailed view of the Hasselblad triple-camera system on the DJI Mavic 3 Pro.
- Hasselblad Main Camera: Ideal for wide-angle shots and high-resolution stills. Adjust aperture (f/2.8-f/11) for optimal exposure.
- Medium Tele Camera: Provides a 3x optical zoom for capturing subjects from a moderate distance.
- Tele Camera: Offers 7x optical zoom and up to 28x hybrid zoom for distant subjects.
- Photo and Video Modes: Utilize various modes such as single shot, burst shooting, AEB, Panorama, and different video resolutions (up to 4K DCI 2160p).
Maintenance
Regular maintenance ensures the longevity and optimal performance of your drone:
- Clean the Drone: Use the provided micro fiber cleaning cloth to gently wipe the drone body and camera lenses after each flight. Avoid harsh chemicals.
- Inspect Propellers: Check propellers for any cracks, bends, or damage before and after each flight. Replace damaged propellers immediately.
- Battery Care: Store batteries in a cool, dry place. Do not overcharge or over-discharge. Follow battery safety guidelines.
- Firmware Updates: Periodically check for and install firmware updates for both the drone and the remote controller to ensure optimal performance and access new features.
- Storage: When not in use, store the drone and accessories in the waterproof backpack to protect them from dust and moisture.
Troubleshooting
Here are some common issues and their potential solutions:
| Problem | Possible Cause | Solution |
|---|---|---|
| Drone not powering on | Low battery, incorrect battery insertion | Charge battery, reinsert battery correctly |
| Loss of signal with remote controller | Interference, drone out of range | Move to an open area, ensure drone is within range, restart both devices |
| Poor image/video quality | Dirty lens, incorrect camera settings, low light | Clean lens, adjust camera settings (ISO, shutter speed), fly in adequate lighting |
| Drone drifting during flight | Strong winds, uncalibrated sensors | Avoid flying in strong winds, perform IMU and compass calibration |
Specifications
| Feature | Detail |
|---|---|
| Brand | DJI |
| Model Name | Mavic 3 Pro |
| Main Camera Sensor | 4/3 CMOS Hasselblad |
| Main Camera Resolution | 20 MP |
| Medium Tele Camera Sensor | 1/1.3-inch CMOS |
| Medium Tele Camera Resolution | 48 MP |
| Tele Camera Sensor | 1/2-inch CMOS |
| Tele Camera Resolution | 12 MP |
| Max Flight Time | 43 minutes |
| Obstacle Sensing | Omnidirectional with APAS 5.0 |
| Video Capture Resolution | 4K DCI 2160p |
| Item Weight | 4 Pounds |
| Dimensions | 19"L x 16"W x 16"H |
| Battery Type | Lithium Ion |
| Connectivity | USB, Wi-Fi |
Warranty and Support
For warranty information and technical support, please refer to the official DJI website or contact their customer service. Keep your purchase receipt as proof of purchase.
Online Resources:
- Visit the DJI Support Page for FAQs, tutorials, and downloads.
- Explore the Official DJI Store on Amazon for additional products and accessories.
Related documentsMAVIC 2 PRO


Ask a question about this manual
Ask about setup, troubleshooting, compatibility, parts, safety, or missing instructions. Manuals+ will review the question and use this page’s manual context to help answer it.