1. Introduction
This user manual provides essential information for the safe and efficient operation, installation, and maintenance of your Cookology VER601SS 60cm Angled Stainless Steel Chimney Kitchen Cooker Hood. Please read this manual thoroughly before installation and use, and retain it for future reference.
2. Safety Information
For your safety and to ensure proper operation, please observe the following precautions:
- Electrical Safety: Ensure the electrical supply matches the rating plate. Do not pull the power cord to disconnect. Always disconnect power before cleaning or maintenance.
- Installation: Installation should be performed by a qualified person in accordance with local regulations. Ensure adequate ventilation in the room when the cooker hood is used simultaneously with appliances burning gas or other fuels.
- Fire Hazard: Do not flambé under the cooker hood. Never leave frying pans unattended during use as overheated oil can ignite. Clean grease filters regularly to prevent grease build-up, which is a fire risk.
- Children and Vulnerable Persons: This appliance is not intended for use by persons with reduced physical, sensory or mental capabilities, or lack of experience and knowledge, unless they have been given supervision or instruction. Children should be supervised to ensure they do not play with the appliance.
- Maintenance: Only use original spare parts. Do not modify the appliance.
3. Product Overview
The Cookology VER601SS is a 60cm angled stainless steel chimney cooker hood designed to efficiently remove cooking fumes and odors from your kitchen. Its modern design integrates seamlessly into contemporary kitchen spaces.

Figure 3.1: Angled view of the Cookology VER601SS cooker hood, showcasing its stainless steel finish and modern design.

Figure 3.2: Front view of the cooker hood, highlighting the control panel with five circular buttons and the integrated lighting.

Figure 3.3: View of the cooker hood with the front panel opened, revealing the mesh grease filter for easy access and cleaning.
4. Setup and Installation
It is highly recommended that installation be carried out by a qualified professional to ensure correct fitting and compliance with all safety standards. The cooker hood can be installed for ducted extraction or recirculating filtration (requires carbon filters, not included).
4.1 Pre-Installation Checks
- Unpack the cooker hood and check for any transport damage.
- Ensure all components are present as per the packing list.
- Remove any protective film from the stainless steel surfaces.
- Verify the wall structure is strong enough to support the weight of the hood.
4.2 Mounting Dimensions
Refer to the diagram below for precise measurements and recommended mounting heights above your cooking surface. Ensure sufficient clearance for optimal performance and safety.
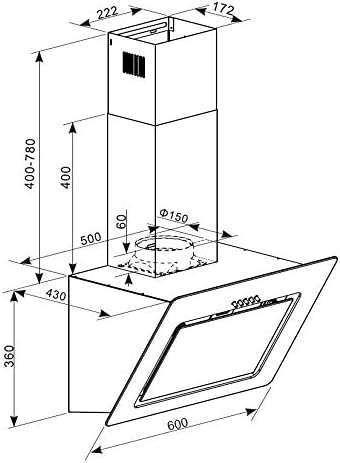
Figure 4.1: Detailed dimensional drawing of the Cookology VER601SS cooker hood, showing all critical measurements for installation, including width, height, depth, and ducting diameter.
4.3 Electrical Connection
Connect the appliance to a properly earthed electrical outlet. The electrical installation must comply with all local wiring regulations.
5. Operating Instructions
The Cookology VER601SS cooker hood features intuitive controls for fan speed and lighting.
5.1 Control Panel
The control panel is located on the front of the hood (refer to Figure 3.2). It consists of five circular buttons:
- Power Button: Turns the hood on or off.
- Fan Speed Buttons (1, 2, 3): Adjusts the extraction power. Press '1' for low speed, '2' for medium, and '3' for high speed.
- Light Button: Turns the integrated LED lights on or off.
For best results, switch on the cooker hood a few minutes before cooking and leave it running for approximately 10-15 minutes after cooking to clear residual fumes and odors.
6. Maintenance
Regular maintenance ensures the longevity and optimal performance of your cooker hood.
6.1 Cleaning the Grease Filters
The VER601SS is equipped with mesh grease filters (see Figure 3.3). These filters trap grease particles from cooking fumes and should be cleaned regularly (approximately every 2-4 weeks, depending on usage) to prevent fire hazards and maintain extraction efficiency.
- Disconnect Power: Always switch off and unplug the cooker hood from the mains supply before cleaning.
- Remove Filters: Open the front panel and carefully unlatch and remove the mesh filters.
- Clean Filters: Wash the filters by hand in hot soapy water or in a dishwasher (on a low-temperature cycle). Ensure they are completely dry before re-installing.
- Re-install Filters: Place the dry filters back into their positions and secure them.
6.2 Cleaning the Exterior
Clean the stainless steel exterior with a soft cloth and a non-abrasive cleaner specifically designed for stainless steel. Avoid using abrasive pads, harsh chemicals, or corrosive detergents, as these can damage the finish.
7. Troubleshooting
If you encounter issues with your cooker hood, refer to the following common problems and solutions:
| Problem | Possible Cause | Solution |
|---|---|---|
| Hood does not operate. | No power supply. Power button not pressed. | Check power connection and circuit breaker. Press the power button. |
| Poor extraction performance. | Grease filters are dirty. Incorrect fan speed. Obstruction in ducting. | Clean or replace grease filters. Select a higher fan speed. Check ducting for blockages. |
| Excessive noise. | Loose components. Incorrect installation. Ducting issues. | Check for loose screws or parts. Ensure proper installation. Verify ducting is correctly sized and installed without kinks. |
| Lights not working. | Light button not pressed. LED lights faulty. | Press the light button. Contact qualified service personnel for replacement. |
If the problem persists after attempting these solutions, please contact customer support.
8. Specifications
| Feature | Detail |
|---|---|
| Model Number | VER601SS |
| Brand | Cookology |
| Filter Type | Mesh |
| Special Features | Easy To Clean |
| Finish Type | Brushed Stainless Steel |
| Noise Level | 62 dB |
| Wattage | 69 watts |
| Dimensions (approx.) | Refer to Figure 4.1 for detailed dimensions. |
9. Warranty and Support
For warranty information and technical support, please refer to the warranty card included with your product or contact Cookology customer service. Keep your proof of purchase for any warranty claims.
For further assistance, visit the official Cookology website or contact your retailer.


